Intel® Debugger (IDB) Manual
Legal Notices
Copyright © 2003 Intel Corporation,
portions © 2001 Compaq Information Technologies Group, L.P.
All Rights Reserved
Disclaimer: Information in this document is provided in connection with Intel products. No license, express or implied, by estoppel or otherwise, to any intellectual property rights is granted by this document. Except as provided in Intel's Terms and Conditions of Sale for such products, Intel assumes no liability whatsoever, and Intel disclaims any express or implied warranty, relating to sale and/or use of Intel products including liability or warranties relating to fitness for a particular purpose, merchantability, or infringement of any patent, copyright or other intellectual property right. Intel products are not intended for use in medical, life saving, or life sustaining applications.
This Intel® Debugger Manual as well as the software described in it is furnished under license and may only be used or copied in accordance with the terms of the license. The information in this manual is furnished for informational use only, is subject to change without notice, and should not be construed as a commitment by Intel Corporation. Intel Corporation assumes no responsibility or liability for any errors or inaccuracies that may appear in this document or any software that may be provided in association with this document.
Designers must not rely on the absence or characteristics of any features or instructions marked "reserved" or "undefined". Intel reserves these for future definition and shall have no responsibility whatsoever for conflicts or incompatibilities arising from future changes to them.
Celeron, Dialogic, i386, i486, iCOMP, Intel, Intel logo, Intel386, Intel486, Intel740, IntelDX2, IntelDX4, IntelSX2, Intel Inside, Intel Inside logo, Intel NetBurst, Intel NetStructure, Intel Xeon, Intel XScale, Itanium, MMX, MMX logo, Pentium, Pentium II Xeon, Pentium III Xeon, and VTune are trademarks or registered trademarks of Intel Corporation or its subsidiaries in the United States and other countries.
* Other names and brands may be claimed as the property of others.
Table of Contents
- About This Manual
-
Part I: A Quick Introduction to Using Intel® Debugger
-
Chapter 1 — Overview
- 1.1 Preparing a Program for Debugging
- 1.2 Starting the Debugger
- 1.3 Entering Debugger Commands
- 1.4 Scripting or Repeating Previous Commands
- 1.5 Context for Executing Commands
- 1.6 Running the Program Under Debugger Control
- 1.7 Pausing the Process at the Problem
- 1.8 Examining the Paused Process
- 1.9 Continuing Execution of the Process
- 1.10 Snapshots as an Undo Mechanism
-
Chapter 1 — Overview
-
Part II: A Guide to Using Intel Debugger
- Chapter 2 — Preparing a Program for Debugging
- Chapter 3 — Starting the Debugger
- Chapter 4 — Giving Commands to the Debugger
- Chapter 5 — Context for Executing Commands
-
Chapter 6 — Running the Program Under Debugger Control
- 6.1 Running the Program as a Child Process
- 6.2 Attaching to a Process
- 6.3 The
load,unload, andfileCommands - 6.4 The
runandrerunCommands - 6.5 The
killCommand - 6.6 The
attachand thedetachCommands - 6.7 Controlling the Process Environment
- 6.8 Multiprocess Debugging
- 6.9 Processes That Use
fork() - 6.10 Processes That Use
exec() - 6.11 Core File Debugging
-
Chapter 7 — Locating the Site of a Problem
-
7.1 Breakpoint Definitions
- 7.1.1 Disposition
- 7.1.2 The
quietSpecifier - 7.1.3 Detectors
- 7.1.4 Thread Filter
- 7.1.5 Logical Filter
- 7.1.6 Breakpoint Actions
- 7.1.7 When Multiple Breakpoints Trigger at Once
- 7.1.8 Recursive Breakpoints
- 7.1.9 Breakpoints and C++
- 7.1.10 Special Signal Breakpoints
-
7.1.11 Breakpoint Interactions with
exec(), fork(), dlopen()anddlclose()System Calls - 7.1.12 Obsolete Breakpoint Commands
- 7.2 Breakpoint Tables
-
7.1 Breakpoint Definitions
- Chapter 8 — Looking Around at the Code, the Data, and Other Process Information
- Chapter 9 — Modifying the Process
- Chapter 10 — Continuing Execution of the Process
- Chapter 11 — Using Snapshots as an Undo Mechanism
- Chapter 12 — Debugging Optimized Code
- Chapter 13 — Support Limitations
-
Part III: Advanced Topics
- Chapter 14 — Preparing Your Program for Debugging
-
Chapter 15 — Debugger's Command Processing Structure
-
15.1 Lexical Elements of Commands
- 15.1.1 Lexical States
- 15.1.2 Identifiers
- 15.1.3 Embedded Keywords
- 15.1.4 Leading Keywords
- 15.1.5 Reserved Identifiers
-
15.1.6 Lexemes Shared by All Languages
- 15.1.6.1 Common Elements of Lexemes
- 15.1.6.2 Whitespace and Command-Separating Lexemes Shared by All Languages
- 15.1.6.3 LNORM Lexemes Shared by All Languages
- 15.1.6.4 LBPT Lexemes Shared by All Languages
- 15.1.6.5 LFILE Lexemes Shared by All Languages
- 15.1.6.6 LKEYWORD Lexemes Shared by All Languages
- 15.1.6.7 LLINE Lexemes Shared by All Languages
- 15.1.6.8 LWORD Lexemes Shared by All Languages
- 15.1.6.9 LSIGNAL Lexemes Shared by All Languages
- 15.1.6.10 LSETENV and LEXPORT Lexemes Shared by All Languages
- 15.1.7 Lexemes That Are Represented Differently in Each Language
- 15.2 Grammar of Commands
-
15.1 Lexical Elements of Commands
- Chapter 16 — Debugging Core Files
- Chapter 17 — Kernel Debugging
- Chapter 18 — Machine-Level Debugging
- Chapter 19 — Debugging Parallel Applications
- Appendixes
About This Manual
What Capabilities Does The Debugger Provide?
The debugger provides a command-line interface.
The debugger provides extensive support for debugging programs written in C, C++, and Fortran (77 and 90).
Obtaining an Install Kit
Kits, manuals, and answers to the frequently asked questions (FAQs) are available from the following sources:
- TBD
Audience
This manual is intended for programmers who have a basic understanding of one of the programming languages that Intel IDB supports (C, C++, Fortran).
Organization
This manual is organized as follows:
-
Part I contains a quick introduction to the debugger.
- Chapter 1 contains all the information you need to make simple use of the debugger.
-
Part II contains most of the information you need to make expert use of the
debugger.
- Chapter 2 describes preparing your program for debugging.
- Chapter 3 describes starting the debugger.
- Chapter 4 describes giving commands to the debugger.
- Chapter 5 describes context for executing commands.
- Chapter 6 describes running your program under debugger control.
- Chapter 7 describes locating the site of the problem.
- Chapter 8 describes how to examine the code, the data, and previously obtained information
- Chapter 9 describes modifying the process.
- Chapter 10 describes continuing execution of the process.
- Chapter 11 describes snapshots as an undo mechanism.
- Chapter 13 describes support limitations.
-
Part III contains advanced reference information.
- Chapter 14 describes preparing a program for debugging.
- Chapter 15 describes the debugger's syntax and grammar.
- Chapter 16 describes debugging core files.
- Chapter 18 describes machine-level debugging.
- Chapter 19 describes parallel debugging.
-
The appendixes contain the following information:
- Appendix 1 describes the debugger variables.
- Appendix 2 describes the debugger aliases.
-
Appendix 3 contains the
corefile_listobj.cexample. - Appendix 4 contains the array navigation example.
Related Documentation
The following documents contain related information:
- Man pages for the various compilers
Reporting Problems
TBD.
What to Report
Please provide the following information when you enter your problem report. Doing so will make it easier for us to reproduce and analyze your problem. If you do not provide this information, we may have to ask you for it.
-
A description of the problem. The clearer and more detailed the description, the easier it will be for us to reproduce and analyze your problem.
-
A transcript of the debugger output. You can obtain this by using the
record iodebugger command or by using thescript(1) system command. -
Operating system and version information. The output of
uname -ais best. -
Version information. The version number is in the welcome banner that displays when you invoke the debugger. You can also obtain the version number by invoking the debugger with the
idb -Vcommand. -
The smallest source code example possible; build instructions (a Makefile is preferable); source languages, compiler versions, and so forth; and a pointer to a
tarfile containing sources or binaries that reproduce the problem. To obtain compiler versions, you can use the-Voption if your compiler supports it (see the reference page for your compiler). -
The exact debugger commands that cause the problem to occur.
-
Any other information that you think would be helpful.
The debugger development team can use ftp to fetch sources and executables
if you can place them in an anonymous FTP area. If not, you may be asked
to use another method.
Conventions
The following conventions are used in this manual:
| Convention | Meaning |
|---|---|
%
|
A percent sign represents the C shell system prompt. |
#
|
A pound sign represents the default superuser prompt. |
|
UPPERCASE lowercase |
The operating system differentiates between lowercase and uppercase characters. On the operating system level, you must type examples, syntax descriptions, function definitions, and literal strings that appear in text exactly as shown. |
| Ctrl/C | This symbol indicates that you must press the Ctrl key while you simultaneously press another key (in this case, C). |
monospaced text
|
This typeface indicates a routine, partition, pathname, directory, file, or non-terminal name. This typeface is also used in interactive examples. |
monospaced bold text
|
In interactive examples, this typeface indicates input that you enter. In syntax statements and text, this typeface indicates the exact name of a command or keyword. |
monospaced italic text
|
Monospaced italic type indicates variable values, place holders,
and function argument names. In syntax definitions, monospaced italic text indicates non-terminal names. When a non-terminal name consists of more than one word, the words are joined using the underscore ( _), for example,
breakpoint_command.
|
| italic text | Italic type indicates book names or emphasized terms. |
foo_bar
    : item1
    | item2
    | item3
|
A colon (:) starts the syntax definition of a non-terminal name (in this example,
foo_bar. Vertical
bars (|) separating items that appear in syntax definitions indicate
that you choose one item from among those listed.
|
[ ]
|
In syntax definitions, brackets indicate items that are optional. |
option ;...option ,...option ...
|
A set of three horizontal ellipses indicates that you can enter additional parameters, options, or values. A semicolon, comma, or space preceding the ellipses indicates successive items must be separated by semicolons, commas, or spaces. |
idb(1)
|
Cross-references to online reference pages include the appropriate
section number in parentheses. For example,
idb(1)
indicates that you can find the material on the
idb
command in Section 1 of the reference pages. The man
command % man 1 idb shows the reference page for
this command.
|
Part I
A Quick Introduction to Using Intel Debugger
Part I provides all the information you need to make simple use of the debugger.
Chapter 1 — Overview
Intel IDB supports DBX and GDB modes. In the GDB mode, Intel IDB operates like the GNU* Debugger, GDB*. See the Starting the Debugger section to get to know how to launch the debugger in the required mode.
You look for a bug by doing the following:
- Find a repeatable reproducer of the bug - the simpler the reproducer is, the simpler the following steps will be to do.
- Prepare your program for debugging.
- Start the debugger.
-
Give commands to the debugger.
-
Command the debugger to either
- Prepare to create a process running the program, or
- Attach to and interrupt a process that you created using normal operating system specific methods.
- Command the debugger to create breakpoints that will pause the process as close as possible to where the bug happened.
- If you are using the debugger to create the process, tell it to create the process now.
-
Command the debugger to either
- Do whatever it takes to reproduce the bug, so that the breakpoints will stop the process close to where the bug has caused something detectably wrong to happen.
-
Look around to determine the location of the bug:
- If the bug is in code where the debugger has stopped the process, exit the debugger and fix the bug.
- If the bug has not happened yet, remove any breakpoints that are triggering too often, create other breakpoints that work better at locating the problem, and continue the process.
- If the bug has already occurred, take the same steps of creating breakpoints and so on, except with the process running backward. Unfortunately, reverse execution is a difficult problem (how do you un-erase that disk?) so the compilers and the debugger do not support it. Instead, you have to rerun from an earlier position (a snapshot if you made one, or else the beginning of the program), first creating breakpoints that stop the process sooner.
1.1 Preparing a Program for Debugging
Compile and link your program using the -g switch.
% icc -g tmp.c
For more details see section 2.2.
1.2 Starting the Debugger
Before you start the debugger, make sure that you have correctly set the size information for your terminal; otherwise, the debugger's command line editing support may act unpredictably. For example, if your terminal is 47x80, you may need to set the following:
% stty rows 47 ; setenv LINES 47
% stty cols 80 ; setenv COLS 80
There are four basic alternatives for running the debugger on a process (see examples below):
- Have the debugger create the process using the shell command line to identify the executable to run. (dbx) (gdb)
- Have the debugger create the process using the debugger commands to identify the executable to run. (dbx) (gdb)
- Have the debugger attach to a running process using the shell command line to identify the process and the executable file that process is running. (dbx) (gdb)
- Have the debugger attach to a running process using the debugger commands to identify the process and the executable file that process is running. (dbx) (gdb)
DBX Mode
Intel IDB starts operating in DBX mode by default, so you do not have to specify any special options in the shell command line.
Examples:
-
Creating the process using the shell command line.
% idb a.out
Linux Application Debugger for ..., Version ..., Build ...
------------------
object file name: a.out
Reading symbolic information ...done
(idb) stop in main
[#1: stop in int main(void) ]
(idb) run
-
Creating the process using the debugger commands.
% idb
Linux Application Debugger for ..., Version ..., Build ...
------------------
(idb) load a.out
Reading symbolic information ...done
(idb) stop in main
[#1: stop in int main(void) ]
(idb) run
-
Ataching to a running process using shell command line.
% ./a.out &
[1] 27859
% jobs
[1]+  Running                 ./a.out &
% idb a.out -pid 27859
Linux Application Debugger for ..., Version ..., Build ...
------------------
Reading symbolic information ...done
Attached to process id 27859  ....
Press Ctrl/C to interrupt the process.
-
Attaching to the process using the debugger commands.
% ./a.out &
[1] 27859
% jobs
[1]+  Running                 ./a.out &
% idb
Linux Application Debugger for ..., Version ..., Build ...
------------------
(idb) attach 27859 a.out
Reading symbolic information ...done
Attached to process id 27859  ....
Press Ctrl/C to interrupt the process.
GDB Mode
To start the debugger in the GDB mode, specify -gdb option in the
shell command
line.
Examples:
-
Creating the process using the shell command line.
% idb -gdb a.out
Linux Application Debugger for ..., Version ..., Build ...
------------------
object file name: a.out
Reading symbols from a.out...done
(idb) break main
Breakpoint 1 at 0x80484f6: file qwerty.c, line 9.
(idb) run
-
Creating the process using the debugger commands.
% idb -gdb
Linux Application Debugger for ..., Version ..., Build ...
-------------------
(idb) file a.out
Reading symbols from a.out...done.
(idb) break main
Breakpoint 1 at 0x80484f6: file qwerty.c, line 9.
(idb) run
-
Ataching to a running process using shell command line.
% ./a.out &
[1] 27859
% jobs
[1]+  Running                 ./a.out &
% idb -gdb a.out -pid 27859
Linux Application Debugger for ..., Version ..., Build ...
------------------
object file name: a.out
Reading symbols from a.out...done.
Attached to process id 27859  ....
Press Ctrl/C to interrupt the process.
-
Attaching to the process using the debugger commands.
% ./a.out &
[1] 27859
% jobs
[1]+  Running                 ./a.out &
% idb -gdb
Linux Application Debugger for ..., Version ..., Build ...
(idb) file a.out
Reading symbols from a.out...done.
(idb) attach 27859
Attached to process id 27859  ....
Press Ctrl/C to interrupt the process.
Note: In the case of Fortran, routine main at which your
program stops is not your main program unit. Rather, it is a main routine
supplied by the Fortran system that performs some initialization and then
calls your code. Just step forward using the step
command a couple of times (probably twice) and
you will soon step into your code.
1.3 Entering Debugger Commands
The debugger issues a prompt when it is ready for the next command from the terminal:
(idb) you type here
When you enter commands, you use the left and right arrow keys to move within the line and the up and down arrow keys to recall previous commands for editing. When you finish entering a command, press the Enter key to submit the completed line to the debugger for processing.
You can continue a line by ending the line to be continued with a
backslash (\)
character.
On a blank line, press the Enter key to re-execute the most-recent valid command.
Following are two very useful commands available in both modes:
(idb) help
(idb) quit
1.4 Scripting or Repeating Previous Commands
DBX Mode
To execute debugger commands from a script, use the source
command as follows:
(idb) source filename
The source command causes the debugger to read and execute
debugger commands from filename.
GDB Mode
The source command is not yet available in the GDB mode.
1.5 Context for Executing Commands
Although the debugger supports debugging multiple processes, it operates only on a single process at a time, known as the current process.
Processes contain one or more threads of execution. The threads execute functions. Functions are sequences of instructions that come from source lines within source files.
As you enter debugger commands to manipulate your process, it would be very tedious to have to repeatedly specify which thread, source file, and so on you wish the command to be applied to. To prevent this, each time the debugger stops the process, it re-establishes a static context and a dynamic context for your commands. The components of the static context are independent of this run of your program; the components of the dynamic context are dependent on this run.
-
The static context consists of the following:
- A current program
- A current file
- A current line
-
The dynamic context consists of the following:
- A current call frame
- A current thread
- The particular thread executing the event that caused the debugger to gain control of the process
You can change most of these individually to point to other instances, as described in the relevant portions of this manual, and the debugger will modify the rest of the static and dynamic context to keep the various components consistent.
1.6 Running a Program Under Debugger Control
As was shown previously, you can tell the debugger to create a process or to attach to an existing process.
After you specify the program (either on the shell
command line or
by using the load(dbx)
or file(gdb) command),
but before you have requested the debugger to
create the process, you can still do things that seem to require a running
process; for example, you can create breakpoints and examine sources. Any breakpoints
that you create will be inserted into the process as soon as possible after it
executes your program.
To have the debugger create a process (rather than attach to an existing process), you request it to run, specifying, if necessary, any arguments and input and output redirection as follows:
% idb a.out
Linux Application Debugger for ..., Version ..., Build ...
...
(idb) run
or
(idb) run arguments
or
(idb) run arguments > output-file
or
(idb) run arguments < input-file > output-file
The result of using any of the preceding command variations is similar to having attached to a running process.
1.7 Pausing the Process at the Problem
Following are the four most common ways to pause a process:
- Press Ctrl/C. (dbx) (gdb)
- Wait until the process raises some signal. It will do this when there is an arithmetic exception, an illegal instruction, or an unsatisfiable memory access, such as an attempt to write to memory for which protection is set to read-only. (dbx) (gdb)
- Create a breakpoint before you run or continue the process. (dbx) (gdb)
- Create a watchpoint before you run or continue the process. (dbx) (gdb)
DBX Mode
-
Pressing Ctrl/C.
(idb) run ^C Interrupt (for process) Stopping process localhost:27903 (a.out). Thread received signal INT stopped at [int main(int):5 0x120001138] 5 while (argc < 2 && i < 10000000) -
Waiting until the process raises some signal.
(idb) run Thread received signal SEGV stopped at [void buggy(char*, char*):13 0x8048b79] 13 output[k] = input[k]; -
Creating a breakpoint before running or continuing the process.
(idb) stop in main [#1: stop in int main(void) ] (idb) run [1] stopped at [int main(void):182 0x1200023f8] 182 List<Node> nodeList; -
Creating a watchpoint before running or continuing the process.
(idb) watch variable nodeList._firstNode write
[#2: watch variable nodeList._firstNode write ]
(idb) cont
[2] Address 0xbffff0fc was accessed at:
List<Node>::List(void): x_list.cxx
 [line 121, 0x8057edd]	_ZN4ListI4NodeEC1Ev(...)+0xf:         movl     $0x0, (%eax)
	0xbffff0fc: Old value = 0x080b0ba4
	0xbffff0fc: New value = 0x00000000
[2] stopped at [List<Node>::List(void):123 0x8057ee3]
    123 }
GDB Mode
-
Pressing Ctrl/C.
(idb) run
^C
Interrupt (for process)

Stopping process localhost:27903 (a.out).
Thread received signal INT
main(argc=1) at x_whatHappensOnControlC.cxx: 5
5     while (argc < 2 && i < 10000000)
-
Waiting until the process raises some signal.
(idb) run
Starting program: /usr/examples/x_segv
Thread received signal SEGV
buggy (input=0xbffff2f1 "/usr/examples/x_segv", output=0x0) at x_segv.cxx:13
13	        output[k] = input[k];
-
Creating a breakpoint before running or continuing the process.
(idb) break main
Breakpoint 1 at 0x8049f70: file x_list.cxx, line 182.
(idb) run
Starting program: /usr/examples/x_list

Breakpoint 1, main () at x_list.cxx:182
182	    List<Node> nodeList;
-
Creating a watchpoint before running or continuing the process.
(idb) watch nodeList._firstNode
Hardware watchpoint 2: nodeList._firstNode
(idb) continue
Continuing.
Old value = 0x80c0c044
New value = 0x00000000

Breakpoint 2, List<Node>::List (this=<no value>) at x_list.cxx:123
123	}
1.8 Examining the Paused Process
This section describes how to examine components of the paused process.
1.8.1 Looking at the Source Files
You can perform the following operations on source files:
- Tell the debugger where your sources are, if it cannot find them.
- Find out the name of the current source file.
- Switch to a different source file.
- List lines in a source file.
- Search within a source file.
DBX Mode
Following is an example that shows listing lines and using the
/ command to search for a string:
(idb) file
x_list.cxx
(idb) list 180: 10
    180 main()
    181 {
    182     List<Node> nodeList;
    183
    184     // add entries to list
    185     //
>   186     IntNode* newNode = new IntNode(1);
    187     nodeList.append(newNode);
    188
    189     CompoundNode* cNode = new CompoundNode(12.345, 2);
(idb) /CompoundNode
    192     CompoundNode* cNode1 = new CompoundNode(3.1415, 7);
Aliases are shorthand forms of longer commands.
This example shows using the W alias, which lists up to 20 lines
around the current line. Note that a right bracket (>) marks the current line.
(idb) alias W
W       list $curline - 10:20
(idb) W
    176
    177
    178 //  The driver for this test
    179 //
    180 main()
    181 {
    182     List<Node> nodeList;
    183
    184     // add entries to list
    185     //
>   186     IntNode* newNode = new IntNode(1);
    187     nodeList.append(newNode);
    188
    189     CompoundNode* cNode = new CompoundNode(12.345, 2);
    190     nodeList.append(cNode);
    191
    192     nodeList.append(new IntNode(3));
    193
    194     IntNode* newNode2 = new IntNode(4);
    195     nodeList.append(newNode2);
GDB Mode
Use info source,
info line,
and list comands for looking at
source files:
(idb) info source
Current source file is x_list.cxx
(idb) list 180,10
180	main()
181	{
182	    List<Node> nodeList;
183
184	    // add entries to list
185	    //
186	    IntNode* newNode = new IntNode(1);
187	    nodeList.append(newNode);
188
189	    CompoundNode* cNode = new CompoundNode(12.345, 2);
(idb) forward-search CompoundNode
192	    CompoundNode* cNode1 = new CompoundNode(3.1415, 7);
1.8.2 Looking at the Threads
In a multithreaded application, you can
obtain information about the thread that
stopped or about all the threads, and you can
then change the context to look more closely
at a different thread. Note that a right bracket (>) marks the current thread.
And the asterisk (*) marks the thread with return status.
DBX Mode
(idb) thread
  Thread Name                      State           Substate    Policy       Pri
  ------ ------------------------- --------------- ----------- ------------ ---
>*     1 default thread            running VP 3                SCHED_OTHER  19

(idb) show thread
  Thread Name                      State           Substate    Policy       Pri
  ------ ------------------------- --------------- ----------- ------------ ---
>*     1 default thread            running VP 3                SCHED_OTHER  19
      -1 manager thread            blk SCS                     SCHED_RR     19
      -2 null thread for slot 0    running VP 1                null thread  -1
      -3 null thread for slot 1    ready VP 3                  null thread  -1
      -4 null thread for slot 2    new             new         null thread  -1
      -5 null thread for slot 3    new             new         null thread  -1
       2 threads(0x140000798)      blocked         cond 3      SCHED_OTHER  19
       3 threads+8(0x1400007a0)    blocked         cond 3      SCHED_OTHER  19
       4 threads+16(0x1400007a8)   blocked         cond 3      SCHED_OTHER  19
       5 threads+24(0x1400007b0)   blocked         cond 3      SCHED_OTHER  19
       6 threads+32(0x1400007b8)   blocked         cond 3      SCHED_OTHER  19
You can select any thread to be the focus of commands that show things. For example:
(idb) thread 2
  Thread Name                      State           Substate    Policy       Pri
  ------ ------------------------- --------------- ----------- ------------ ---
>      2 threads(0x140000798)      blocked         cond 3      SCHED_OTHER  19
GDB Mode
Within the GDB mode, you can have a look at a particular thread by specifying the internal debugger thread number. The asterisk (*) marks the current thread. Or you can observe all threads while your program is running:(idb) info threads 0 Thread 1024 (LWP 19513) 0x804f8f6 in __sigsuspend from /tmp/pthread_manythreads 1 Thread 2049 (LWP 19514) 0x805a42a in __clone from /tmp/pthread_manythreads * 2 Thread 1026 (LWP 19515) 0x804f8f6 in __sigsuspend from /tmp/pthread_manythreads 3 Thread 2051 (LWP 19516) 0x804f8f6 in __sigsuspend from /tmp/pthread_manythreads 4 Thread 3076 (LWP 19517) 0x804f8f6 in __sigsuspend from /tmp/pthread_manythreads 5 Thread 4101 (LWP 19518) 0x8048288 in prime_search at pthread_manythreads.c:79This command provides the following information about known threads:
- Number: Number of a thread from the debugger point of view. This number is not used for numbering again if a thread dies.
- Thread TID: Thread identifier. TID is an identifier (non duplicated) assigned to each thread inside the thread library.
-
LWP PID: Light weight process identifier (non duplicated) assigned by the Linux kernel
to each process in the system.
LinuxThreadsarchitecturally has PID for each thread in a multithread application. - Location: Location where the thread stopped. Its output is very similar to the backtrace location field.
You can select any thread to be the focus of commands that show things. For example:
(idb) thread 2 * 2 Thread 1026 (LWP 19515) 0x804f8f6 in __sigsuspend from /tmp/pthread_manythreads
1.8.3 Looking at the Call Stack
You can examine the call stack of any thread. Even if you are not using threads explicitly, your process will have one thread running your code. You can move up and down the stack, and examine the source being executed at each call.
DBX Mode
(idb) where 4
>0 0x804a519 in ((Node*)0x80c38f0)->Node::Node() "x_list.cxx":79
#1 0x804a568 in ((IntNode*)0x80c38f0)->IntNode::IntNode(data=2) "x_list.cxx":88
#2 0x804a61f in ((CompoundNode*)0x80c38f0)->CompoundNode::CompoundNode(fdata=12.3450003, idata=2) "x_list.cxx":103
#3 0x804a09e in main() "x_list.cxx":189
(idb) up 2
>2 0x804a61f in ((CompoundNode*)0x80c38f0)->CompoundNode::CompoundNode(fdata=12.3450003, idata=2) "x_list.cxx":103
103 IntNode(idata),
(idb) list $curline - 10: 20
93 cout << " type is integer, value is ";
94 cout << _data << endl;
95 }
96
97
98 //=============================================================================
99 // CompoundNode definition
100 //
101 CompoundNode::CompoundNode(float fdata, int idata)
102 :
> 103 IntNode(idata),
104 _fdata (fdata)
105 {
106 }
107 void CompoundNode::printNodeData() const
108 {
109 cout << " type is compound, value is ";
110 cout << _fdata << endl;
111 cout << " parent ";
112 IntNode::printNodeData();
(idb) down 1
>1 0x804a568 in ((IntNode*)0x80c38f0)->IntNode::IntNode(data=2) "x_list.cxx":88
88 IntNode::IntNode(int data) : _data(data)
GDB Mode
(idb) backtrace 4
>0 0x804a519 in ((Node*)(class Node *) 0x80c38f0)->Node::Node(this=(class Node *) 0x80c38f0) "x_list.cxx":79
#1 0x804a568 in ((IntNode*)(class IntNode *) 0x80c38f0)->IntNode::IntNode(this=(class IntNode *) 0x80c38f0, data=2) "x_list.cxx":88
#2 0x804a61f in ((CompoundNode*)(class CompoundNode *) 0x80c38f0)->CompoundNode::CompoundNode(this=(class CompoundNode *) 0x80c38f0, fdata=12.345, idata=2) "x_list.cxx":103
#3 0x804a09e in main() "x_list.cxx":189
(idb) up 2
>2 0x804a61f in ((CompoundNode*)(class CompoundNode *) 0x80c38f0)->CompoundNode::CompoundNode(this=(class CompoundNode *) 0x80c38f0, fdata=12.345, idata=2) "x_list.cxx":103
103 IntNode(idata),
(idb) list 93,112
93 cout << " type is integer, value is ";
94 cout << _data << endl;
95 }
96
97
98 //=============================================================================
99 // CompoundNode definition
100 //
101 CompoundNode::CompoundNode(float fdata, int idata)
102 :
103 IntNode(idata),
104 _fdata (fdata)
105 {
106 }
107 void CompoundNode::printNodeData() const
108 {
109 cout << " type is compound, value is ";
110 cout << _fdata << endl;
111 cout << " parent ";
112 IntNode::printNodeData();
(idb) down 1
>1 0x804a568 in ((IntNode*)(class IntNode *) 0x80c38f0)->IntNode::IntNode(this=(class IntNode *) 0x80c38f0, data=2) "x_list.cxx":88
88 IntNode::IntNode(int data) : _data(data)
1.8.4 Looking at the Data
You can look at variables
and evaluate expressions involving them by using the
print command.
DBX Mode
(idb) print fdata
12.3450003
(idb) print idata
2
(idb) print idata + 59
61
(idb) print this
0x80c3670
(idb) print *this
class CompoundNode {
_fdata = 0;
_data = 0; // class IntNode
_nextNode = 0x0; // class IntNode::Node
}
GDB Mode
(idb) print fdata
$2 = 12.345
(idb) print idata
$3 = 2
(idb) print idata + 59
$4 = 61
(idb) print this
$5 = (class CompoundNode *) 0x80c3670
(idb) print *this
$6 = {<IntNode> = {<Node> = {_nextNode = 0x0}, _data = 0}, _fdata = 0}
The p is a shortcut,
and the inspect command is a synonym
for the print command.
1.8.5 Looking at the Signal State
The debugger shows you the signal that stopped the thread.
DBX Mode
(idb) run
Thread received signal SEGV
stopped at [void buggy(char*, char*):13 0x8048b79]
13 output[k] = input[k];
Information: idb allows you to restart the execution of your program
from saved positions. Enter "help snapshot" for details.
GDB Mode
(idb) run Starting program: /usr/examples/x_segv Thread received signal SEGV buggy (input=0xbffff2f1 "/usr/examples/x_segv", output=0x0) at x_segv.cxx:13 13 output[k] = input[k]; Information: idb allows you to restart the execution of your program from saved positions. Enter "help snapshot" for details.
1.8.6 Looking at the Generated Code
You can print memory as instructions or as data.
DBX Mode
In the following example, the
wi alias lists machine instructions
before and after the current instruction. Note that the asterisk (*)
marks the current instruction.
(idb) alias wi wi ($curpc - 20)/10 i (idb) wi CompoundNode::CompoundNode(float, int): x_list.cxx [line 105, 0x120002348] cpys $f17,$f17,$f0 [line 105, 0x12000234c] bis r31, r18, r8 [line 101, 0x120002350] bis r31, r19, r16 [line 101, 0x120002354] bis r31, r8, r17 [line 101, 0x120002358] bsr r26, IntNode::IntNode(int) *[line 101, 0x12000235c] ldq r18, -32712(gp) [line 101, 0x120002360] lda r18, 48(r18) [line 101, 0x120002364] stq r18, 8(r19) [line 101, 0x120002368] sts $f0, 24(r19) [line 106, 0x12000236c] bis r31, r19, r0 (idb) $pc/10x 0x12000235c: 0x8038 0xa65d 0x0030 0x2252 0x0008 0xb653 0x0018 0x9813 0x12000236c: 0x0400 0x47f3 (idb) $pc/6xx 0x12000235c: 0xa65d8038 0x22520030 0xb6530008 0x98130018 0x12000236c: 0x47f30400 0x47f5041a (idb) $pc/2X 0x12000235c: 0x22520030a65d8038 0x98130018b6530008
GDB Mode
Use the x command to dump memory in various
formats.
The disassemble command also provides disassembling
capability.
(idb) x /10i $pc Dump of assembler code for function CompoundNode::CompoundNode(class CompoundNode * const, float, int): 0x804a60e <_ZN12CompoundNodeC1Efi(...)+24>: addl $-8, %esp 0x804a611 <_ZN12CompoundNodeC1Efi(...)+27>: movl -12(%ebp), %eax 0x804a614 <_ZN12CompoundNodeC1Efi(...)+30>: movl %eax, (%esp) 0x804a617 <_ZN12CompoundNodeC1Efi(...)+33>: movl -4(%ebp), %eax 0x804a61a <_ZN12CompoundNodeC1Efi(...)+36>: movl %eax, 0x4(%esp) 0x804a61e <_ZN12CompoundNodeC1Efi(...)+40>: call 0x804a54e <_ZN7IntNodeC1Ei(...)> 0x804a623 <_ZN12CompoundNodeC1Efi(...)+45>: addl $0x8, %esp 0x804a626 <_ZN12CompoundNodeC1Efi(...)+48>: movl -12(%ebp), %eax 0x804a629 <_ZN12CompoundNodeC1Efi(...)+51>: movl $0x8087834, (%eax) 0x804a62f <_ZN12CompoundNodeC1Efi(...)+57>: movl -12(%ebp), %eax (idb) x /10x $pc 0x804a60e: 0xc483 0x8bf8 0xf445 0x0489 0x8b24 0xfc45 0x4489 0x0424 0x804a61e: 0x2be8 0xffff (idb) x /6w $pc 0x804a60e: 0x8bf8c483 0x0489f445 0xfc458b24 0x04244489 0x804a61e: 0xffff2be8 0x08c483ff (idb) x /2g $pc 0x804a60e: 0x000000008bf8c483 0x00000000fc458b24
To examine individual registers, use the print command
with name of register prepended with the dollar sign ($). Commands showing all
(or subset of) the registers, are specific for the mode, see examples below.
DBX Mode
To look at all the
registers, use the printregs
command. For example:
(idb) print $eax 134942544 (idb) printx $eax 0x80b0f50 (idb) printregs $eax 0x80b0f50 134942544 $ecx 0xa1 161 $edx 0x0 0 $ebx 0x401ae9e4 1075505636 $esp [$sp] 0xbffff53c -1073744580 $ebp 0xbffff55c -1073744548 $esi 0x40016b64 1073834852 $edi 0xbffff6bc -1073744196 $eip [$pc] 0x804a628 134522408 $eflags 0x287 647 $cs 0x23 35 $ss 0x2b 43 $ds 0x2b 43 $es 0x2b 43 $fs 0x0 0 $gs 0x0 0 $orig_eax 0xffffffff -1 $fctrl 0x37f 895 $fstat 0x0 0 $ftag 0x0 0 $fiseg 0x23 35 $fioff 0x804a619 134522393 $foseg 0x2b 43 $fooff 0xbffff554 -1073744556 $fop 0x0 0 $f0 0x00000000000000000000000000000000 0 $f1 0x0000000000003ffdf13a8dc3008792a0 0.47115 $f2 0x00000000000000000000000000000000 0 $f3 0x00000000000000000000000000000000 0 $f4 0x00000000000000000000000000000000 0 $f5 0x00000000000000000000000000000000 0 $f6 0x0000000000003ffb9700000000000000 0.0737305 $f7 0x0000000000004002c5851f0000000000 12.345 $xmm0 0x00000000000000000000000000000000 $xmm1 0x00000000000000000000000000000000 $xmm2 0x00000000000000000000000000000000 $xmm3 0x00000000000000000000000000000000 $xmm4 0x00000000000000000000000000000000 $xmm5 0x00000000000000000000000000000000 $xmm6 0x00000000000000000000000000000000 $xmm7 0x00000000000000000000000000000000 $mxcsr 0x1f80 8064 $vfp 0xbffff55c 0xbffff55c
GDB Mode
Following commands allow you to examine sets of registers:
-
info registers
For example:
(idb) print $eax $11 = 134942544 (idb) print $eax $12 = 0x80b0f50 (idb) info registers $eax 0x80b0f50 134942544 $ecx 0xa1 161 $edx 0x0 0 $ebx 0x401ae9e4 1075505636 $esp [$sp] 0xbffff53c -1073744580 $ebp 0xbffff55c -1073744548 $esi 0x40016b64 1073834852 $edi 0xbffff6bc -1073744196 $eip [$pc] 0x804a628 134522408 $eflags 0x287 647 $cs 0x23 35 $ss 0x2b 43 $ds 0x2b 43 $es 0x2b 43 $fs 0x0 0 $gs 0x0 0 $orig_eax 0xffffffff -1 $fctrl 0x37f 895 $fstat 0x0 0 $ftag 0x0 0 $fiseg 0x23 35 $fioff 0x804a619 134522393 $foseg 0x2b 43 $fooff 0xbffff554 -1073744556 $fop 0x0 0 $f0 0x00000000000000000000000000000000 0 $f1 0x0000000000003ffdf13a8dc3008792a0 0.47115 $f2 0x00000000000000000000000000000000 0 $f3 0x00000000000000000000000000000000 0 $f4 0x00000000000000000000000000000000 0 $f5 0x00000000000000000000000000000000 0 $f6 0x0000000000003ffcdcd8000000000000 0.215668 $f7 0x0000000000004002c5851f0000000000 12.345 $xmm0 0x00000000000000000000000000000000 $xmm1 0x00000000000000000000000000000000 $xmm2 0x00000000000000000000000000000000 $xmm3 0x00000000000000000000000000000000 $xmm4 0x00000000000000000000000000000000 $xmm5 0x00000000000000000000000000000000 $xmm6 0x00000000000000000000000000000000 $xmm7 0x00000000000000000000000000000000 $mxcsr 0x1f80 8064 $vfp 0xbffff55c 0xbffff55c
1.9 Continuing Execution of the Process
After you are satisfied that you understand what is going on, you can move the process forward and see what happens. The following table shows the aliases and commands you can use to do this.
| Desired Behavior | Alias | Command | Can Take Repeat Count |
|---|---|---|---|
| Continue until another interesting thing happens |
c
|
cont
|
Yes* |
| Single step by line, but step over calls |
n
|
next
|
Yes |
| Single step to a new line, stepping into calls |
s
|
step
|
Yes |
| Continue until control returns to the caller | None |
return(dbx),
finish(gdb)
|
No |
| Single step by instruction, over calls |
ni
|
nexti
|
Yes |
| Single step by instruction, into calls |
si
|
stepi
|
Yes |
* In GDB mode repeat count has a differen meaning for the
cont command. For the other commands repat
count has the same meaning in both modes.
The following examples demonstrate stepping through lines of source code (dbx) (gdb) and stepping at the instruction level (dbx) (gdb).
DBX Mode
Stepping through lines of source code:
(idb) list $curline - 10: 20
172
173 if (i == 1) cout << "The list is empty ";
174 cout << endl << endl;
175 }
176
177
178 // The driver for this test
179 //
180 main()
181 {
> 182 List<Node> nodeList;
183
184 // add entries to list
185 //
186 IntNode* newNode = new IntNode(1);
187 nodeList.append(newNode);
188
189 CompoundNode* cNode = new CompoundNode(12.345, 2);
190 nodeList.append(cNode);
191
(idb) next
stopped at [int main(void):186 0x8049f82]
186 IntNode* newNode = new IntNode(1);
(idb) next 10
stopped at [int main(void):201 0x804a3e0]
201 nodeList.append(cNode2);
(idb) step
stopped at [void List<Node>::append(struct Node* const):148 0x805800a]
148 if (!_firstNode)
(idb) list $curline - 2: 6
146 {
147
> 148 if (!_firstNode)
149 _firstNode = node;
150 else {
151 Node* currentNode = _firstNode;
(idb) step
stopped at [void List<Node>::append(struct Node* const):151 0x805801d]
151 Node* currentNode = _firstNode;
(idb) list $curline - 2: 5
149 _firstNode = node;
150 else {
> 151 Node* currentNode = _firstNode;
152 while (currentNode->getNextNode())
153 currentNode = currentNode->getNextNode();
(idb) return
stopped at [int main(void):201 0x804a3f8]
201 nodeList.append(cNode2);
(idb) step
stopped at [int main(void):203 0x804a3fb]
203 nodeList.print();
(idb) step
stopped at [void List<Node>::print(void):162 0x8058092]
162 Node* currentNode = _firstNode;
(idb) list $curline: 8
> 162 Node* currentNode = _firstNode;
163
164 int i = 1;
165 cout << "The list is: " << endl;
166 while (currentNode) {
167 cout << "Node " << i ;
168 currentNode->printNodeData();
169 currentNode = currentNode->getNextNode();
(idb) step 2
stopped at [void List<Node>::print(void):165 0x80580a1]
165 cout << "The list is: " << endl;
Stepping at the instruction level:
(idb) $curpc - 20/14i void List<Node>::print(void): x_list.cxx [line 161, 0x805808d] print+0x1: movl %esp, %ebp [line 161, 0x805808f] print+0x3: subl $0x1c, %esp [line 162, 0x8058092] print+0x6: movl 0x8(%ebp), %eax [line 162, 0x8058095] print+0x9: movl (%eax), %eax [line 162, 0x8058097] print+0xb: movl %eax, -12(%ebp) [line 164, 0x805809a] print+0xe: movl $0x1, -8(%ebp) *[line 165, 0x80580a1] print+0x15: addl $-8, %esp [line 165, 0x80580a4] print+0x18: movl $0x80c2f54, (%esp) [line 165, 0x80580ab] print+0x1f: movl $0x8085814, 0x4(%esp) [line 165, 0x80580b3] print+0x27: call std::operator<<(struct std::basic_ostream<char,std::char_traits<char>>&, const char*) [line 165, 0x80580b8] print+0x2c: addl $0x8, %esp [line 165, 0x80580bb] print+0x2f: movl %eax, -28(%ebp) [line 165, 0x80580be] print+0x32: addl $-8, %esp [line 165, 0x80580c1] print+0x35: movl -28(%ebp), %eax (idb) stepi 2 stopped at [void List<Node>::print(void):165 0x80580ab] print+0x1f: movl $0x8085814, 0x4(%esp) (idb) nexti stopped at [void List<Node>::print(void):165 0x80580b3] print+0x27: call std::operator<<(struct std::basic_ostream<char,std::char_traits<char>>&, const char*) (idb) nexti stopped at [void List<Node>::print(void):165 0x80580b8] print+0x2c: addl $0x8, %esp
GDB Mode
Stepping through lines of source code:
(idb) list
172
173 if (i == 1) cout << "The list is empty ";
174 cout << endl << endl;
175 }
176
177
178 // The driver for this test
179 //
180 main()
181 {
182 List<Node> nodeList;
183
184 // add entries to list
185 //
186 IntNode* newNode = new IntNode(1);
187 nodeList.append(newNode);
188
189 CompoundNode* cNode = new CompoundNode(12.345, 2);
190 nodeList.append(cNode);
191
(idb) next
186 IntNode* newNode = new IntNode(1);
(idb) next 10
201 nodeList.append(cNode2);
(idb) step
List<Node>::append (this=(struct List<Node> *) 0xbfffed0c, node=(struct Node *) 0x80ba1c0) at x_list.cxx:148
148 if (!_firstNode)
(idb) list -2,+6
141 }
142
143
144 template <class NODETYPE>
145 void List<NODETYPE>::append(NODETYPE* const node)
146 {
147
(idb) step
151 Node* currentNode = _firstNode;
(idb) list -2,+5
144 template <class NODETYPE>
145 void List<NODETYPE>::append(NODETYPE* const node)
146 {
147
148 if (!_firstNode)
149 _firstNode = node;
(idb) finish
main () at x_list.cxx:201
201 nodeList.append(cNode2);
(idb) step
203 nodeList.print();
(idb) step
List<Node>::print (this=(const struct List<Node> *) 0xbfffed0c) at x_list.cxx:162
162 Node* currentNode = _firstNode;
(idb) set listsize 8
(idb) list ,8
162 Node* currentNode = _firstNode;
163
164 int i = 1;
165 cout << "The list is: " << endl;
166 while (currentNode) {
167 cout << "Node " << i ;
168 currentNode->printNodeData();
169 currentNode = currentNode->getNextNode();
(idb) step 2
165 cout << "The list is: " << endl;
Stepping at the instruction level:
(idb) x /14i $pc Dump of assembler code for function void List<Node>::print(const struct List<Node> * const): 0x804aaf9 <print+21>: add $0xfffffff8,%esp 0x804aafc <print+24>: movl $0x80b9e14,(%esp,1) 0x804ab03 <print+31>: movl $0x8085994,0x4(%esp,1) 0x804ab0b <print+39>: call 0x80503c4 <std::operator<<> 0x804ab10 <print+44>: add $0x8,%esp 0x804ab13 <print+47>: mov %eax,0xffffffe4(%ebp) 0x804ab16 <print+50>: add $0xfffffff8,%esp 0x804ab19 <print+53>: mov 0xffffffe4(%ebp),%eax 0x804ab1c <print+56>: mov %eax,(%esp,1) 0x804ab1f <print+59>: movl $0x8050860,0x4(%esp,1) 0x804ab27 <print+67>: call 0x804c864 <operator<<> 0x804ab2c <print+72>: add $0x8,%esp 0x804ab2f <print+75>: mov 0xfffffff4(%ebp),%eax 0x804ab32 <print+78>: test %eax,%eax (idb) stepi 2 165 cout << "The list is: " << endl; (idb) nexti 165 cout << "The list is: " << endl; (idb) nexti 165 cout << "The list is: " << endl;
1.10 Snapshots as an Undo Mechanism
Often when you move the process forward, you accidentally go too far. For example, you may step over a call that you should have stepped into.
In a program that does not use multiple threads, you can use snapshots to save your state before you step over the call. Then clone that snapshot to position another process just before the call so you can step into it.
The following example shows the stages of a snapshot being used in this way:
-
The first stage is to build the program and start debugging.
-
The next stage is to stop the process just before the call and take a snapshot. You can see you are just before the call because the right bracket (
>) to the left of the source list shows the line about to be executed.(idb) next 2 stopped at [int main(void):187 0x1200024b8] 187 nodeList.append(newNode); (idb) list $curline - 10: 20 177 178 // The driver for this test 179 // 180 main() 181 { 182 List<Node> nodeList; 183 184 // add entries to list 185 // 186 IntNode* newNode = new IntNode(1); > 187 nodeList.append(newNode); 188 189 CompoundNode* cNode = new CompoundNode(12.345, 2); 190 nodeList.append(cNode); 191 192 CompoundNode* cNode1 = new CompoundNode(3.1415, 7); 193 nodeList.append(cNode1); 194 195 nodeList.append(new IntNode(3)); 196 (idb) save snapshot # 1 saved at 08:41:46 (PID: 1012). stopped at [int main(void):187 0x1200024b8] 187 nodeList.append(newNode); -
You now step over the call. The execution is now after the call, shown by the right bracket (
>) being on the following source line.(idb) next stopped at [int main(void):189 0x1200024d0] 189 CompoundNode* cNode = new CompoundNode(12.345, 2); (idb) list $curline - 10: 20 179 // 180 main() 181 { 182 List<Node> nodeList; 183 184 // add entries to list 185 // 186 IntNode* newNode = new IntNode(1); 187 nodeList.append(newNode); 188 > 189 CompoundNode* cNode = new CompoundNode(12.345, 2); 190 nodeList.append(cNode); 191 192 CompoundNode* cNode1 = new CompoundNode(3.1415, 7); 193 nodeList.append(cNode1); 194 195 nodeList.append(new IntNode(3)); 196 197 IntNode* newNode2 = new IntNode(4); 198 nodeList.append(newNode2); -
Oh, how you wish you hadn't done that! No problem, just clone that snapshot you made.
(idb) clone snapshot Process has exited Process 1009 cloned from Snapshot 1. # 1 saved at 08:41:46 (PID: 1012). stopped at [int main(void):187 0x1200024b8] 187 nodeList.append(newNode); -
Now you are in a new process before the call is executed.
(idb) list $curline - 10: 20 177 178 // The driver for this test 179 // 180 main() 181 { 182 List<Node> nodeList; 183 184 // add entries to list 185 // 186 IntNode* newNode = new IntNode(1); > 187 nodeList.append(newNode); 188 189 CompoundNode* cNode = new CompoundNode(12.345, 2); 190 nodeList.append(cNode); 191 192 CompoundNode* cNode1 = new CompoundNode(3.1415, 7); 193 nodeList.append(cNode1); 194 195 nodeList.append(new IntNode(3)); 196
Note: fork() was used by the debugger both to create the
snapshot and to clone it.
Part II
A Guide to Using Intel Debugger
Part II provides most of the information needed to make expert use of the debugger.
Some additional details have been moved to Part III: Advanced Topics so they do not hinder the reading of this section.
Chapter 2 — Preparing a Program for Debugging
To facilitate debugging, you can prepare your source code and the compiler and linker environment.
2.1 Preparing Your Source Code
You do not need to make changes to the source code to debug the program. However, you can do the following to make debugging easier:
- If the source code has functions that can be called to output data structures, you can call them from the debugger; you may want to create such functions.
-
It is a good idea to make the following items part of your source code:
- An initial stall point if you cannot create the process easily from within the debugger.
- Assertions sprinkled liberally through the sources to help locate errors early.
2.2 Preparing the Compiler and Linker Environment
Debugging information is put into .o
files by compilers. The level and format
of information is controlled by compiler options. Use the -g option
with the Intel® Compiler, for example:
% icc -g hello.c ... % icpc -g hello.cpp ...
With GNU* Compiler, GCC*,
use -gdwarf-2 option:
% gcc -gdwarf-2 hello.c ... % g++ -gdwarf-2 hello.cpp ...
See your compiler's reference page for more details.
The debugging information is propagated into the a.out (executable)
or
.so (shared library)
by the ld command.
It is removed by the strip command. If you strip your programs,
keep the unstripped version to use with the debugger.
The debugging information can cause .o
files to be very large,
causing long link times, but even so it can also be incomplete.
If you are debugging optimized code, refer to the appropriate compiler
documentation for information about various -g switches
and
their relationship to optimization.
Chapter 3 — Starting the Debugger
You can start the debugger in the following ways:
This chapter also discusses the following topics:
3.1 Starting the Debugger from a Shell
When you invoke the debugger from a shell, you can bring a program or core file under debugger control, or you can attach to a running process.
The following is the shell syntax
to invoke the debugger using the
idb command:
idb
[ -c file ]
[ -gui ]
[ -gdb ]
[ -i file ]
[ -I directory ]
[ -interactive ]
[ -k ]
[ -line serial_line ]
[ -nosharedobjs ]
[ -parallel ]
[ -pid process_id ]
[ -prompt string ]
[ -remote ]
[ -rp remote_debug_protocol ]
[ -tty terminal_device ]
[ -quiet ]
[ -V ]
[ executable_file [ core_file ] ]
The following table describes the idb command
options and parameters:
| Options and Parameters | Description |
|---|---|
-c file
|
Specifies an initialization command file. The default initialization file is
.dbxinit. During startup, the debugger searches for this file in
the current directory. If it is not there, the debugger searches
your home directory. This file is processed after the target process has been
loaded or attached to.
|
-gdb
|
Start working in the GDB mode. |
-i file
|
Specifies a pre-initialization command file. The default pre-initialization
file is .idbrc.
The debugger
searches for this file during startup, first in the current
directory and then in your home directory. This file is processed before
the debugger has connected to the application being debugged, so that commands
such as set $stoponattach = 1 will have taken effect when the
connection is made.
|
-I directory
|
Specifies the directory containing the source code for the target
program, in a manner similar to the use command. Use multiple
-I options to specify more than one directory.
The debugger searches directories in the order in which they were
specified on the command line.
|
-interactive
|
Causes the debugger to act as though stdin is isatty(),
regardless of whether or not it is. This flag is sometimes useful when using
rsh to run the debugger. Currently, the only effect is to cause
the debugger to output the prompt to stdout when it is ready for
the next line of input.
|
-nosharedobjs
|
Prevents the reading of symbol table information for any shared objects
loaded when the process executes. Later in the debug session, you can
enter the readsharedobj command to read the
symbol table information for a specified object.
|
-pid process_id
|
Specifies the process ID of the process to be debugged. |
-prompt string
|
Specifies a debugger prompt. If the prompt
argument contains spaces or special
characters, enclose the argument in quotes ( % idb -prompt ">> " sample >> quit DBX Mode
You can also change the prompt by setting the
(idb) set $prompt = "newPrompt>> " newPrompt>> GDB Mode
Use (idb) set prompt (gdb mode) (gdb mode) show prompt Intel IDB's prompt is "(gdb mode) ". (gdb mode) Note: There is a space at the end of the first line of the example above. If space is missed, example will look like following: (idb) set prompt (gdb mode) (gdb mode)show prompt Intel IDB's prompt is "(gdb mode)". (gdb mode) |
-quiet
|
Causes the debugger to start but not to print sign-on message. |
-V
|
Causes the debugger to print its version number and exit without starting a debugging session. |
executable_file
|
Specifies the program executable file. |
core_file
|
Specifies the core file. |
For example, to invoke the debugger on an executable file named a.out:
% idb a.out
To invoke the debugger on a core file:
% idb a.out core
To invoke the debugger and attach to a running process:
% idb -pid 8492 a.out
To invoke the debugger and attach to a running process when you do not know what file it is executing:
% idb -pid 8492
3.2 Starting the Debugger Using Emacs*
You can control your debugger process entirely through the Emacs Grand Unified Debugger (GUD) buffer mode, which is a variant of shell mode. All the debugger commands are available, and you can use the shell mode history commands to repeat them.
The debugger supports:
The information in the following sections assumes you are familiar with Emacs and are using the Emacs notation for naming keys and key sequences.
For each Emacs session, before you can invoke the debugger, you must load the Intel Debugger-specific Emacs LISP code, as follows:
M-x load-file
At the Load file: prompt, type the path to the Intel Debugger-specific
Emacs LISP file, which is located in the Intel IDB installation directory. For
example:
/opt/intel/compiler70/ia32/bin/idb.el
You can also place a load-file call in your
Emacs initialization file (~/.emacs). For example:
(load-file "/opt/intel/compiler70/ia32/bin/idb.el")
To start the debugger with Emacs, type:
M-x idb
The following invocation line displays:
Run the debugger (like this): idb
Edit the invocation line by typing the target program and pressing Return. Emacs remembers the invocation. To debug the same program again, you need only press Return.
Emacs displays the GUD buffer and runs the debugger within it; the debugger
starts and displays its (idb) prompt, indicating readiness.
The GUD buffer saves all of the commands you type and the program output for
you to edit. In general, interact with the debugger in the GUD buffer as you
would with a debugger started from a shell.
One of the benefits of running the debugger from within Emacs is a closer
correlation between program execution and source. When your program stops,
for example at a breakpoint, Emacs displays the source of your program in a
second buffer (source buffer) and indicates the current execution line with =>.
Note: If the source is already loaded into a buffer, Emacs often finds
that buffer. However, in some NFS mounting situations, Emacs may use an
alternate name for some directories and will create a second buffer for your
source (often with <2> appended to the name). Be careful that you do not modify
the original buffer or kill it outright.
By default, Emacs sets its current working directory to be the directory
containing the target program. Because the debugger does not do this when invoked
directly, you may need to change the source code search path when
using the debugger from within Emacs. To set an alternate source code search
path, use the
debugger map source directory
command.
All Emacs editing functions and GUD key bindings are available. For example:
-
You can execute a
stepcommand by typing the command in the GUD buffer. -
You can select a line of code in the current source buffer and type a command to set a breakpoint at that position:
C-x SPC
For more information on Emacs functionality and key bindings, see the Emacs documentation. For example:
M-x info
Then select the Emacs menu, then the Debuggers menu.
XEmacs will come up with the source buffer displayed. Use C-x 2
and a buffer menu to select the control buffer.
3.3 Starting the Debugger Using DDD*
GNU* DDD* is a graphical front-end for command-line debuggers, such as GDB*. You can use it with Intel IDB as well.
DBX Mode
Specify --ladebug and --debugger idb options in the shell command line,
for example:
$ ddd --ladebug --debugger idb a.out
If idb is not accessible trough PATH environment variable,
specify path to the debugger, absolute or relative, for example:
$ ddd --ladebug --debugger /opt/intel/compiler70/ia32/bin/idb a.out
GDB Mode
Specify --debugger "idb -gdb" options in the shell command line,
for example:
$ ddd --debugger "idb -gdb" a.out
Alternatively, you can include set $cmdset="gdb" command to ~/.idbrc file
to start Intel IDB in GDB mode. In this case -gdb option is redundant:
$ ddd --debugger idb a.out
If idb is not accessible trough PATH environment variable,
specify path to the debugger, absolute or relative, for example:
$ ddd --debugger "/opt/intel/compiler70/ia32/bin/idb -gdb" a.out
3.4 Ending a Debugging Session
DBX Mode
To exit the debugger, use the quit command:
quit_command : quit
Alternatively, you can type exit, which is a pre-defined
alias for quit.
GDB Mode
Use the quit command
(q is a shorter
equivalent) to exit the debugger.
quit_command
: quit [ exit_status ]
| q [ exit_status ]
exit_status
: expression
Optionally you can specify debugger exit status. Example:
(idb) quit 3 % echo $? 3 %
3.5 Getting Help
To access the online help about debugger commands, use the
help
command.
DBX Mode
help_command : help [ topic ]
Enter help to see a list of help topics. Enter help
command to see a list of debugger commands. Enter
help idb to see a list of function-oriented debugger
commands.
GDB Mode
help_command
: help [ topic ]
| h [ topic ]
| complete [ args ]
If you do not specify any arguments, the help (or
h) command will display a short list of named classes of commands. Use
the help command with a name of a class or
a name of a particular command to get more detailed help.
You may also use the complete args command to list
all the possible completions for the beginning of a command.
Use args to specify the beginning of the command you want completed.
Chapter 4 — Giving Commands to the Debugger
The debugger has several different mechanisms you can use to direct its behavior. It receives input from:
- Environment variables
- Shell command line
-
stdin, which is usually one of the following:- A terminal
- A file
- A pipe connecting the debugger to an editor (usually Emacs)
-
Other files:
-
At startup, before attaching to or starting the target executable
and before processing command line qualifiers, commands in:
-
.idbrc, if available, otherwise -
~/.idbrc, if available
-
- Just before accepting command input from you:
-
Files specified in the
sourcecommand
-
At startup, before attaching to or starting the target executable
and before processing command line qualifiers, commands in:
Some examples of the difference between .idbrc
and .dbxinit are shown in the following table:
| Example Command |
If Used in .idbrc
|
If Used in .dbxinit
|
|---|---|---|
Assume the command "set
$stoponattach = 1" is in one of these
files and you invoked the debugger as:
% idb -pid process_id executable_file |
The debugger attaches and stops. | The debugger attaches and waits for you to press Ctrl/C; subsequent attaches will stop. |
Assume the command "stop in main" is in one of these
files.
|
The debugger generates a message that there is no
main in which to place a breakpoint, because there is no target yet.
|
The debugger sets the breakpoint
(assuming there is a main in the target).
|
This chapter discusses the following topics:
- The debugger's command processing structure
- Interrupting a debugger action
- Entering and editing command lines
- Syntax of commands
- Using scripts and aliases
- Executing shell commands
- Invoking your editor
4.1 Debugger's Command Processing Structure
The debugger processes commands as follows:
- Prompts for input.
- Obtains a complete line from the input file and performs:
- Parses the entire line according to the parsing rules for the current language.
- Executes the commands.
4.2 Interrupting a Debugger Action
To interrupt program execution or to abort a debugger action, press Ctrl/C. This returns the debugger to the prompt.
4.3 Entering and Editing Command Lines
The debugger reads lines from stdin. The debugger supports command
line editing when processing stdin if stdin is a
terminal and the
debugger variable $editline
is non-zero (the default; see the
set
command to change it). For this to work
correctly, you must set the terminal width to
the correct value. After editing, press the Return key to send the line to the
debugger.
- Use the left and right arrow keys to edit parts of the line.
- Use the up and down arrow keys to recall and edit earlier commands.
Note: When you use the up and down arrow keys, the debugger skips duplicate
commands. To see a complete list of the commands you have entered, use the
history command.
The debugger copies each line from stdin to the
record input file,
if you have requested that file.
The debugger scans each line from the beginning, looking for backslash (\)
characters, which 'quote' the immediately following character. If the line ends
in a quoted newline, then another line is similarly processed from stdin and
appended to the first one, with the quoted newline removed.
Whether or not command line editing is enabled, you can always use your terminal's cut-and-paste function to avoid excessive typing while entering input.
4.3.1 History Replacement of the Line
Leading spaces and tabs are removed from the assembled line.
For assembled lines that begin with an exclamation
point (!), the following
rules apply:
-
If the second character is also an exclamation point (
!), the assembled line is replaced by the most-recent entry from the history list. Any remaining characters after the digits or!are appended to the assembled line. -
Otherwise, spaces and tabs are skipped, and one of the following actions
occurs:
- If the next character is a digit, then the digits are read as a decimal number, and the assembled line is replaced by that line from the history list, with 1 being the oldest entry.
-
If the next character is a hyphen (
-), then the digits following it are read as a decimal number, and the assembled line is replaced by that line from the history list, with -1 being the most-recent entry. - Otherwise, the rest of the line is used to find the most-recent command that starts with those characters, and the assembled line is replaced by that line from the history list.
For lines that begin with a caret (^), these rules apply:
-
The line is analyzed to extract the following:
- The characters following the first caret but before a second caret, or until the end of line. These characters are the target string.
- If there is a second caret, the characters following it but before a third caret, or until the end of line. These characters are the replacement string.
- If there is a third caret, the characters following it to the end of the line. These characters are the append string.
- The most-recent entry from the history list is checked to see if it has an occurrence of the target string. If it does not, an error is reported.
- The assembled line is replaced by this most-recent entry, except that the first occurrence of the target string is replaced by the replacement string (possibly zero length), and the append string is appended to the assembled line.
The assembled line is now appended to the history list.
Exclamation points and carets cannot be used in command lists built with
braces ({});
for example, {print3; !!3} will not parse. They may be used in scripts.
History in a command list is not limited by braces, but goes all the way back. For example:
(idb) print 1
1
(idb) stop in main { print 2; history 3}
[#1: stop in int main(void) { print 2; history 3} ]
(idb) run
2
11: print 1
12: stop in main {print 2; history 3}
13: run
[1] stopped at [int main(void):182 0x8049f70]
182 List<Node> nodeList;
Note: Commands in breakpoint action lists are not entered into the history list.
4.3.2 Alias Expansion of the Line (DBX Mode only)
The assembled line is now subjected to alias expansion.
This is done by scanning the
line, looking for pound (#), semicolon (;), and left brace ({) characters
that are not inside strings.
-
Strings are recognized by their opening and closing double or single quotes. Backslash quotation causes a quote character not to terminate the string.
-
Pound (
#) characters and all that follow to the end of the line are discarded, unless the pound character is the very first character in the line. If that is the case, the pound character is not discarded because a completely empty line has special meaning. An exception is made for pound (#) characters that are surrounded by non-whitespace characters, such as "file#name". This is needed because thetmpnamstandard library function generates file and directory names containing pound (#) characters.
The debugger performs alias expansion as follows:
-
At the beginning of the line, and immediately after semicolon (
;) or left brace ({) characters not inside strings, the debugger checks for the occurrence of an alias identifier. -
If it finds an alias identifier, it associates the formal parameters of the alias with the specified actual parameters.
If the alias has no formal parameters, this match consumes no more of the input.
-
If there are formal parameters, white space is skipped, and then a '
(' character is checked for and skipped. The characters following the '(' up to the first non-nested ',' or ')' character are associated with the formal parameter.Again, the characters within strings are not tested. Nesting is caused by '
(' and ')' characters outside of strings. -
If there are more formal parameters, the '
,' character is treated as the terminator of the actual parameter. It is skipped and processing continues as for the first parameter.
-
-
After the alias and the correct number of actuals have been identified, all the characters from the start of the alias identifier to its end (no parameters) or the trailing '
)' (one or more parameters) are replaced by the expansion. -
Within the definition of the alias, all occurrences of the formal parameter are replaced by the actual parameter, regardless of whether or not it is in a string.
4.3.3 Environment Variable Expansion
The debugger expands environment variables and the leading tilde (~) in the
following cases:
- As part of a command in which a file name or a directory is expected.
-
In the arguments to
runorrerun(dbx).
As in any shell, you can group an environment variable name using a pair of
curly braces ({}), and quote a dollar sign ($) by preceding it with
a backslash (\).
The following table shows how various environment variables expand. It
assumes that the home directory is
/usr/users/hercules and the environment variable BIN is
/usr/users/hercules/bin.
| Command with Environment Variable | Expands into |
|---|---|
load ~/a.out
|
load /usr/users/hercules/a.out
|
load $BIN/a.out
|
load /usr/users/hercules/bin/a.out
|
load ${BIN}2/a\$b
|
load /usr/users/hercules/bin2/a$b
|
map source directory $BIN ${BIN}2
|
map source directory /usr/users/hercules/bin /usr/users/hercules/bin2
|
stop at "$BIN/a.out":20
|
stop at "/usr/users/hercules/bin/a.out":20
|
run $BIN/a.out ~/core
|
run /usr/users/hercules/bin/a.out /usr/users/hercules/core
|
4.4 Syntax of Commands
The debugger has different parsing rules for each of the different languages it supports. A line is processed according to the current language, even if executing the line will change the current language.
4.4.1 Lexical Elements of Commands
For the debugger to parse the line, it must first turn the line into a sequence of tokens, a process called "tokenizing" or "lexical analysis". Tokenizing is done with a state machine.
As the debugger starts tokenizing a line into a command, it starts processing the characters using the lexical state LKEYWORD. It uses the rules for lexical tokens in this state, recognizing the longest sequence of characters that forms a lexical token.
After the lexical token is recognized, the debugger appends it to the tokenized form of the line, perhaps changes the state of the tokenizer, and starts on the next token.
For more detailed information on lexical elements, see Lexical Elements of Commands in Part III.
4.4.2 Grammar of Commands
Some pieces of the grammar were modified from a grammar originally written by James A. Roskind, and covered by a copyright that requires a statement that... Portions Copyright (c) 1989, 1990 James A. Roskind
Each command line must parse as one of the following:
input : command_list | comment
A command_list is a sequence of commands that are executed one after
the other.
command_list : command ;... | command ; | command
A comment is a line that begins with
a pound (#) character.
comment
: #
Any text after an unquoted pound character is ignored by the debugger. If the first non-whitespace character on a line is a pound character, the whole line is ignored.
Note: The difference between a blank command line and a command line that is a comment is that a blank line entered from the keyboard will cause the debugger to repeat the previous command and the comment line will not. Blank lines not entered from the keyboard are treated as comment lines.
4.4.3 Categories of Commands
Commands usually start with, and often contain, keywords. These keywords must be lowercase.
DBX Mode
Following is a list of debugger command categories:
command : alias_command | attach_command | braced_command_list | breakpoint_command | browse_source_command | call_stack_command | command_repetition_command | continue_command | detach_command | dbgvar_command | edit_file_command | environment_variable_command | execute_commands_from_file_command | execute_shell_command | guion_command | help_command | history_command | if_command | kill_command | load_command | look_around_command | machinecode_level_command | modifying_command | multiprocess_command | parallel_debugging_command | quit_command | record_command | run_command | snapshot_command | shared_library_command | thread_command | unload_command
4.4.4 Keywords Within Commands
If the identifiers
thread,
in,
at, and if
occur within the
expression in the
following commands, the debugger treats them as keywords
unless they are enclosed within parentheses (()).
For example, if your program has thread defined as an
integer, enter the following command to inspect the first thread
levels of the stack.
For example:
(idb) where 3 >0 0x8049a6c in c() "x_whereAmbigParse.c":7 #1 0x8049a8f in b() "x_whereAmbigParse.c":12 #2 0x8049aa2 in a() "x_whereAmbigParse.c":13 (idb) (idb) (idb) (idb) where three(3) >0 0x8049a6c in c() "x_whereAmbigParse.c":7 #1 0x8049a8f in b() "x_whereAmbigParse.c":12 #2 0x8049aa2 in a() "x_whereAmbigParse.c":13 (idb) (idb) (idb) (idb) where thread (1) Stack trace for thread 1 >0 0x8049a6c in c() "x_whereAmbigParse.c":7 #1 0x8049a8f in b() "x_whereAmbigParse.c":12 #2 0x8049aa2 in a() "x_whereAmbigParse.c":13 #3 0x8049abe in main() "x_whereAmbigParse.c":17 #4 0x400dd177 in __libc_start_main(...) in /lib/i686/libc.so.6 #5 0x8049929 in _init(...) in /usr/examples/x_whereAmbigParse (idb) (idb) (idb) (idb) where three(3) thread (1) Stack trace for thread 1 >0 0x8049a6c in c() "x_whereAmbigParse.c":7 #1 0x8049a8f in b() "x_whereAmbigParse.c":12 #2 0x8049aa2 in a() "x_whereAmbigParse.c":13 (idb) (idb) (idb) (idb) where (thread(3)) >0 0x8049a6c in c() "x_whereAmbigParse.c":7 #1 0x8049a8f in b() "x_whereAmbigParse.c":12 #2 0x8049aa2 in a() "x_whereAmbigParse.c":13 (idb) (idb) (idb)
4.4.5 Using Braces to Make a Composite Command
It is possible to surround a command_list
with braces to make it work like a single command. Some places
require a braced_command_list just for readability, or to assist
the debugger in understanding your input.
braced_command_list : { command_list }
4.4.6 Conditionalizing Command Execution
The debugger provides the if command, whose behavior depends on
the value of an expression.
if_command : if expression braced_command_list [ else_clause ] else_clause : else braced_command_list
In this command, the first braced_command_list is executed if
expression evaluates to a non-zero value; otherwise, the
braced_command_list in the else_clause is executed, if specified.
For example:
(idb) set $c = 1
(idb) assign pid = 0
(idb) if (pid < $c) { print "Greater" } else { print "Lesser" }
Greater
4.4.7 Debugger Variables
Debugger variables are pseudovariables that exist within the debugger instead of within your program. They have the following uses:
- Support some limited programming capabilities within the debugger command language
- Allow you to examine and change various debugger options
- Allow you to find out exactly what various debugger commands did
The following table lists the three different varieties of debugger variables:
| Kind of variable | Purpose |
|---|---|
| User-defined variables | You create these and can set them to a value of any type. |
| Preference variables | You modify these to change debugger behavior. You can only set a preference variable to a value that is valid for that particular variable. |
| Display/state variables | These variables display the parts of the current debugger state. You cannot modify them. |
For more information about debugger variables, see Appendix 1 — Debugger Variables.
The following commands deal specifically with debugger variables:
dbgvar_command : set dbgvar_name = expression | set dbgvar_name | set | unset dbgvar_name
The dbgvar_name should not exist anywhere in your program,
or you may confuse yourself about which of the occurrences you are actually
dealing with. The predefined debugger variables all start with a dollar sign
($), to help avoid this confusion. It is strongly recommended that you
follow the same practice; in a future release, all debugger variables
will be required to start with a dollar sign.
Note: If a debugger variable exists that shares a name with a program variable, and you print an expression involving that name, which of the two variables the debugger finds is undefined.
The first form creates the debugger variable if it does not already exist. It then sets the value of the debugger variable to the result of evaluating the expression. For example:
(idb) set $myLoopCounter = 0 (idb) print $myLoopCounter 0
The second form is equivalent to the command
set dbgvar_name = 1. For example:
(idb) print $stoponattach 0 (idb) set $stoponattach (idb) print $stoponattach 1
The set form shows all the debugger variables and their
values:
(idb) set $ascii = 0 $beep = 1 $catchexecs = 0 $catchforkinfork = 0 $catchforks = 0 $childprocess = 0 $cmdset = "idb" $curevent = 0 $curfile = "x_list.cxx" $curfilepath = "../src/x_list.cxx" $curline = 182 $curpc = 0x8049f4c $curprocess = 30078 $cursrcline = 182 $cursrcpc = 0x8049f4c $curthread = 1 $dbxoutputformat = 0 $dbxuse = 0 $debuggerpid = 30076 $decints = 0 $disasm_shows_unwind = 0 $doverbosehelp = 1 $editline = 1 $eventecho = 1 $floatshrinking = 1 $framesearchlimit = 0 $funcsig = 1 $givedebughints = 1 $hasmeta = 0 $hexints = 0 $historylines = 20 $indent = 1 $lang = "C++" $lasteventmade = 0 $lc_ctype = "en_US.ISO8859-1" $listwindow = 20 $main = "\"x_list.cxx\"`main" $maxarrlen = 1024 $maxstrlen = 128 $memorymatchall = 0 $myLoopCounter = 0 $octints = 0 $overloadmenu = 1 $page = 1 $pagewindow = 0 $parentprocess = 0 $pimode = 1 $prompt = "(idb) " $readtextfile = 0 $regstyle = 1 $repeatmode = 1 $reportsotrans = 0 $showlineonstartup = 0 $showwelcomemsg = 1 $stackargs = 1 $statusargs = 1 $stepg0 = 0 $stoponattach = 1 $stopparentonfork = 0 $symbolsearchlimit = 100 $threadlevel = "native" $usedynamictypes = 1 $verbose = 0
To see the value of just one debugger variable,
print it. For example:
(idb) print $catchexecs 0
The unset form deletes the debugger variable. Some predefined debugger
variables either cannot be deleted or are automatically recreated in the future
when needed. For example:
(idb) unset $myLoopCounter (idb) print $myLoopCounter Symbol "$myLoopCounter" is not defined. (idb) unset $catchforks Warning: The debugger variable "$catchforks" was not unset because it is an idb predefined variable
4.5 Scripting or Repeating Previous Commands
To repeat the last command line, enter two exclamation points (!)
or press the Return key. You can also enter !-1.
command_repetition_command : !! | ! integer | !- integer | ! string
To repeat a command line entered during the current debugging
session, enter an exclamation point followed by the integer
associated with the command line. (Use the
history command
to see a list of commands used.) For example, to repeat the
seventh command used in the current debugging session, enter !7.
Enter !-3 to repeat the third-to-the-last command. See also
History replacement of the line.
To repeat the most-recent command starting with a string, use the
last form of the command. For example, to repeat a command that
started with bp, enter !bp.
Following are other ways to reuse old commands and save typing effort:
- Use a completely empty line to repeat the last command but not the last line, which could have been a comment or a syntactically invalid attempt at a command. Immediately pressing the Return key is the recommended way of doing this.
- Use command line editing to recall and modify commands you have already entered.
- It is often useful to have a text editor up and running while debugging, and use it to assemble short scripts that you can copy and paste to the debugger. Keep a separate text file that has such scripts in it, as well as other notes you wish to keep. This provides continuity from one debugging session to the next, and from one day to the next.
If you place commands in a file, you can execute them directly from the file rather than cutting and pasting them to the terminal. For example:
execute_commands_from_file_command : source filename | playback input filename
Use the source
command to read and execute commands from a file. (You can also
execute debugger commands
when you invoke the debugger by creating an initialization file named
.dbxinit.) These commands
can be nested,
and as each comes to an end, reading resumes from where it left off in the
previous file.
Be aware, however, that blank lines in these files do not repeat the last command, unlike what blank lines do when entered from the terminal. Format the commands as if they were entered at the debugger prompt.
Use the pound character (#) to create comments to format your
scripts.
The following is an example debugger script:
(idb) sh cat ../src/myscript step where 2
The following example shows how to execute it:
(idb) run
[1] stopped at [int main(void):182 0x8049f48]
182 List<Node> nodeList;
(idb) source ../src/myscript
stopped at [List<Node>::List(void):121 0x8057e56]
121 List<NODETYPE>::List() : _firstNode(NULL)
>0 0x8057e56 in ((List<Node>*)<bad value>)->List<Node>::List() "x_list.cxx":121
#1 0x8049f57 in main() "x_list.cxx":182
When a command file is executed, the value of the
$pimode debugger
variable determines whether the commands are echoed. If the $pimode
variable is set to 1, commands are echoed; if $pimode is set to 0
(the default), commands are not echoed. The debugger output resulting
from the commands is always echoed.
4.5.1 Recording Input and Output
To help you make command files, as well as to help you see what has happened before, the debugger can write both its input and its output to files, as follows:
record_command : record io [ filename ] | record input [ filename ] | record output [ filename ] | unrecord io | unrecord input | unrecord output
Use record input to save debugger commands to a file. The
commands in the file can be executed using the source command or the
playback input command.
If no file name is specified, the debugger creates a file with a
random file name in /tmp as the record file. The debugger issues a message
giving the name of that file.
To stop recording debugger input or output, redirect as shown in the
following example, use the appropriate version of the unrecord command,
or exit the debugger:
(idb) record input /dev/null (idb) record output /dev/null
The following example shows how to use the
record input command to record a series of debugger commands in a
file named myscript:
(idb) record input myscript
(idb) stop in main
[#1: stop in int main(void) ]
(idb) run
[1] stopped at [int main(void):182 0x8049f48]
182 List<Node> nodeList;
(idb) record input /dev/null
This example results in the following recorded input in
myscript:
(idb) sh cat myscript stop in main run record input /dev/null
The record output command saves the debugger output to a file.
The output is simultaneously written to stdout (normal output) or
stderr (error messages). For example:
(idb) record output myscript
(idb) stop in List<Node>::append
[#2: stop in void List<Node>::append(struct Node* const) ]
(idb) cont
[2] stopped at [void List<Node>::append(struct Node* const):148 0x8058026]
148 if (!_firstNode)
(idb) next
stopped at [void List<Node>::append(struct Node* const):149 0x805802f]
149 _firstNode = node;
After the above commands are executed, myscript contains the
following:
(idb) sh cat myscript
[#2: stop in void List<Node>::append(struct Node* const) ]
[2] stopped at [void List<Node>::append(struct Node* const):148 0x8058026]
148 if (!_firstNode)
stopped at [void List<Node>::append(struct Node* const):149 0x805802f]
149 _firstNode = node;
The record io command saves both input to and output
from the debugger. For example:
(idb) record io myscript
(idb) stop in main
[#1: stop in int main(void) ]
(idb) run
[1] stopped at [int main(void):12 0x120001130]
12 int i;
(idb) quit
% cat myscript
(idb) stop in main
[#1: stop in int main(void) ]
(idb) run
[1] stopped at [int main(void):12 0x120001130]
12 int i;
(idb) quit
If input or output is already being recorded, a new record input
command will close the old file and record to a new one, rather
than record simultaneously to two files. In that connection,
note that record io is equivalent to the combination of
record input and record output, and will cause any open
recording files to be closed.
Note that the prompt itself is only recorded for
record io.
4.5.2 Viewing the Command History
You can see all the commands you have already entered by using the
history command. Use history_number to indicate
how many commands to show, starting with the most recent. If you do not
specify
$historylines, the 20 previous commands are
shown. See also
History replacement of the line.
history_command : history [ integer_constant ]
For example:
(idb) history 6 18: stop in main 19: run 20: stop at 103 21: cont 22: print "history_EXAMPLE START" 23: history 6
4.6 Defining Aliases (DBX mode only)
You can extend the set of debugger commands by defining aliases.
When the debugger is tokenizing a command line, it expands aliases and then retokenizes the expansion.
alias_command : alias [ alias_name ] | alias alias_name [ ( argument_name, ...) ] string | unalias alias_name
The following example shows how to define and use an alias:
(idb) alias cs
alias cs is not defined
(idb) alias cs "stop at 186; run"
(idb) cs
[#1: stop at "x_list.cxx":186 ]
[1] stopped at [int main(void):186 0x120002420]
186 IntNode* newNode = new IntNode(1);
The following example further modifies the cs alias
to specify the breakpoint's line number when you enter the
cs command:
(idb) alias cs (x) "stop at x; run"
(idb) cs(186)
[#2: stop at "x_list.cxx":186 ]
Process has exited
[2] stopped at [int main(void):186 0x120002420]
186 IntNode* newNode = new IntNode(1);
Note: No warning is given if the alias_name already has a
definition as an alias. The old definition will be replaced by the new one.
Use the unalias command followed by an alias name to delete the
specified alias.
4.7 Executing Shell Commands
You can have the debugger execute a call to the operating system's system function.
This function is documented in system(3).
The call results in the
sh(dbx) or
shell(gdb) commands.
DBX Mode
execute_shell_command : sh string
For example, you can execute a system command through a from the debugger by issuing the following command:
(idb) sh uname -m i686 (idb)
To execute more than one command at the specified shell, spawn a shell as follows, for example:
(idb) sh csh -f % ls out out % ls *.b recio.b stdio.b % exit (idb)
GDB Mode
execute_shell_command
: shell string
For example:
(idb) shell uname -m i686 (idb)
To execute more than one command at the shell, spawn a shell as follows:
(idb) shell bash --norc $ ls out out $ ls *.b recio.b stdio.b $ exit (idb)
4.8 Invoking Your Editor (DBX Mode only)
You can use the edit command to invoke the editor defined
by the EDITOR environment variable.
edit_file_command : edit [ string ]
The editor is given the string as the file name to edit. If no file name is specified, the editor is given the current file. If no current file exists, the editor is started without a file.
If the EDITOR environment variable is undefined, the debugger
invokes the vi editor.
The following example invokes the Emacs editor on the file chars.c:
(idb) sh printenv EDITOR emacs (idb) file chars.c (idb) edit
The following example invokes the nedit editor on the file
~/foo/bar.f:
(idb) sh printenv EDITOR nedit (idb) edit ~/foo/bar.f
Chapter 5 — Context for Executing Commands
This chapter discusses the following topics:
5.1 Multiple Processes
The debugger supports debugging multiple processes at a time, but at
any given time is only operating on a single process, known as the current
process. The debugger variable $curprocess contains the
process id
for this process. Naming and switching the debugger between
processes is described in Multiprocess Debugging.
5.2 Creating Processes
The debugger can find and control the following:
- Processes that you may request it to create later
- Processes that are currently running
Specifying an executable file on the shell command line or executing the
load(dbx) or
file(gdb) command causes the debugger to
gain control of a process that you may request it to create later.
Note: In the background, the debugger immediately creates a process executing the program, stalls it, and uses it to answer questions about which shared libraries are mapped, and so on. This process never continues, and is killed when:
- The debugger exits.
- You unload this executable file.
- You try to run the program.
Using the run command on such a potential
process causes the debugger to create a process that is identified as currently
running and recreatable.
Specifying a pid on the shell
command line or executing the
attach command causes the debugger to
know about the process as currently running and not recreatable.
Catching a fork() causes the new child process to be
identified as currently running and not recreatable.
5.3 Multiple Call Frames, Threads, and Sources
Processes contain one or more threads of execution. The threads execute functions. Functions are sequences of instructions that are generated by compilers from source lines within source files.
As you enter the debugger commands to manipulate your process, it would be very tedious to have to repeatedly specify which thread, source file, and so on, you wish the command to be applied to. To prevent this, each time the debugger stops the process, it re-establishes a static context and a dynamic context for your commands. The components of the static context are independent of this run of your program; the components of the dynamic context are dependent on this run.
Some pieces of these contexts are available as debugger variables.
- The static context consists of the following:
-
The dynamic context consists of the following:
- Current call frame
-
Current process -
$curprocess -
Current thread -
$curthread - The thread executing the event that caused the debugger to gain control of the process
You can switch most of these individually to point to other instances, as described in the relevant portions of this manual, and the debugger will modify the rest of the static and dynamic context to keep the various components consistent.
Chapter 6 — Running the Program Under Debugger Control
Often, running the program in a process just requires forking a
process and executing the program within it with the right environment
variables,
argc/argv, file descriptors, and so on. This is what
usually happens when you
run your program from a shell command line.
However, sometimes the program requires more context, or a process may already have been created. Perhaps it is part of a pipe, perhaps it is a long-running process, or perhaps it is created from a shell script or makefile.
Hence, the following situations are possible:
- Running your program as a child process of the debugger process.
- Using the debugger's ability to attach to any process it has access to.
6.1 Running the Program as a Child Process
If your program has a simple command line, and only requires stdin, stdout,
and stderr connected, you can run it as a child process of the
debugger process. For example:
DBX Mode
% idb a.out
or
% idb (idb) load a.out
GDB Mode
% idb -gdb a.out
or
% idb -gdb (idb) file a.out
6.2 Attaching to a Process
If your program is any of the following, you can use the debugger's ability to attach to any process to which it has access:
- Already running in a process
- Has a complex command line
- Is part of a pipe
- Is started by a script that is difficult to modify
Examples:
DBX Mode
% idb -pid 8492 a.out
or
% idb (idb) attach 8492 a.out
GDB Mode
% idb -gdb -pid 8492 a.out
or
% idb -gdb (idb) file a.out (idb) attach 8492
When you do this, the process continues execution until it raises a
signal that
the debugger intercepts, for example,
SEGV. If you have set the $stoponattach
preference variable, it stops immediately.
One method you can use to make attaching to a process work in a predictable way is to modify your program to loop in a known function until the debugger interrupts it, for example, when you use Ctrl/C:
-
Add some code such as the following to your application:
volatile int endStallForDebugger=0; void stallForDebugger() { while (!endStallForDebugger) ; } int main() { ... stallForDebugger(); ... } -
Run this version of your program.
-
Attach the debugger to the running process as described above.
-
Stop the program with Ctrl/C or by use of
$stoponattach. -
Use the debugger to assign to the
stallForDebuggervariable, and continue the execution of the process, so that it exits from the loop:(idb) assign endStallForDebugger = 1 (idb) # set any needed breakpoints, and so on (idb) cont
6.3 The load, unload, and file Commands
Using the
load(dbx) and
file(gdb)
commands,
you can tell the debugger which executable
file you intend to execute in some process. These commands
read the symbol table information of an executable file.
The load(dbx)
command can optionally load a core file.
(This is done automatically when you give the debugger a file name
on the shell
command line.)
DBX Mode
load_command : load filename [ filename ]
The second file name is used to specify a core file. If you specify a core file, the debugger acts as though it is attached to the process at the point just before it died, except that you cannot execute commands that require a runnable process, such as commands that try to continue the process or evaluate function calls.
Examples:
% idb /usr/examples/x_list
(idb) listobj
Program is not active
(idb) load /usr/examples/x_list
Reading symbolic information ...done
(idb) listobj
section Start Addr End Addr
------------------------------------------------------------------------------
/usr/examples/x_list
.text 0x8048000 0x8084c4b
.data 0x8085c60 0x80b0683
.bss 0x80b0684 0x80b0e3f
/lib/i686/libm.so.6
.text 0x4002d000 0x4004eac2
.data 0x4004fad0 0x4004fc93
.bss 0x4004fc94 0x4004fcf3
/opt/intel/cc-7.0b-015/compiler70/ia32/lib/libcxa.so.1
.text 0x40050000 0x40071029
.data 0x40072040 0x40081687
.bss 0x40081688 0x40081713
/lib/i686/libc.so.6
.text 0x40082000 0x401b3665
.data 0x401b4680 0x401b8d87
.bss 0x401b8d88 0x401bcf67
/lib/ld-linux.so.2
.text 0x40000000 0x40015228
.data 0x40016240 0x4001653f
.bss 0x40016540 0x40016997
GDB Mode
file_command : file [ filename ]
If filename is specified, the debugger loads the specified exacutable.
Without an argument, the debugger unloads the current executable file.
Example:
% idb -gdb /usr/examples/x_list
or:
(idb) info files (idb) file /usr/examples/x_list Reading symbols from /usr/examples/x_list...done. (idb) info files Symbols from "/usr/examples/x_list". Unix child process: Using the running image of child process 10951. While running this, idb does not access memory from... Local exec file: '/usr/examples/x_list', file type <unknown> 0x8048000 - 0x8084d50 is .text 0x8085000 - 0x80b8da4 is .data 0x80b8da4 - 0x80b9520 is .bss
Creating a process both creates the debugger's knowledge of it and makes it the current process that the debugger is controlling.
The opposite of loading an executable file is unloading an executable file, when the debugger removes all related symbol table information that the debugger associated with the process being debugged.
DBX Mode
unload_command : unload [ pid ,... ] | unload [ filename ] pid : integer_constant
Process for unloading can be specified by either a process id or an executable file name.
(idb) listobj
section Start Addr End Addr
------------------------------------------------------------------------------
/usr/examples/x_list
.text 0x8048000 0x8084c4b
.data 0x8085c60 0x80b0683
.bss 0x80b0684 0x80b0e3f
/lib/i686/libm.so.6
.text 0x4002d000 0x4004eac2
.data 0x4004fad0 0x4004fc93
.bss 0x4004fc94 0x4004fcf3
/opt/intel/cc-7.0b-015/compiler70/ia32/lib/libcxa.so.1
.text 0x40050000 0x40071029
.data 0x40072040 0x40081687
.bss 0x40081688 0x40081713
/lib/i686/libc.so.6
.text 0x40082000 0x401b3665
.data 0x401b4680 0x401b8d87
.bss 0x401b8d88 0x401bcf67
/lib/ld-linux.so.2
.text 0x40000000 0x40015228
.data 0x40016240 0x4001653f
.bss 0x40016540 0x40016997
(idb) unload
Process has exited
(idb) listobj
Program is not active
GDB Mode
Use the file comand without an
argument to unload an executable file.
(idb) info files Symbols from "/usr/examples/x_list". Unix child process: Using the running image of child process 10950. While running this, idb does not access memory from... Local exec file: '/usr/examples/x_list', file type <unknown> 0x8048000 - 0x8084d50 is .text 0x8085000 - 0x80b8da4 is .data 0x80b8da4 - 0x80b9520 is .bss (idb) file No symbol file now. (idb) info files
6.4 The run and rerun Commands
After you have loaded a program, you can create a process executing this
program using either of the following forms of the run
command:
DBX Mode
run_command : run [ argument_string ] [ io_redirection ... ] | rerun [ argument_string ] [ io_redirection ... ]
If the rerun command is specified without
arguments, the arguments and io_redirection arguments of the most recent
run
command entered with arguments are used. If there was no previous
run command, the
rerun command defaults to
run.
GDB Mode
run_command : run [ argument_string ] [ io_redirection ... ] | r [ argument_string ] [ io_redirection ... ]
arg_commands
: set_args_command
| show_args_command
set_args_command
: set args [ argument_string ] [ io_redirection ... ]
show_args_command
: show args
If the run (or r) command does not specify any arguments, default arguments are used.
Default arguments are specified by the previous run command
with arguments or by set args command.
To view default arguments, use the show args command.
Note:
The set args commands does not affect process currently
running. New arguments will affect only the next run.
If the last modification time or
size of the binary file or any of the shared objects
used by the binary file has changed since the last run or
rerun(dbx)
command was issued, the debugger automatically rereads the symbol
table information. If this happens, the old breakpoint
settings may no longer be valid after the new symbol table
information is read.
The argument_string provides both the argc and argv for the
created process in the same way a shell does.
The debugger breaks up the argument_string into words, and supports several
shell features, including tilde
(~) and environment variable expansion, wildcard
substitution, single quote ('), double quote ("), and single character
quote (\).
The io_redirection argument allows you to change stdin, stdout, and
stderr, which are otherwise inherited from the debugger process:
io_redirection : < filename | > filename | 1> filename | 2> filename | >& filename
The various forms have the same effect as in the csh(1) shell.
Note: Although the grammar currently allows more than the following forms of redirection, you should only use the following forms because the grammar may change in a future release of the debugger.
> filename Redirect stdout
1> filename Redirect stdout
2> filename Redirect stderr
>& filename Redirect stdout and stderr
1> filename 2> filename Redirect stdout and stderr to different files
Examples:
DBX Mode
(idb) stop in main
[#1: stop in int main(void) ]
(idb) run -s > prog.output
[1] stopped at [int main(void):182 0x1200023f8]
182 List<Node> nodeList;
GDB Mode
(idb) break main
Breakpoint 1 at 0x804a0a0: file x_list.cxx, line 182.
(idb) show args
Argument list to give program being debugged when it is started is "".
(idb) run
Starting program: /usr/examples/x_list
Breakpoint 1, main () at x_list.cxx:182
182 List<Node> nodeList;
(idb) continue
Continuing.
The list is:
Node 1 type is integer, value is 1
Node 2 type is compound, value is 12.345
parent type is integer, value is 2
Node 3 type is compound, value is 3.1415
parent type is integer, value is 7
Node 4 type is integer, value is 3
Node 5 type is integer, value is 4
Node 6 type is compound, value is 10.123
parent type is integer, value is 5
Destroying nodes...
All nodes destroyed
Program terminated normally with exit code 0
(idb) set args -s > prog.output
(idb) show args
Argument list to give program being debugged when it is started is " -s > prog.output".
(idb) run
Starting program: /usr/examples/x_list
Breakpoint 1, main () at x_list.cxx:182
182 List<Node> nodeList;
Information: idb allows you to restart the execution of your program
from saved positions. Enter "help snapshot" for details.
6.5 The kill Command
You can kill the current process:
kill_command : kill
Killing a process leaves the debugger running. Any breakpoints previously
set are retained. You can later rurun the program by
the rerun(dbx) or
the run(gdb) commands.
For example:
DBX Mode
(idb) show process
Current Process: localhost:24048 (/usr/examples/x_list) paused.
(idb) kill
Process has exited
(idb) rerun
[1] stopped at [int main(void):182 0x8049f48]
182 List<Node> nodeList;
Information: idb allows you to restart the execution of your program
from saved positions. Enter "help snapshot" for details.
GDB Mode
(idb) info program Using the running image of child process 10952. Program stopped at 0x804a0a0. It stopped at breakpoint 1. (idb) kill Program terminated normally (idb) info program The "info program" command has failed because there is no running program. (idb) run Starting program: /usr/examples/x_list Breakpoint 1, main () at x_list.cxx:182 182 List<Node> nodeList; Information: idb allows you to restart the execution of your program from saved positions. Enter "help snapshot" for details.
6.6 The attach and the detach Commands
If a process already exists, you can have the debugger attach to it:
GDB Mode
attach_command
: attach pid
Note:
The attach command
requires the name of executable to be specified before attaching to the process.
Use the file command or shell
command line to specify the
filename.
The process is specified by its pid:
pid
: expression
For example:
DBX Mode
(idb) attach 12345 a.out
GDB Mode
(idb) file a.out Reading symbols from a.out...done. (idb) attach 12345
The file name must be an executable file that the process is executing, or a copy of it, or an unstripped copy of it. If file name is not specified, the current executable is used.
Attaching to a process both creates the debugger's knowledge of it and
makes it the current process that the debugger is controlling.
When you do this, the process continues execution until it raises a
signal that the debugger intercepts.
Usually you do this by pressing
Ctrl/C or by using the shell
command
kill in another window. Any other mechanism for
raising a signal within the process will also do.
You can set the
debugger variable $stoponattach
to 1 to direct the debugger to immediately stop any process that it attaches to:
(idb) ^C
Interrupt (for process)
Stopping process localhost:16077 (loop.out).
Thread received signal INT
stopped at [int main(void):3 0x120001100]
3 while (1) ;
The opposite of attaching to a process is detaching from a process. When you detach the debugger from a process, all breakpoints are removed and the process continues to run, but the debugger can no longer identify or control it:
GDB Mode
detach_command : detach
The detach command detaches the debugger from a current process
and, therefore, does not require pid.
6.7 Controlling the Process Environment
You can set and unset environment variables for processes created in the future to set up an environment different from the environment of the debugger and from the shell from which the debugger was invoked. When set, the environment variables apply to all new processes you debug.
Note: The environment commands have no effect on the environment of any currently running process. The environment commands do not change or show the environment variables of the debugger or of the current process. They only affect the environment variables that will be used when a new process is created.
environment_variable_command : show_environment_variable_command | set_environment_variable_command | unset_environment_variable_command
To print either all the environment variables that are currently set or a
specific one, use a show_environment_variable_command.
DBX Mode
show_environment_variable_command : printenv [ environment_variable_name ] | export | setenv
GDB Mode
show_environment_variable_command
: show environment [ environment_variable_name ]
| show env [ environment_variable_name ]
The show env is a synonym for the
show environment command.
If you do not specify a name of the environment variable to show, the debugger will print all the environment variables.
To add or change an environment variable, use a set_environment_variable_command.
If the environment_variable_value is not specified, the environment
variable value is set to "".
DBX Mode
set_environment_variable_command : export environment_variable_name = environment_variable_value | setenv environment_variable_name environment_variable_value
GDB Mode
set_environment_variable_command
: set environment environment_variable_name [ [ = ] environment_variable_value ]
| set env environment_variable_name [ [ = ] environment_variable_value ]
environment_variable_value
: string
To remove an environment variable, use the following commands:
DBX Mode
unset_environment_variable_command : unsetenv environment_variable_name | unsetenv *
If an asterisk (*) is specified, all environment variables are removed.
GDB Mode
unset_environment_variable_command
: unset environment environment_variable_name
| unset env environment_variable_name
Note: There is no command to simply return to the initial
state the environment variables had when the debugger started. You must use
set_environment_variable commands and
unset_environment_variable commands
appropriately.
For example:
DBX
(idb) printenv TOOLDIRECTORY Error: Environment variable 'TOOLDIRECTORY' was not found in the environment. (idb) setenv TOOLDIRECTORY /usr/examples/tools (idb) printenv TOOLDIRECTORY TOOLDIRECTORY=/usr/examples/tools
GDB
(idb) show environment TOOLDIRECTORY Environment variable "TOOLDIRECTORY" not defined. (idb) set environment TOOLDIRECTORY /usr/examples/tools (idb) show environment TOOLDIRECTORY TOOLDIRECTORY=/usr/examples/tools (idb) unset environment TOOLDIRECTORY (idb) show environment TOOLDIRECTORY Environment variable "TOOLDIRECTORY" not defined.
6.8 Multiprocess Debugging
The debugger can find and control more than one process at a time. The debugger can find and control a process for one of three reasons:
At any one time, you can control only one of the processes that the debugger controls. The rest are stalled. You must explicitly switch the debugger to the process you want to work with, stalling the one it was controlling:
multiprocess_command : show_process_command | switch_process_command
You can show the processes the debugger controls:
show_process_command : show process [ all ] | process all : all | *
For example:
You can explicitly command the debugger to control a different process:
switch_process_command : process pid | process filename
The process you are switching away from remains stalled until either the debugger exits or until you switch to it and continue it.
The following example creates two processes and switches from one to the other:
Both the
load(dbx)
command and the
attach(dbx)
command switch the debugger to the process on which they operate.
6.9 Processes That Use fork()
The debugger has the following predefined variables that you can set for debugging a program that forks:
-
$catchforks— When set to a non-zero value, this variable instructs the debugger to stop the child process on exit out of thefork()orvfork()calls. The parent process continues to run. The default is 0 (zero). -
$stopparentonfork— When set to a non-zero value, this variable instructs the debugger to stop the parent process on exiting out of thefork()orvfork()calls after it forks a child process. The child process continues to run if$catchforksis 0; otherwise, it does not. The default is 0 (zero). -
$catchforkinfork— When set to a non-zero value, this variable instructs the debugger to stay in the fork routine after the fork and notifies you as soon as the forked process is created; otherwise, you are notified when the call finishes. You can debug forking processes before any "atfork" handlers are run by setting$catchforkinfork. Because the target stops inside the system call, you will need to issueupcommands to get to user-written code. The default is 0 (zero).
When a fork occurs, the debugger sets the debugger variables
$childprocess and
$parentprocess to the child and
parent process IDs, respectively.
In the following example, the debugger notifies you that the child process has stopped. The parent process continues to run.
(idb) set $catchforks = 1
(idb) run
Process 29027 forked. The child process is 29023.
Process 29023 stopped on fork.
stopped at [int main(void):6 0x120001178]
6 int pid = fork();
fork.c: I am the parent.
Process has exited with status 0
(idb) show process
>localhost:29028 (/usr/examples/fork) loaded.
localhost:29023 (/usr/examples/fork) paused.
In the preceding example, note the following:
- The debugger indicates that the child process has stopped, and shows the line number at which it is stopped.
- The last two lines show that the child process has stopped and that the parent process has completed execution.
Continuing the previous example, the following shows how to switch the debugger to the child process. Listing the source code shows the source for the child process.
(idb) process $childprocess
(idb) show process
localhost:29028 (/usr/examples/fork) loaded.
>localhost:29023 (/usr/examples/fork) paused.
(idb) list
7
8 if (pid == 0)
9 {
10 printf("fork.c: I am the child.\n");
11 }
12 else
13 {
14 printf("fork.c: I am the parent.\n");
15 }
16 }
In the preceding example, note the following:
- The first line switches the current process context to the child process.
- The right angle bracket indicates the current process.
-
The
listcommand lists the source code for the current process.
Note: If you catch the child but not the parent, and the parent code tries to execute a wait on the child, the target will get stuck if you don't let the child run to completion. This happens because the parent will be running but making no progress, and the child is stopped by the debugger. For example:
(idb) set $catchforks = 1
(idb) set $stopparentonfork = 0
(idb) list
10 int new_pid = 0;
11
12 if (pid == 0) {
13 printf( "fork.c: I am the child.\n" );
14 fflush( stdout );
15
16 } else {
17 printf( "fork.c: I am the parent, about to wait.\n" );
18 fflush( stdout );
19
20 new_pid = wait( &status );
21
22 printf( "fork.c: I am the parent, and my wait is finished\n" );
23
24 if (new_pid != pid )
25 printf( "\tthere was some error\n" );
26 else {
27 if (WIFEXITED(status))
28 printf( "\tthe child terminated normally\n" );
29
30 else if (WIFSIGNALED(status))
(idb) sh cat ./x.c_fork_hang.txt
If we 'cont' now, the process will fork; the child will be
caught and the parent will run to the 'wait' call and wait
for the child to terminate.
At that time, the child will be under debugger control,
but the current process will be the parent, which will be
running but making no progress. Only a Ctrl/C will allow
further progress.
The example program has set up another process to simulate
a Ctrl/C by the user. It will send SIGINT to the parent.
(idb) cont
Process 580893 forked. The child process is 580851.
Process 580851 stopped on fork.
stopped at [void test(void):9 0x120001318]
9 int pid = fork();
fork.c: I am the parent, about to wait.
:
User is waiting here
:
:
Sending SIGINT to parent process
:
Thread received signal INT
stopped at [<opaque> __wait4(...) 0x3ff800d0918]
Information: An <opaque> type was presented during execution of the previous command. For complete type information on this symbol, recompilation of the program will be necessary. Consult the compiler man pages for details on producing full symbol table information using the '-g' (and '-gall' for cxx) flags.
(idb) where
>0 0x3ff800d0918 in __wait4(...) in /usr/shlib/libc.so
#1 0x3ff800d668c in __wait(...) in /usr/shlib/libc.so
#2 0x120001398 in test() "c_fork_hang.c":20
#3 0x120001528 in main() "c_fork_hang.c":71
#4 0x1200012a8 in __start(...) in /usr/examples/c_fork_hang
(idb) show process
>localhost:580893 (/usr/examples/c_fork_hang) paused.
\_localhost:580851 (/usr/examples/c_fork_hang) paused.
6.10 Processes That Use exec()
Set $catchexecs to 1 to instruct the debugger to stop
the process and
notify you when an exec occurs. The process stops before executing any user
program code or
static initializations. You can debug the newly executed process.
The debugger keeps a history of the progression of
the executed files.
In the following scenario, you set the predefined variables
$catchforks and
$catchexecs to 1. The debugger will notify
you when an execution occurs.
Because $catchforks is set, you will also be tracking the child
process and, therefore, you will be notified of any exec in the child
process.
The following example shows an exec occurring on the current
context and the child process stopped on the run-time loader entry point:
(idb) set $catchforks = 1
(idb) set $catchexecs = 1
(idb) run
Process 14839 forked. The child process is 14835.
Process 14835 stopped on fork.
stopped at [int main(void):8 0x1200011f8]
8 if ((pid = fork()) == 0)
x_exec.c: I am the parent.
Process has exited with status 0
(idb) show process
>localhost:14918 (x_exec) loaded.
localhost:14835 (x_exec) paused.
(idb) process $childprocess
(idb) list 6: 13
6 int pid;
7
> 8 if ((pid = fork()) == 0)
9 {
10 printf("About to exec \n");
11 fflush(stdout); /* Make sure the output gets out! */
12 execlp("announcer", "announcer", NULL);
13 printf("After exec \n");
14 }
15 else
16 {
17 printf("x_exec.c: I am the parent.\n");
18 }
(idb) cont
About to exec
The process 14835 has execed the image "./announcer".
Reading symbolic information ...done
stopped at [ 0x3ff8001bf48]
5 printf("announcer.c: I am here!! \n");
Note the following:
-
Use
process $childprocessto set the current process context to the child process. - Listing the source code, you can see the process is almost ready to execute.
-
The debugger notifies you when the
execoccurs. - The child process is stopped on the run-time loader entry point. The source display shows the code in the main routine.
6.11 Core File Debugging
When the operating system encounters an unrecoverable error, for example, a
segmentation violation (SEGV),
the system creates a file named core and places it in the current directory.
The core file is not an executable file; it is a snapshot of the state of
your process at the time the error occurred. It allows you to analyze the
process at the point it crashed. For more information on core file debugging,
see Core File Debugging in Part III.
Chapter 7 — Locating the Site of a Problem
To determine why a problem is happening, you usually want to execute your program up to or just before the point at which you observe the first evidence of the problem. Then you can examine the internal state of your program and try to identify something that explains the visible problem. Possibly you will see right away how the problem occurs, in which case you are finished debugging. You then correct your program, recompile, relink, and confirm that the correction works as intended.
Often, you will see something about the program state that is wrong but you will not see how it got that way. In that case, you need to make a guess at where the mistake might have occurred. Then, repeat this whole process, trying to stop at or just before the possible trouble point.
For simple problems, it may be easy to describe the
conditions under which you want to stop the program; for example, "the
first time traverse is called" or "when division_by_zero
occurs". Other
situations may require either more complex descriptions or repeated
trial-and-error attempts to discover the critical information needed to solve
your problem.
Breakpoints provide the means by which you specify to the debugger an event or condition under which you want to intervene in the execution of your program and what actions you want the debugger to take when that event is detected.
You can define breakpoints based on:
- Reaching a certain place in your program (such as entering a certain function or reaching code for a particular source line number)
- Accessing the contents of a variable or other memory when it is either read or written
- Raising a specified signal
You can also enable, disable, or delete breakpoints.
Breakpoint commands include the following:
breakpoint_command : breakpoint_definition_command | simple_stop_command | signal_command | obsolete_breakpoint_definition_command | breakpoint_table_command
This chapter discusses the following topics:
7.1 Breakpoint Definitions
The following is a particularly common breakpoint:
DBX Mode
(idb) stop in main [#1: stop in int main(void) ]
GDB Mode
(idb) break main Breakpoint 1 at 0x804a0a0: file x_list.cxx, line 182.
This command tells the debugger that when execution enters the function
main, you want the debugger to suspend execution and return control
to you.
The debugger responds to a breakpoint command by displaying how it
recorded the request internally.
The debugger assigns a number to the breakpoint (in this case, it is 1), which
it uses later to
refer to that breakpoint. The debugger does not just repeat the command as you entered it;
it provides a more complete description of the function main to help you
confirm that it has correctly identified the function you meant.
Later, after you cause the program to execute, if that event occurs, the debugger reports the event and then prompts you for what to do next. For example:
DBX Mode
(idb) run
[1] stopped at [int main(void):182 0x8049f48]
182 List<Node> nodeList;
GDB Mode
(idb) run Starting program: /usr/examples/x_list Breakpoint 1, main () at x_list.cxx:182 182 List<Node> nodeList;
Both the event part and the action part of a breakpoint definition command consist of several subparts:
breakpoint_definition_command : disposition [ quiet ] detector [ thread_filter ] [ logical_filter ] [ breakpoint_actions ]
where the detector,
thread_filter (if specified),
and logical_filter (if
specified) collectively specify the event part, and the
disposition, quiet (if specified) and
breakpoint_actions
(if specified) collectively specify the action part.
Note: Additional obsolete forms of breakpoint definition are retained only for backward compatibility with earlier versions of the debugger. These forms are explained later. The obsolete forms may be eliminated in a future release.
There are three distinct points in time at which a breakpoint definition has an effect:
-
When the command is entered
The command is parsed, names and expressions that occur in any of the event parts are evaluated, and the breakpoint actions are parsed and checked for correctness (but not evaluated).
-
When the debugger initiates program execution
For each breakpoint that is not disabled, appropriate modifications are made to the program to enable detection of the specified event.
-
When a detector triggers during program execution
The thread filter specification (if present) and logical filter (if present) are evaluated to determine whether the breakpoint as a whole has triggered. If not, then execution is resumed (silently). If so, the breakpoint actions are performed, after which execution stops or resumes according to the specified disposition.
7.1.1 Disposition
disposition : stop | when
The stop command specifies that when the event specified by the
breakpoint occurs and all processing for that breakpoint has been completed,
the debugger should prompt for further commands.
The when command specifies that when the event specified by the
breakpoint occurs and all processing for that breakpoint has been completed,
the debugger may resume execution of the program. See the section
When Multiple Breakpoints Trigger at Once
for an explanation of how the debugger determines when to resume execution.
7.1.2 The quiet Specifier
By default, when an event is detected and the debugger determines that the breakpoint actions should be performed, the debugger prints a line that identifies the breakpoint, for example:
(idb) when in main { stop }
[#1: when in int main(void) { stop } ]
(idb) run
[1] when [int main(void):182 0x8049f48]
[1] stopped at [int main(void):182 0x8049f48]
182 List<Node> nodeList;
The optional quiet specifier tells the debugger to omit this
information.
(idb) when quiet in main { stop }
[#11: when quiet in int main(void) { stop } ]
(idb) run
(idb) list $curline: 1
> 182 List<Node> nodeList;
7.1.3 Detectors
The debugger uses several kinds of detectors, each corresponding to a particular kind of event:
DBX Mode
detector : place_detector | watch_detector | signal_detector | unaligned_detector
A place detector specifies a place or location in your program. It can refer to the beginning of a function, a particular line in one of your source files, a specific value of the PC (program counter), or certain sets of these.
A watch detector specifies a variable or other memory locations that should be monitored to detect certain kinds of access (read, write, and so on).
A signal detector specifies a set of signals to be monitored.
An unaligned access detector specifies any kind of memory access using an unaligned access.
This section describes each type of detector.
7.1.3.1 Place Detectors
You can use place detectors to determine when execution reaches a particular place or location in your program:
place_detector : in function_name | in all function_name | pc address_expression | at line_specifier | every proc entry | every procedure entry | every instruction | expression
The in function_name detector
specifies the event where execution reaches the entry of the
named function. For example:
If the function name is ambiguous (more than one function can match the name in some languages, including C++), the debugger prompts you with a list of alternatives from which to choose.
(idb) stop in foo
Select from
----------------------------------------------------
1 int C::foo(double*)
2 void C::foo(float)
3 void C::foo(int)
4 void C::foo(void)
5 None of the above
----------------------------------------------------
2
[#4: stop in void C::foo(float) ]
If you choose the last option ("None of the above"), then no function is selected and no breakpoint is defined.
The in all function_name detector
is the same as in function_name except that it
specifies all of the functions that match the given name, whether one or more:
(idb) stop in all foo [#3: stop in all foo ]
The pc address_expression detector
specifies the event where execution reaches the given machine address:
(idb) stop pc $pc + 8 [#7: stop PC == 0x804a539 ]
The at line_specifier detector
specifies the event where code associated with a particular
line of the source is reached:
(idb) stop at 190 [#8: stop at "x_list.cxx":190 ]
If no code is associated with the given line number, the debugger finds and substitutes the closest higher line number that has associated code.
The every procedure entry detector specifies that a
breakpoint should be
established for every function entry point in the program.
(idb) stop every procedure entry [#9: stop every procedure entry ]
Note: This command can be very time consuming because it searches your entire program — including all shared libraries that it references — and establishes breakpoints for every entry point in every executable image. This can also considerably slow execution of your program as it runs.
A disadvantage of this command is that it establishes breakpoints for hundreds
or even thousands of entry points about which you have little or no information.
For example, if you use stop every proc entry immediately
after loading a program and then run it, the debugger will stop or
trace over 100 entry points before reaching your main entry point.
About the only thing that you can do if execution stops at most such unknown
places is continue until some function relevant to
your debugging is reached.
The every instruction detector specifies a breakpoint for every
instruction in your entire program:
(idb) stop every instruction [#10: stop every instruction ]
When used with the stop
disposition, a subsequent continue behaves essentially the same
as a step by instruction command (see stepi).
When used with the when disposition, subsequent
next and step commands allow you to trace
all of the instructions that are executed as a result of those stepping
commands.
Beware that even when next is used to step over a called
routine, the trace output includes all of the instructions that are executed
within the called routine (and any routines that it calls).
Note: This command will slow execution of your program considerably.
The detector expression (that is, an expression not preceded
by one of the keywords in, at, or
pc) specifies either a function name or line number
depending on how the expression is parsed and evaluated. An expression
that evaluates to the name of a function is handled just like the
equivalent command that uses in in the detector; otherwise,
it is handled like the equivalent command that uses at
in the detector.
7.1.3.2 Watch Detectors
You can use watch detectors to determine when a variable or other memory location is read or written and/or changed. Breakpoints with watch detectors are also known as watchpoints.
watch_detector : basic_watch_detector watch_detector_modifiers basic_watch_detector : variable expression | memory start_address_expression | memory start_address_expression , end_address_expression | memory start_address_expression : byte_count_expression watch_detector_modifiers : [ access_modifier ] [ within_modifier ] access_modifier : write | read | changed | any within_modifier : within function_name
You can specify a variable whose memory is to be watched, or specify the memory directly. The accesses that are considered can be limited to those that write (the default), read, write and actually change the value, or can include all accesses.
If you specify a variable, the memory to be watched includes all of the
memory for that variable, as determined by the variable's type. The following
example watches for write access to variable _nextNode,
which is allocated in the 8 bytes at the address shown in the last line of
the example:
(idb) whatis _nextNode struct Node* Node::_nextNode (idb) print "sizeof(_nextNode) =", sizeof((_nextNode)) sizeof(_nextNode) = 4 (idb) stop variable _nextNode write [#3: stop variable _nextNode write ]
The specified variable is watched. If "p" is a pointer,
watch variable p will watch the content of
the pointer, not the memory pointed to by "p". Use
watch memory *p to watch the memory pointed
to by "p".
If you specify memory directly in terms of its address, the memory to be watched is defined as follows:
-
By default (no last address or size given), then 8 bytes beginning at the given start address:
(idb) when memory &_nextNode : 8 any [#4: when memory &_nextNode : 8 any ]
-
If an end address is given, then all bytes of memory from the start address to and including the end address:
(idb) stop memory &_nextNode, ((long)&_nextNode) + 3 read [#5: stop memory &_nextNode, ((long)&_nextNode) + 3 read ]
This watches the 4 bytes specified on the command line.
-
If you specify a byte count, then the given number of bytes starting at the given start address:
(idb) stop memory &_nextNode : 2 changed [#6: stop memory &_nextNode : 2 changed ]
This watches the 2 bytes specified on the command line for a change in contents.
If you specify the within modifier, then only those
accesses that occur
within the given function (but not any function it calls)
are watched. For example:
(idb) whatis t
int t
(idb) stop variable t write within foo
[#2: stop variable t write within void C::foo(void) ]
(idb) cont
[2] Address 0x804bbfc was accessed at:
void C::foo(void): x_overload.cxx
[line 22, 0x8048af3] foo+0x6: movl $0x0, 0x804bbfc
0x804bbfc: Old value = 0x0000000f
0x804bbfc: New value = 0x00000000
[2] stopped at [void C::foo(void):22 0x8048afd]
22 void C::foo() { t = 0; state++; return; }
7.1.3.3 Signal Detectors
You can use signal detectors to determine when a particular signal is raised:
signal_detector : signal signal_id ,... signal_id : integer_constant | signal_name
You can specify signals by numeric value or by their conventional operating system names, without or without the leading "SIG":
(idb) stop signal SEGV, 3, SIGINT [#2: stop signal SEGV, 3, SIGINT ]
If the debugger catches a signal event, then a subsequent simple
continue will resume execution without
raising the signal again in your process. However, a signal can be specified
as part of the continue command to send the signal to
your process when it resumes.
7.1.3.4 Unaligned Access Detectors
You can use an unaligned access detector to determine when an unaligned memory access occurs:
unaligned_detector : unaligned
Unaligned accesses may be automatically handled by the operating
system. By default, an unaligned access results in an information message
and then is corrected so that your program can continue. (You or your system
administrator can choose a different default. See uac(1) for
more information.) This message looks like this:
Unaligned access pid=30231 <x_signals> va=0x11ffff791 pc=0x120001af4 ra=0x120001b84 inst=0xa0220000
You can request the debugger to detect unaligned accesses:
(idb) stop unaligned access
[#1: stop unaligned access ]
(idb) run
Thread encountered Unaligned Access
[1] stopped at [int unalignedAccess(void):27 0x120001af8]
27 return y;
7.1.4 Thread Filter
A thread filter determines whether a detected event should be further considered for breakpoint processing.
thread_filter : thread thread_id ,...
The thread_id expressions are evaluated at the time the breakpoint command
is entered, and each must yield an integer value.
A detected event is retained for further consideration only if the thread in which the event occurs matches one of the given threads. If not, the detection is quietly ignored.
If the thread_filter does not indicate a match, then any
related logical filter is not evaluated.
7.1.5 Logical Filter
A logical filter determines whether a detected event should be further considered for breakpoint processing:
logical_filter : if expression
A detected event is retained for further consideration only if
the given expression evaluates to true. If not, the
detection is quietly ignored.
The expression is checked syntactically in the context of the place where the breakpoint command is given: it must be syntactically valid according to the language rules that apply there. However, the expression is not evaluated and names that occur in the expression need not be visible. After the syntax check, the expression is remembered in an internal form and is not rechecked later when it is evaluated.
If an error occurs when the expression is evaluated, for example, because
a name in the expression is not defined, then the error is reported and
the value of the expression is assumed to be true.
An error in the expression does not change the disposition. If continuation was specified, then that is still what occurs. For example:
(idb) when in List<Node>::append if x
[#5: when in void List<Node>::append(struct Node* const) if x ]
(idb) cont
Symbol "x" is not defined.
[Error while evaluating breakpoint condition - taken as true]
[5] when [void List<Node>::append(struct Node* const):148 0x8058026]
Symbol "x" is not defined.
[Error while evaluating breakpoint condition - taken as true]
[5] when [void List<Node>::append(struct Node* const):148 0x8058026]
[4] stopped at [int main(void):195 0x804a1ad]
195 nodeList.append(new IntNode(3));
It is valid for a logical filter expression to contain a call to another
routine in your program. Such a call is evaluated in the same way as if
it occurred in a call or print command.
However,
execution of the called routine might result in triggering a breakpoint;
this is called a recursive breakpoint.
7.1.6 Breakpoint Actions
The action part of a breakpoint command specifies actions to be performed when the event part has triggered (including passing any thread and/or logical filters):
breakpoint_actions : { action_list } action_list : command | command ; | command ;...
7.1.6.1 Special Commands
The following debugger commands behave differently in some fashion when used within a breakpoint action list:
-
Simple stop
A
simple_stop_commandis a stop without any detector or other parameters:simple_stop_command : stop
If used within a breakpoint action list, it specifies that the disposition for the breakpoint should be to stop after completion of action list processing, even if the breakpoint was specified with the
whendisposition. If used outside an action list, it has no effect.A simple stop command does not terminate action list processing; it only affects the disposition that applies later. For example:
(idb) when in List<Node>::print { stop ; print "*** stopped ***"} [#6: when in void List<Node>::print(void) { stop ; print "*** stopped ***"} ] (idb) cont [6] when [void List<Node>::print(void):162 0x80580ae] *** stopped *** [6] stopped at [void List<Node>::print(void):162 0x80580ae] 162 Node* currentNode = _firstNode; -
History
The
historycommand does not display commands that are performed as part of the action list of a breakpoint.
7.1.6.2 Commands to Use with Caution
You must be very careful when using some commands in breakpoint action lists. The following commands cause the debugger to resume execution of your program in the midst of action list processing:
-
call -
continue -
goto -
next -
return -
step - Any command that contains an expression whose evaluation involves calling a function in your program
It is easy in such cases to lose track of just what state breakpoint processing is really in or where you really are in your program. Such confusion may mislead or misdirect your debugging effort. For further discussion, see the section on Recursive breakpoints.
7.1.6.3 Commands to Avoid
You should avoid altogether some commands in breakpoint action lists. The following are commands that directly or indirectly change the process that the debugger is controlling:
-
attachanddetach -
runandrerun -
processwith an argument
The debugger does not explicitly prohibit these commands, but their behavior within action lists is implementation-defined and subject to change from release to release. In very specialized cases, you may be able to obtain useful results by using them in action lists, but do not expect the same behavior over the long term.
7.1.7 When Multiple Breakpoints Trigger at Once
It is possible for multiple breakpoints to specify the same event, or possibly overlapping events. Thus, more that one breakpoint detector may trigger at the same time.
When more than one breakpoint detector triggers, the thread filters and logical filters of all the breakpoints involved are processed before the action part of any breakpoint is performed.
After the set of breakpoints that trigger is determined, the action parts of each of them are performed in an undefined order.
After all action parts are performed, execution of the program is resumed only if all of the breakpoints so specify in their disposition. If any one of them specifies a break, the debugger prompts you for further commands.
7.1.8 Recursive Breakpoints
The following commands cause the debugger to resume execution of your program while in the midst of action list processing:
-
call -
continue -
goto -
next -
return -
step - Any command that contains an expression whose evaluation involves calling a function in your program
In all of these cases, the debugger temporarily suspends processing of the
current breakpoint to start your program executing again and then waits
for that execution to complete. As long as no new breakpoint is triggered
during that execution, all will be fine. However, if a new breakpoint
triggers, in particular one with the stop disposition,
then you may be prompted for new command input for the recursive
breakpoint even before the initial breakpoint has completed. Further,
continuing execution may ultimately allow the original breakpoint to
complete, at which time its disposition will come into play.
It is easy in such cases to lose track
of just what state breakpoint processing is really in or where you
really are in your program. Such confusion may mislead or misdirect your
debugging effort. See the
call command
example, which locates
suspended execution in nested function calls.
7.1.9 Breakpoints and C++
This section describes how to use breakpoints when debugging C++ programs.
7.1.9.1 Member Functions
Setting breakpoints in C++ member functions is illustrated using the following program:
(idb) list 3: 25
3 class C {
4 public:
5 void foo();
6 void foo(int);
7 void foo(float);
8 int foo(double *);
9 };
10
11 C o;
12 C* p = new C;
13 int t = 0;
14 int state = 1;
15
16 main(){
17 t++;
18 o.foo();
19
20 }
21
22 void C::foo() { t = 0; state++; return; }
23 void C::foo(int i) { state++; return; }
24 void C::foo(float f) { state++; return; }
25 int C::foo(double *) { return state;}
You must name member functions in a way that makes them visible at the current position, according to the normal C++ visibility rules. For example:
(idb) stop in main
[#1: stop in int main(void) ]
(idb) run
[1] stopped at [int main(void):17 0x8048ad3]
17 t++;
(idb) stop in foo
Symbol "foo" is not defined.
foo has no valid breakpoint address
Warning: Breakpoint not set
If not positioned within a member function of a class, it is generally necessary to name the desired member function using type qualification, an object of the class type, or a pointer to an object of the class type. For example:
(idb) stop in C::foo
Select from
----------------------------------------------------
1 int C::foo(double*)
2 void C::foo(float)
3 void C::foo(int)
4 void C::foo(void)
5 None of the above
----------------------------------------------------
3
[#5: stop in void C::foo(int) ]
(idb) stop in o.foo
Select from
----------------------------------------------------
1 int C::foo(double*)
2 void C::foo(float)
3 void C::foo(int)
4 void C::foo(void)
5 None of the above
----------------------------------------------------
1
[#6: stop in int C::foo(double*) ]
(idb) stop in p->foo
Select from
----------------------------------------------------
1 int C::foo(double*)
2 void C::foo(float)
3 void C::foo(int)
4 void C::foo(void)
5 None of the above
----------------------------------------------------
4
[#7: stop in void C::foo(void) ]
You can avoid the ambiguity associated with an overloaded function by specifying a complete signature for the function name. For example:
(idb) stop in C::foo(void) [#8: stop in void C::foo(void) ] (idb) stop in C::foo(int) [#9: stop in void C::foo(int) ]
7.1.9.2 Templates and Instantiations
The debugger has no knowledge of templates that may occur in your program. However, you can usually debug template instantiations the same way as the equivalent non-instantiated class or function.
Debugging of template instantiations is illustrated using the following source text:
(idb) list 144: 13
144 template <class NODETYPE>
145 void List<NODETYPE>::append(NODETYPE* const node)
146 {
147
148 if (!_firstNode)
149 _firstNode = node;
150 else {
151 Node* currentNode = _firstNode;
152 while (currentNode->getNextNode())
153 currentNode = currentNode->getNextNode();
154 currentNode->setNextNode(node);
155 }
156 }
Normal debugging commands then apply to the instantiation (not the template as such):
(idb) whatis List<Node>::append
void List<Node>::append(class Node* const)
(idb) stop in List<Node>::append
[#1: stop in void List<Node>::append(class Node* const) ]
(idb) run
[1] stopped at [void List<Node>::append(class Node* const):148 0x120001d9c]
148 if (!_firstNode)
(idb) where 2
>0 0x120001d9c in ((List<Node>*)0x11fffee68)->List<Node>::append(node=0x140002c00) "x_list.cxx":148
#1 0x1200024a4 in main() "x_list.cxx":187
7.1.9.3 Exception Handlers
When working with exception handlers, you can set a breakpoint at the appropriate line to determine if an exception is thrown. In addition, you can set breakpoints in these functions that are part of the C++ library support for exceptions:
-
terminate - Gains control when any unhandled exception occurs, which will result in program termination.
-
unexpected - Gains control when a function containing an exception specification tries to throw an exception that is not included in that specification.
These special library functions are illustrated using the following source:
(idb) list 30: 29
30 // Throw an exception. The "throw(int)" syntax tells the compiler that
31 // only integer exceptions can escape this method. This will result in
32 // an unexpected exception from C++.
33 //
34 void throwAnException() throw(int)
35 {
36 throw "Bug";
37 }
38
39 // Provide some depth to the stack, for demonstration purposes
40 //
41 void someOperation()
42 {
43 int z = unalignedAccess(); // Some tests ignore this exception
44 throwAnException();
45 }
46
47 main()
48 {
49 try {
50 someOperation();
51 }
52 catch(char* str) {
53 cout << "Caught exception [" << str << "]" << endl;
54 }
55 catch(...) {
56 cout << "Caught something" << endl;
57 }
58 }
You can trace the flow of execution, as in the following:
(idb) stop at 52 [#1: stop at "x_signals.cxx":52 ] (idb) stop in all terminate [#2: stop in all terminate ] (idb) stop in all unexpected [#3: stop in all unexpected ] (idb) run [3] stopped at [<opaque> unexpected(void) 0x3ff802a064c] Information: An <opaque> type was presented during execution of the previous command. For complete type information on this symbol, recompilation of the program will be necessary. Consult the compiler man pages for details on producing full symbol table information using the '-g' (and '-gall' for cxx) flags. (idb) where >0 0x3ff802a064c in unexpected(...) in /usr/lib/cmplrs/cxx/libcxx.so #1 0x120001b38 in throwAnException() "x_signals.cxx":36 #2 0x120001b88 in someOperation() "x_signals.cxx":44 #3 0x120001bc4 in main() "x_signals.cxx":50 #4 0x1200019c8 in __start(...) in /usr/examples/x_signals (idb) cont [3] stopped at [<opaque> unexpected(...) 0x3ff80287704] (idb) where >0 0x3ff80287704 in unexpected(...) in /usr/lib/cmplrs/cxx/libcxx.so #1 0x3ff802a064c in unexpected(...) in /usr/lib/cmplrs/cxx/libcxx.so #2 0x120001b38 in throwAnException() "x_signals.cxx":36 #3 0x120001b88 in someOperation() "x_signals.cxx":44 #4 0x120001bc4 in main() "x_signals.cxx":50 #5 0x1200019c8 in __start(...) in /usr/examples/x_signals (idb) cont [2] stopped at [<opaque> terminate(...) 0x3ff802875cc] (idb) where >0 0x3ff802875cc in terminate(...) in /usr/lib/cmplrs/cxx/libcxx.so #1 0x3ff80287750 in unexpected(...) in /usr/lib/cmplrs/cxx/libcxx.so #2 0x3ff802a064c in unexpected(...) in /usr/lib/cmplrs/cxx/libcxx.so #3 0x120001b38 in throwAnException() "x_signals.cxx":36 #4 0x120001b88 in someOperation() "x_signals.cxx":44 #5 0x120001bc4 in main() "x_signals.cxx":50 #6 0x1200019c8 in __start(...) in /usr/examples/x_signals (idb) cont Thread received signal ABRT stopped at [<opaque> __kill(...) 0x3ff800e1578]
7.1.10 Special Signal Breakpoints
Signals are operating-system-defined events that can be handled by the debugger.
7.1.10.1 The catch and ignore Commands
You can use two special breakpoint commands, catch and
ignore, to handle signal events:
signal_command : catch_command | ignore_command catch_command : catch [ signal_id ] ignore_command : ignore [ signal_id ]
A catch command with an operand specifies that the debugger should
catch and handle the given signal. You can specify the signal by integer
number or by standard signal name, with or without the leading "SIG". The
catch command is equivalent to the breakpoint command:
(idb) catch BUS
or
(idb) stop signal SIGBUS [#1: stop signal SIGBUS ]
with these exceptions:
-
No entry is made in the breakpoint table for a
catchcommand. - A catch for a signal that is already being caught does not create an additional breakpoint for that signal.
An ignore command with an operand specifies that the given signal
should
not be caught or handled by the debugger; rather, such a signal is passed to your
program. The ignore command is equivalent to deleting the
breakpoint created by a catch command for that
signal.:
(idb) ignore BUS
A catch command without an operand lists all signals that are currently
being handled. Similarly, an ignore command without an operand lists the
signals that are currently being ignored. Together, the two lists show
all signals known to the debugger.
You can issue these commands immediately after the debugger starts to show which signals are caught and which are ignored by default:
(idb) catch INT, QUIT, ILL, TRAP, ABRT, FPE, BUS, SEGV, SIGSYS, PIPE, TERM, URG, STOP, TTIN, TTOU, XCPU, XFSZ, PROF, USR1, USR2, VTALRM, RTMIN, RTMIN1, RTMIN2, RTMIN3, RTMIN4, RTMIN5, RTMIN6, RTMIN7, RTMAX, RTMAX7, RTMAX6, RTMAX5, RTMAX4, RTMAX3, RTMAX2, RTMAX1 (idb) ignore HUP, KILL, ALRM, TSTP, CONT, CLD, WINCH, POLL
7.1.10.2 Unaligned Accesses
You can request the debugger to catch unaligned accesses:
(idb) catch unaligned
This command is very much like the stop unaligned
command:
Although this looks like a normal catch command, it
differs in several respects:
-
unalignedis not the name of a signal. - There is no corresponding signal number.
-
unalignedis never listed by either thecatchorignorecommands without an argument.
Like other catch commands, the following rules apply:
-
No entry is made in the breakpoint table for a
catchcommand. - Repeating the command does not create an additional breakpoint.
Note: You cannot specify unaligned in a signal
detector of a normal breakpoint definition.
You can request the debugger to ignore unaligned accesses when
catch unaligned is in effect (the default) by using the following
command:
(idb) ignore unaligned
However, if a breakpoint was defined using an unaligned access detector, then it must be disabled using a disable or delete breakpoint command.
7.1.10.3 Unaligned Accesses (Linux Only)
Unaligned accesses are automatically handled and quietly corrected on Linux. The debugger cannot catch these events.
7.1.10.4 Ctrl/C
If your program seems to be caught in a loop, you can press Ctrl/C.
The debugger interprets this as a command to send a signal interrupt (SIGINT)
to your program. Because the debugger itself catches signal SIGINT by
default, this interrupts your program and returns control to the debugger
prompt.
If you give the command ignore SIGINT, then it is no longer
possible to regain control of your program using Ctrl/C. In that case,
signal
SIGINT is delivered directly to your program. Unless your program
has explicitly arranged otherwise, SIGINT will result in program
termination.
7.1.11 Breakpoint Interactions with exec(), fork(), dlopen() and dlclose() System Calls
A process starts with a copy of its parent's memory as the result of a
fork() system call; after running for a while within that
memory, the process will often make an exec() system call to
start a new executable file within that process.
The debugger keeps track of the exec() calls that occur so that it can
keep track of various properties associated with each executable file. In
particular, the breakpoint table is one of those properties. Thus, if you
run or rerun your program, the same breakpoints
can be re-established, even though a new process is initiated. Similarly,
if you work with more than one process, each process has a distinct breakpoint
table associated with it.
When a dlopen() system call occurs, the debugger reprocesses the current
breakpoint table and automatically sets up the means to detect any events
that apply to the newly loaded image.
When a dlclose() system call occurs, the debugger also reprocesses the
breakpoint and de-activates any events that apply to the unloaded image.
7.1.12 Obsolete Breakpoint Commands (DBX Mode only)
The following forms of breakpoint commands are obsolete, but are still supported for backward compatibilty with earlier versions of the debugger:
obsolete_breakpoint_definition_command : obsolete_watch_breakpoint_definition_command | obsolete_trace_breakpoint_definition_command | obsolete_stopi_breakpoint_definition_command | obsolete_wheni_breakpoint_definition_command | obsolete_tracei_breakpoint_definition_command
7.1.12.1 Obsolete Watchpoint Definition
An obsolete watchpoint definition is similar to a stop variable
or stop memory breakpoint:
obsolete_watch_breakpoint_definition_command : watch obsolete_watch_detector [ obsolete_watch_modifiers ] [ breakpoint_actions ] obsolete_watch_detector : variable variable_name | [ memory ] start_address_expression | [ memory ] start_address_expression , end_address_expression | [ memory ] start_address_expression : byte_count_expression obsolete_watch_modifiers : [ access_modifier ] [ thread_filter ] [ within_modifier ] [ logical_filter ]
An obsolete watchpoint and a stop command differ in the following
respects:
-
The obsolete watchpoint command begins with
watchinstead ofstop. -
The keyword
memoryis optional; if omitted, it is assumed. - The order of filters and modifiers is different.
These differences are purely syntactic; the semantics are the same.
(idb) watch variable _firstNode write
[#3: watch variable _firstNode write ]
(idb) cont
[3] Address 0xbffff0fc was accessed at:
void List<Node>::append(struct Node* const): x_list.cxx
[line 149, 0x8058035] append(struct Node* const)+0x15: movl %edx, (%eax)
0xbffff0fc: Old value = 0x00000000
0xbffff0fc: New value = 0x080b0f40
[3] stopped at [void List<Node>::append(struct Node* const):149 0x8058037]
149 _firstNode = node;
7.1.12.2 Obsolete Tracepoint Definition
An obsolete tracepoint definition is similar to a when in
or when at breakpoint, possibly combined with watching
for a change of a variable's value:
obsolete_trace_breakpoint_definition_command : trace [ variable_name ] [ thread_filter ] [ where_modifier ] [ logical_filter ] [ breakpoint_actions ] | trace function_name [ logical_filter ] [ breakpoint_actions ] | trace line_specifier [ logical_filter ] [ breakpoint_actions ] where_modifier : in function_name | at line_specifier line_specifier : quoted_filename:line_number | line_number quoted_filename : "filename" | 'filename'
Following are the differences between an obsolete tracepoint and a when
command:
-
The obsolete tracepoint command begins with
traceinstead ofwhen. -
If you specify a variable name, a trace identification line is displayed only when the value of the variable changes (and the logical filter evaluates to
true).The debugger implementation of
tracefor detecting variable changes tends to be slow — at each place where control might be stopped, as specified by the where modifier and filters, the value of the variable is compared to the value remembered at the time execution began. -
The order of filters and modifiers is different.
For example:
(idb) trace in List<Node>::print
[#7: trace in void List<Node>::print(void) ]
(idb) trace i in List<Node>::print
[#8: trace i in void List<Node>::print(void) ]
(idb) trace List<Node>::print if i { print "Test 1"}
[#9: trace in void List<Node>::print(void) if i { print "Test 1"} ]
If the trace command is given with no arguments, the debugger
prints a trace identification line when each function in your program is
entered. For example:
(idb) trace
[#10: trace ]
(idb) status
#10 at procedure entry { trace-proc }
This is equivalent to the when every proc entry command
(with equivalent performance degradation).
7.1.12.3 Instruction-Related Breakpoint Commands
The following commands control obsolete instruction-related breakpoints:
obsolete_stopi_breakpoint_definition_command : stopi [ expression ] [ thread_filter ] [ match_address ] [ logical_filter ] obsolete_tracei_breakpoint_definition_command : tracei [ expression ] [ thread_filter ] [ match_address ] [ logical_filter ] obsolete_wheni_breakpoint_definition_command : wheni [ expression ] [ thread_filter ] [ match_address ] [ logical_filter ] breakpoint_actions match_address : at address_expression
The stopi, tracei, and wheni
forms of breakpoint definition are similar to the corresponding
stop,
trace,
and when forms,
with the following differences:
-
They have a different initial keyword.
-
If you specify a variable name, then breakpoint triggers only when the value of the variable changes (and the logical and thread filters are true).
The debugger implementation of
traceifor detecting variable changes tends to be slow: at each place where control might be stopped, as specified by thewheremodifier and filters, the value of the variable is compared to the value remembered at the time execution began.Most important, the variable change and filter tests are performed after every instruction is executed, making these definitions especially demanding on program performance.
-
The order of filters and modifiers is different.
-
The
atkeyword is followed by an address in these commands, instead of a line number.
7.2 Breakpoint Tables
As breakpoints are defined, they are recorded in a breakpoint table associated with the current program. You can display and modify this table in certain limited ways.
breakpoint_table_command : show_all_breakpoints_command | delete_breakpoint_command | enable_breakpoint_command | disable_breakpoint_command
Each entry in the breakpoint table has the following properties:
- A unique breakpoint number that is used to identify and refer to that breakpoint.
- An event description that characterizes the circumstances under which the breakpoint triggers.
- Actions (a possibly empty list of debugger commands) to be performed when the breakpoint triggers.
- A final disposition: either continue or break (stop).
- Enabled and disabled states.
In addition to the main effects of a breakpoint definition, as discussed
in Breakpoint Definitions, a breakpoint
definition also sets the debugger variable
$lasteventmade to the breakpoint number of the breakpoint just
defined. This value can be recalled for later use if desired. For example:
(idb) stop in List<Node>::append
[#2: stop in void List<Node>::append(struct Node* const) ]
(idb) cont
[2] stopped at [void List<Node>::append(struct Node* const):148 0x8058026]
148 if (!_firstNode)
(idb) print $lasteventmade
2
(idb) set $my_break = $lasteventmade
(idb) print $my_break
2
If an error occurs in a breakpoint command, the variable
$lasteventmade is not changed.
7.2.1 Showing Breakpoint Status
Use the following commands to display the current breakpoint table:
DBX Mode
show_all_breakpoints_command : status
GDB Mode
show_all_breakpoints_command
: info breakpoints [ expression ]
| info watchpoints [ expression ]
| info break [ expression ]
| info b [ expression ]
| i breakpoints [ expression ]
| i watchpoints [ expression ]
| i break [ expression ]
| i b [ expression ]
All these commands are synonyms.
Specify breakpoint number to print information about particular breakpoint. If you do not specify an argument, the debugger prints information about all breakpoints.
Each entry in the current breakpoint table is displayed showing all of its properties. For example:
DBX Mode
(idb) status
#1 PC==0x8049f48 in int main(void) "x_list.cxx":182 { stop }
#2 PC==0x8058026 in void List<Node>::append(struct Node* const) "x_list.cxx":148 { break }
#3 Access memory (write) 0xbffff0fc to 0xbffff0ff { stop }
GDB Mode
(idb) info breakpoints Num Type Disp Enb Address What 1 breakpoint keep y 0x804a0a0 in main at x_list.cxx:182 2 breakpoint keep y 0x804aa4a in List<Node>::append(class List<Node> * const, class Node * const) at x_list.cxx:148 3 breakpoint keep y Access memory (changed) 0xbfffec9c to 0xbfffec9f
When an entry in the current breakpoint table references a shared object that is not currently mapped, it's contribution to the What column indicates Not Currently Mapped.
When large or complex values are passed by value to the routine in the status line,
the output can be voluminous. You can set the control variable
$statusargs to 0
to suppress the output of argument type information in the status line.
7.2.2 Enabling, Disabling, and Deleting Breakpoints
When a breakpoint is defined, it is enabled by default. When the debugger starts or resumes process execution, it first adapts the process so that it can detect when the given events occur. A breakpoint can be disabled so it is not involved in determining when the process should next stop. A breakpoint that is no longer required can be deleted entirely.
DBX Mode
disable_breakpoint_command : disable all | disable breakpoint_number_expression ,... enable_breakpoint_command : enable all | enable breakpoint_number_expression ,... delete_breakpoint_command : delete all | delete breakpoint_number_expression ,...
GDB Mode
disable_breakpoint_command
: disable [ breakpoints ] [ bpnums ]
| dis [ breakpoints ] [ bpnums ]
enable_breakpoint_command
: enable [ breakpoints ] [ bpnums ]
delete_breakpoint_command
: delete [ breakpoints ] [ bpnums ]
| d [ breakpoints ] [ bpnums ]
bpnums
: bpnum ...
bpnum
: integer
You can specify one or more breakpoint numbers to disable, enable or delete. If you do not specify any arguments, the debugger disables, enables or deletes all the breakpoints.
For example:
DBX Mode
(idb) disable 1
(idb) status
#1 PC==0x8049f48 in int main(void) "x_list.cxx":182 { stop } Disabled
#2 PC==0x8058026 in void List<Node>::append(struct Node* const) "x_list.cxx":148 { break }
#3 Access memory (write) 0xbffff0fc to 0xbffff0ff { stop }
(idb) disable 10 - 8,1 + 1 + 1
(idb) status
#1 PC==0x8049f48 in int main(void) "x_list.cxx":182 { stop } Disabled
#2 PC==0x8058026 in void List<Node>::append(struct Node* const) "x_list.cxx":148 { break } Disabled
#3 Access memory (write) 0xbffff0fc to 0xbffff0ff { stop } Disabled
(idb) delete 1
(idb) status
#2 PC==0x8058026 in void List<Node>::append(struct Node* const) "x_list.cxx":148 { break } Disabled
#3 Access memory (write) 0xbffff0fc to 0xbffff0ff { stop } Disabled
(idb) enable all
(idb) status
#2 PC==0x8058026 in void List<Node>::append(struct Node* const) "x_list.cxx":148 { break }
#3 Access memory (write) 0xbffff0fc to 0xbffff0ff { stop }
GDB Mode
(idb) disable 1 (idb) info breakpoints Num Type Disp Enb Address What 1 breakpoint keep n 0x804a0a0 in main at x_list.cxx:182 2 breakpoint keep y 0x804aa4a in List<Node>::append(class List<Node> * const, class Node * const) at x_list.cxx:148 3 breakpoint keep y Access memory (changed) 0xbfffec9c to 0xbfffec9f (idb) disable 2-3 (idb) info breakpoints Num Type Disp Enb Address What 1 breakpoint keep n 0x804a0a0 in main at x_list.cxx:182 2 breakpoint keep n 0x804aa4a in List<Node>::append(class List<Node> * const, class Node * const) at x_list.cxx:148 3 breakpoint keep n Access memory (changed) 0xbfffec9c to 0xbfffec9f (idb) delete 1 (idb) info breakpoints Num Type Disp Enb Address What 2 breakpoint keep n 0x804aa4a in List<Node>::append(class List<Node> * const, class Node * const) at x_list.cxx:148 3 breakpoint keep n Access memory (changed) 0xbfffec9c to 0xbfffec9f (idb) enable (idb) info breakpoints Num Type Disp Enb Address What 2 breakpoint keep y 0x804aa4a in List<Node>::append(class List<Node> * const, class Node * const) at x_list.cxx:148 3 breakpoint keep y Access memory (changed) 0xbfffec9c to 0xbfffec9f
Chapter 8 — Looking Around at the Code, the Data, and Other Process Information
This chapter describes how to look at the following components of a running process:
- The source files
- The threads, their mutexes, and their condition variables
- The call stack of one or more threads
- The data
- The generated code
- The shared libraries that are loaded
8.1 Looking at the Source Files
The debugger supports commands to perform the following operations with source files:
- Determine the location of the source files
- Select a particular file as the current file
- List portions of the current file
- Search through the current file for target strings
browse_source_command : source_directory_mapping_command | source_searchlist_command | select_source_file_command | list_source_file_command | search_source_file_command
Special debugging information that the compiler puts in the .o
files
correlates the machine instructions and data back to the source files and the
positions they came from.
Source files are compiled and linked into executable files. During debugging, the debugger tries to find these source files to display them for you. If the source files have moved, or if the paths to them are relative, the debugger may not be able to locate them. All the information the debugger needs comes from the executable files or shared libraries, not from the source files.
8.1.1 How the Debugger Finds Source Files
The debugger searches for a source file
(dir_name/base_name) using the following algorithm:
-
If
dir_nameis mapped to another source directory (mapped_dir_name), look formapped_dir_name/base_name. -
If Step 1 fails to find a readable file:
Case 1: Ifdir_nameis absolute, look fordir_name/base_name.
Case 2: Ifdir_nameis relative, for each entryuse_dirinuse_list, look foruse_dir/dir_name/base_name. Note that theuse_listentries are tried in the order they appear in theuse_list. -
If Step 2 fails, for each entry
use_dirinuse_list, look foruse_dir/base_name. Just as in Step 2, theuse_listentries are tried in the order they appear in theuse_list. - If Step 3 fails, the debugger cannot find any source file.
The debugger uses the first-found readable file as the source file.
The debugger has source directory mapping commands that:
- Inform you in which directories the debugger is looking for the source files.
- Allow you to designate directories in which the debugger will look for the source files.
The following example shows how to use source directory mapping.
Suppose you compile x_solarSystem as follows:
% pwd /usr/users/debugger/sandbox/test/src/common/Examples % ls -R bin/ src/ ./bin: x_solarSystem* ./src: solarSystemSrc/ ./src/solarSystemSrc: base_class_includes/ main/ star.cxx derived_class_includes/ orbit.cxx heavenlyBody.cxx planet.cxx ./src/solarSystemSrc/base_class_includes: heavenlyBody.h orbit.h ./src/solarSystemSrc/derived_class_includes: planet.h star.h ./src/solarSystemSrc/main: solarSystem.cxx % cd src % cc -g -o ../bin/x_solarSystem \ -IsolarSystemSrc/base_class_includes \ -IsolarSystemSrc/derived_class_includes \ main/solarSystem.cxx heavenlyBody.cxx orbit.cxx planet.cxx star.cxx
Then you move the directory solarSystemSrc elsewhere:
% mv solarSystemSrc movedSolarSystemSrc
Now debug x_solarSystem in
/usr/users/debugger/sandbox/test/src/common/Examples/bin:
DBX Mode
(idb) list $curline - 10: 20
Source file not found or not readable, tried...
./solarSystemSrc/main/solarSystem.cxx
../src/solarSystemSrc/main/solarSystem.cxx
/usr/examples/solarSystemSrc/main/solarSystem.cxx
./solarSystem.cxx
../src/solarSystem.cxx
/usr/examples/solarSystem.cxx
The debugger cannot find the file because it has been moved to another directory.
The following command displays a summary of the source directories
in a.out. The
ellipsis (...) here means that solarSystemSrc contains one or more source
directories.
DBX Mode
(idb) show source directory
.
solarSystemSrc
...
Information: You can further expand a '...' using the command
show source directory <directory>
or
show all source directory <directory>
where <directory> is the directory on the line above the '...'.
The first command displays only the children of <directory>, whereas
the second command displays all the descendants of <directory>.
The following command directs the debugger to look for source files originally
in
solarSystemSrc in movedSolarSystemSrc instead. This
time, the debugger finds the source file.
DBX Mode
(idb) map source directory solarSystemSrc ../src/movedSolarSystemSrc
(idb) list $curline - 10: 20
104
105 // Insert the new entry appropriately
106 //
107 if (iAmBiggerThan < biggestCount) {
108 biggestMoons[iAmBiggerThan] = moon;
109 }
110 }
111
112 int main()
113 {
> 114 unsigned int j = 1; // for scoping examples
115 for (unsigned int i = 0; i < biggestCount; i++)
116 biggestMoons[i] = NULL;
117
118 Star *sun = new Star("Sol", G, 2);
119 buildOurSolarSystem(sun);
120 sun->printBodyAndItsSatellites(j);
121 printBiggestMoons();
122
123 return 0;
The following command gives a complete list of source directories. As you can
see, solarSystemSrc is mapped to movedSolarSystemSrc.
As a side effect of mapping
solarSystemSrc to movedSolarSystemSrc,
the subdirectories in solarSystemSrc are
mapped to their counterparts under movedSolarSystemSrc.
DBX Mode
(idb) show all source directory . solarSystemSrc *=> ../src/movedSolarSystemSrc solarSystemSrc/base_class_includes => ../src/movedSolarSystemSrc/base_class_includes solarSystemSrc/derived_class_includes => ../src/movedSolarSystemSrc/derived_class_includes solarSystemSrc/main => ../src/movedSolarSystemSrc/main
To summarize, the debugger provides the following four commands for checking and setting source directory mappings:
DBX Mode
source_directory_mapping_command : show source directory [ directory_name ] | show all source directory [ directory_name ] | map source directory from_directory_name to_directory_name | unmap source directory from_directory_name
Use the show source directory(dbx)
command to display the directory mapping
information of directory_name and its child directories (or immediate
subdirectory). If directory_name is not specified, the mapping
information of all the source directories whose parent is not a source
directory is displayed.
The show all source directory(dbx)
command is identical to the
show source directory(dbx)
command except that the mapping information of all the descendants of
directory_name is displayed:
DBX Mode
(idb) show source directory . solarSystemSrc *=> ../src/movedSolarSystemSrc ... (idb) show all source directory . solarSystemSrc *=> ../src/movedSolarSystemSrc solarSystemSrc/base_class_includes => ../src/movedSolarSystemSrc/base_class_includes solarSystemSrc/derived_class_includes => ../src/movedSolarSystemSrc/derived_class_includes solarSystemSrc/main => ../src/movedSolarSystemSrc/main
When you further expand ellipsis points (...) where directory is the
directory on the line above the ellipsis points:
-
The
show source directory(dbx) command displays only the children ofdirectory_name. -
The
show all source directory(dbx) command displays all the descendants ofdirectory_name.
Use the map source directory(dbx)
command to tell the debugger that the source files in the directory
from_directory_name can now be found in
to_directory_name.
The unmap source directory(dbx)
command maps from_directory_name back to itself;
in other words, if from_directory_name has been mapped to some other directory,
this command will restore its default mapping. For example:
DBX Mode
(idb) show source directory . solarSystemSrc *=> ../src/movedSolarSystemSrc ... (idb) show source directory solarSystemSrc solarSystemSrc *=> ../src/movedSolarSystemSrc solarSystemSrc/base_class_includes => ../src/movedSolarSystemSrc/base_class_includes solarSystemSrc/derived_class_includes => ../src/movedSolarSystemSrc/derived_class_includes solarSystemSrc/main => ../src/movedSolarSystemSrc/main
(idb) unmap source directory solarSystemSrc (idb) show source directory solarSystemSrc solarSystemSrc solarSystemSrc/base_class_includes solarSystemSrc/derived_class_includes solarSystemSrc/main
Note: The symbol *=> means that you are
setting the mapping explicitly using the
map source directory(dbx)
command, whereas => means that the mapping is derived from
an existing explicit mapping.
By default, the use_list is: (1) the current directory and
(2) the directory containing the executable file. (dbx)
Each process has its own use_list.
You can also use the idb command
-I option to specify search directories.
The following commands let you view and modify the use_list.
DBX Mode
source_search_list_command : use_command | unuse_command
GDB Mode
source_search_list_command : directory_command | show directories
Enter the use(dbx)
without an argument or
show directories(gdb)
command to list the directories in which the debugger searches for source code
files. Specify a directory argument to make
source code files in that directory available to the debugger. You can also use
the idb command -I
option to specify search directories,
which puts those directories in the use_list.
You can customize your debugger environment source code search paths by adding
commands to your .dbxinit file that use the
use command:
DBX Mode
use_command : use [directory_name ...]
If the directory_name is specified,
it is either appended to or replaces the use_list, depending on whether the
value of the $dbxuse debugger variable
is zero (append) or non-zero (replace).
GDB Mode
directory_command : directory [directory_name ...]
Use the directory command with no argument to
reset the use_list to empty value.
If the directory_name is specified, it is prepended to use_list.
Several directory names may be given to the directory command,
separated by ':' or whitespace. If you specify a directory, which is already in the list,
it is moved forward.
To get the full list of directories in the search list, use the
show directories command.
DBX Mode
The unuse command removes entries from the use_list:
unuse_command : unuse [directory_name ...] | unuse *
Enter the unuse command without the
directory_name
to set the search list to the default (the home directory, the current
directory, and the directory containing the executable file). Include the
directory names to remove them from the search list. The asterisk
(*) argument removes all directories from the search list.
8.1.2 How the Debugger Chooses Which Source File to List
The debugger has a concept of current source file, so you do not have
to explicitly specify a source file in many commands.
Whenever the process stops, the current source file is set to the
source file for the code currently executing.
The commands up, down,
class(dbx),
and file(dbx) also set
the current source file.
DBX Mode
You can see and modify the current source file selection:
select_source_file_command : file [ filename ] : fileexpr [ expression ]
Use the file command without a file name to display the name
of the current file scope. Include the file name to change the file scope.
Change the file scope to set a breakpoint in a function not in the file
currently being executed.
To see source code for or set a breakpoint in a function not in the file
currently being executed,
use the file command to set the file scope.
If the file name is not a literal, use the fileexpr
command. For example, if you have a script that calculates a file name in a debugger
variable or in a routine that returns a file name as a string, you can use
fileexpr to set the file.
The following example uses the file command to set
the debugger file scope to a file different from the main program, and
then stops at line number 26 in that file. This example also shows the
fileexpr command setting the current scope back to
the original file, which is solarSystem.cxx.
(idb) run
[1] stopped at [int main(void):114 0x804c440]
114 unsigned int j = 1; // for scoping examples
(idb) file
solarSystemSrc/main/solarSystem.cxx
(idb) set $originalFile = "solarSystem.cxx"
(idb) list 24: 10
24 Moon *phobos = new Moon("Phobos", 9, 11, mars);
25 Moon *deimos = new Moon("Deimos", 23, 6, mars);
26
27 Planet *jupiter = new Planet("Jupiter", 778330, sun);
28 Moon *io = new Moon("Io", 422, 1815, jupiter);
29 Moon *europa = new Moon("Europa", 671, 1569, jupiter);
30 Moon *ganymede = new Moon("Ganymede", 1070, 2631, jupiter);
31 Moon *callisto = new Moon("Callisto", 1883, 2400, jupiter);
32 Moon *amalthea = new Moon("Amalthea", 181, 98, jupiter);
33
(idb) file star.cxx
(idb) list 24: 10
24 // Stars are simple objects
25 //
26 Star::Star(
27 char* name,
28 StellarClass classification,
29 StellarSubclass subclassification)
30 : HeavenlyBody(name),
31 _classification(classification),
32 _subclassification(subclassification)
33 {
(idb) stop at 26
[#2: stop at "solarSystemSrc/star.cxx":26 ]
(idb) cont
[2] stopped at [Star::Star(char*, enum StellarClass, StellarSubclass):26 0x804d1f4]
26 Star::Star(
(idb) file
solarSystemSrc/star.cxx
(idb) fileexpr $originalFile
(idb) file
solarSystemSrc/main/solarSystem.cxx
(idb) list 24: 10
24 Moon *phobos = new Moon("Phobos", 9, 11, mars);
25 Moon *deimos = new Moon("Deimos", 23, 6, mars);
26
27 Planet *jupiter = new Planet("Jupiter", 778330, sun);
28 Moon *io = new Moon("Io", 422, 1815, jupiter);
29 Moon *europa = new Moon("Europa", 671, 1569, jupiter);
30 Moon *ganymede = new Moon("Ganymede", 1070, 2631, jupiter);
31 Moon *callisto = new Moon("Callisto", 1883, 2400, jupiter);
32 Moon *amalthea = new Moon("Amalthea", 181, 98, jupiter);
33
GDB Mode
In the GDB mode, the current file can be changed, for example, using the list
command.
See the example:
(idb) run
Starting program: /usr/examples/x_solarSystem
Breakpoint 1, main () at solarSystemSrc/main/solarSystem.cxx:114
114 unsigned int j = 1; // for scoping examples
(idb) info source
Current source file is solarSystemSrc/main/solarSystem.cxx
(idb)
(idb) list 24,+10
24 Moon *phobos = new Moon("Phobos", 9, 11, mars);
25 Moon *deimos = new Moon("Deimos", 23, 6, mars);
26
27 Planet *jupiter = new Planet("Jupiter", 778330, sun);
28 Moon *io = new Moon("Io", 422, 1815, jupiter);
29 Moon *europa = new Moon("Europa", 671, 1569, jupiter);
30 Moon *ganymede = new Moon("Ganymede", 1070, 2631, jupiter);
31 Moon *callisto = new Moon("Callisto", 1883, 2400, jupiter);
32 Moon *amalthea = new Moon("Amalthea", 181, 98, jupiter);
33
34 Planet *saturn = new Planet("Saturn", 1426940, sun);
(idb) list star.cxx:26,+10
26 Star::Star(
27 char* name,
28 StellarClass classification,
29 StellarSubclass subclassification)
30 : HeavenlyBody(name),
31 _classification(classification),
32 _subclassification(subclassification)
33 {
34 }
35
36 void Star::print(unsigned int i) const
(idb) info source
Current source file is star.cxx
(idb) break 26
Breakpoint 2 at 0x805455c: file solarSystemSrc/star.cxx, line 26.
(idb) continue
Continuing.
Breakpoint 2, Star::Star (this=0x80d2c50, name=0x808e61c "Sol", classification=G, subclassification=2 '\002') at solarSystemSrc/star.cxx:26
26 Star::Star(
(idb) info source
Current source file is star.cxx
(idb) list solarSystem.cxx:24,+10
24 Moon *phobos = new Moon("Phobos", 9, 11, mars);
25 Moon *deimos = new Moon("Deimos", 23, 6, mars);
26
27 Planet *jupiter = new Planet("Jupiter", 778330, sun);
28 Moon *io = new Moon("Io", 422, 1815, jupiter);
29 Moon *europa = new Moon("Europa", 671, 1569, jupiter);
30 Moon *ganymede = new Moon("Ganymede", 1070, 2631, jupiter);
31 Moon *callisto = new Moon("Callisto", 1883, 2400, jupiter);
32 Moon *amalthea = new Moon("Amalthea", 181, 98, jupiter);
33
34 Planet *saturn = new Planet("Saturn", 1426940, sun);
(idb) info source
Current source file is solarSystem.cxx
8.1.3 Listing Source Files
DBX Mode
The simplest way to see a source file is to use a text editor.
The edit command will display an
editor on the current file, using
the current definition of the EDITOR environment variable, if there is one.
However, some primitive inspection capabilities are built into the
debugger. The list command displays source lines,
which can be defined by following way:
- The position of the program counter
- The last line listed, if multiple list commands are entered
-
The line number specified as the arguments to the
listcommand
DBX Mode
list_source_file_command : list [ line_expression ] | list line_expression , line_expression | list line_expression : line_expression line_expression : expression
If specified, the first expression must evaluate to either an integer (the line number of the first line to display within the current source file) or a function (the first line of the function).
Specify the exact range of source lines as either a comma followed by the expression for the last line, or a colon followed by the expression for the the number of lines. This second expression must evaluate to an integer value.
If a second expression is not given, the debugger shows 20 lines, fewer if the end of source file is reached.
GDB Mode
list_source_file_command : list [ [+ | -] line_expression ] [ , [ [+ | -] line_expression ] ] | list function
If a function name or the only one
line_expression is specified as the single argument
then lines centred around the function beginning or specified line are printed.
Commands list + and list -
print some lines after and before the last printed correspondently.
The line in arguments can be specified by following way:
-
integer number- the line in the current source file with specified number -
+offsetand-offset- the line moved on 'offset' lines upper or downer from the last printed -
*address- the line which contains code for specified program address
User can specify a source file name for arguments given in form integer number
and function by following way:
filename:integer_number and filename:function.
For example, to list lines 16 through 20:
DBX Mode
(idb) list 16, 20
16
17 class Node {
18 public:
19 Node ();
20
GDB Mode
(idb) list 16,20
16
17 class Node {
18 public:
19 Node ();
20
For example, to list 6 lines, beginning with line 16:
DBX Mode
(idb) list 16: 6
16
17 class Node {
18 public:
19 Node ();
20
21 virtual void printNodeData() const = 0;
GDB Mode
(idb) list 16,+6
16
17 class Node {
18 public:
19 Node ();
20
21 virtual void printNodeData() const = 0;
8.1.4 Searching the Content of Source Files
The following search commands search through the current source file to help you find the lines to list:
DBX Mode
search_source_file_command : / [ string ] | ? [ string ]
GDB Mode
search_source_file_command : [forward-]search regular expression | reverse-search regular expression
DBX Mode
Note: The string is actually just the rest of the line, not a string literal. The rest of the line is still having alias expansion done on it.
Use a slash (/) to search forward from the most recently
listed line; use a question mark (?) to search backward.
Like most searches, it will stop at the end (or beginning) of the file being searched,
and will wrap if the command is repeated at that point.
When the string is omitted, the previous search continues
from where it found the string. When the string is present, the search starts from either
the
start (/) or the end (?) of the
current line.
When a match is found, the debugger lists the line number and the line. That line
becomes the starting point for any further searches, or for a
list command. For example:
-
To locate
_firstNode:DBX Mode
(idb) /_firstNode 69 NODETYPE* _firstNode;GDB Mode
(idb) forward-search _firstNode 69 NODETYPE* _firstNode;
-
Then to locate
appendbefore line 69:DBX Mode
(idb) ?append 65 void append (NODETYPE* const node);GDB Mode
(idb) reverse-search append 65 void append (NODETYPE* const node);
-
Then to locate
appendafter line 65:DBX Mode
(idb) /append 145 void List<NODETYPE>::append(NODETYPE* const node)GDB Mode
(idb) forward-search append 145 void List<NODETYPE>::append(NODETYPE* const node)
The debugger provides parameterized aliases and debugger variables of arbitrary types. You can use these to do list traversal (see the array navigation example).
8.2 Looking at the Threads
A thread is a single, sequential flow of control within a process. Each thread contains a single point of execution. Threads execute within (and share) a single address space; therefore, a process's threads can read and write the same memory locations.
8.2.1 Thread Levels
The debugger supports three levels of threads:
-
decthreads(user spece threads), also known as POSIX threads on Tru64 -
pthreads(kernel threads), also known as POSIX threads in Linux - Kernel threads (operating system level threads), also known as native threads
To specify the thread level, set the $threadlevel
debugger variable to one of the following strings:
-
decthreads— for POSIX thread library debugging on Tru64 -
pthreads— for POSIX thread library debugging on Intel® platforms in Linux -
native— for kernel thread debugging.
For example:
(idb) set $threadlevel = "decthreads"
For core file debugging, the $threadlevel is always set to
"native".
8.2.2 Thread Manipulation Commands
You can use a variety of commands to manipulate the threads:
DBX Mode
thread_command : show_thread_command | switch_thread_command | show_condition_variable_command | show_mutex_variable_command | pthread_command
GDB Mode
thread_commands : info_thread_command | thread_command
8.2.3 Thread Display Commands
You can use the following commands to display threads:
DBX Mode
show_thread_command : show thread [ thread_id_list ] [ thread-state-filter ] thread_id_list : thread_id ,... | * thread_id : expression thread_state_filter : with state eq thread_state eq :==(for C, and C++) |.eq.(for Fortran) thread_state : ready | running | terminated | blocked
Use the show thread command without parameters to list all the
threads known to the debugger.
If you specify one or more thread identifiers, the debugger displays information about the threads you specify, if the thread matches what you specified in the list. If you omit a thread specification, the debugger displays information for all threads.
Use the show thread commands to list threads that have specific
characteristics, such as threads that are currently blocked.
For example:
(idb) print $threadlevel
"decthreads"
(idb) show thread
Thread Name State Substate Policy Pri
------ ------------------------- --------------- ----------- ------------ ---
* 1 default thread running VP 3 SCHED_OTHER 19
-1 manager thread blk SCS SCHED_RR 19
-2 null thread for slot 0 running VP 1 null thread -1
-3 null thread for slot 1 ready VP 3 null thread -1
-4 null thread for slot 2 new new null thread -1
-5 null thread for slot 3 new new null thread -1
> 2 threads(0x140000798) blocked cond 3 SCHED_OTHER 19
3 threads+8(0x1400007a0) blocked cond 3 SCHED_OTHER 19
4 threads+16(0x1400007a8) blocked cond 3 SCHED_OTHER 19
5 threads+24(0x1400007b0) blocked cond 3 SCHED_OTHER 19
6 threads+32(0x1400007b8) blocked cond 3 SCHED_OTHER 19
(idb) set $threadlevel = "native"
(idb) print $threadlevel
"native"
(idb) show thread
Id State
* 0x9 stopped
* 0x9 unstarted
0x3 unstarted
0x7 unstarted
GDB Mode
info_threads_command : info threads thread : expression
Use the info threads command to list all the threads known to the debugger.
(idb) info threads
  0 Thread 1024 (LWP 19513)  0x804f8f6 in __sigsuspend from /tmp/pthread_manythreads
  1 Thread 2049 (LWP 19514)  0x805a42a in __clone from /tmp/pthread_manythreads
* 2 Thread 1026 (LWP 19515)  0x804f8f6 in __sigsuspend from /tmp/pthread_manythreads
  3 Thread 2051 (LWP 19516)  0x804f8f6 in __sigsuspend from /tmp/pthread_manythreads
  4 Thread 3076 (LWP 19517)  0x804f8f6 in __sigsuspend from /tmp/pthread_manythreads
  5 Thread 4101 (LWP 19518)  0x8048288 in prime_search at pthread_manythreads.c:79
Note: In the output, the right bracket indicator (>) marks the
current thread, whereas the asterisk (*) indicator marks the thread with
the event that stopped the application.
You can switch to a different thread as the current thread. The debugger
variable $curthread contains the thread identifier
of the current
thread.
switch_thread_command : thread [ thread_id ]
The $curthread value is updated when program
execution stops or completes.
You can modify the current thread by assigning $curthread a valid
thread identifier. This is equivalent to issuing the thread
thread_id command. When there is no process or program,
$curthread is set to 0.
Use the thread command without a thread identifier to
identify the current thread. Supply a thread identifier to make another
thread the current thread.
GDB Mode
(idb) thread 2
* 2 Thread 1026 (LWP 19515)  0x804f8f6 in __sigsuspend from /tmp/pthread_manythreads
8.2.4 Mutex Queries
A mutex (mutual exclusion) semaphore is a programming flag that allows multiple pthreads
to synchronize access to shared resources, to ensure the following:
- All threads see a clean and consistent view of the data, without allowing one thread to change something while another thread is reading it.
- Two threads do not change different parts of the data at the same time, possibly in inconsistent ways.
Use the show mutex command to list information about currently available
pthread mutexes:
DBX Mode
show_mutex_variable_command : show mutex [ mutex_id_list ] [ mutex_state_filter ] mutex_id_list : mutex_id ,... | (mutex_id ,...) mutex_state_filter : with state eq mutex_state eq :==(for C, and C++) |.eq.(for Fortran) mutex_state : locked
If you specify one or more mutex identifiers, the debugger displays information about only those mutexes specified, provided that the list matches the identifiers of currently available mutexes. If you omit the mutex identifier specification, the debugger displays information about all mutexes currently available.
Use the show mutex with state == locked command to display
information exclusively for locked mutexes.
If $verbose is set to 1, the sequence numbers of the
threads locking the mutexes are displayed.
The following example shows the output from a simple show mutex
command:
DBX Mode
(idb) show mutex
Mutex Name State Owner Pri Type Waiters (+Count)
------ ------------------------- ----- ------ --- -------- --------------------
1 malloc heap Normal
2 malloc hash Normal
3 malloc cache[0] Normal
4 malloc cache[1] Normal
5 malloc cache[2] Normal
6 malloc cache[3] Normal
7 malloc cache[4] Normal
8 malloc cache[5] Normal
9 malloc cache[6] Normal
10 malloc cache[7] Normal
11 malloc cache[8] Normal
12 malloc cache[9] Normal
13 malloc cache[10] Normal
14 malloc cache[11] Normal
15 malloc cache[12] Normal
16 malloc cache[13] Normal
17 malloc cache[14] Normal
18 malloc cache[15] Normal
19 malloc cache[16] Normal
20 malloc cache[17] Normal
21 malloc cache[18] Normal
22 malloc cache[19] Normal
23 malloc cache[20] Normal
24 malloc cache[21] Normal
25 malloc cache[22] Normal
26 malloc cache[23] Normal
27 malloc cache[24] Normal
28 malloc cache[25] Normal
29 malloc cache[26] Normal
30 malloc cache[27] Normal
31 malloc cache[28] Normal
32 brk Normal
33 exc cr Recurs
34 exc read rwl Normal
35 known mutex queue Normal
36 known cond queue Normal
37 known VP queue Normal
38 known rwl queue Normal
39 VM 0 lookaside Normal
40 VM 1 lookaside Normal
41 VM 2 lookaside Normal
42 VM 0 cache Normal
43 VM 1 cache Normal
44 VM 2 cache Normal
45 debugger client registry Normal
46 Global lock Recurs
47 ldr Recurs
48 prime_list(0x140000660) Normal
49 cond_mutex(0x1400006c0) Normal
50 current_mutex(0x140000690 Normal
51 curr_worker_mutex(0x14000 Lock Normal
If the application being debugged has no pthreads, or if the
$threadlevel is set
to native, an appropriate message is issued.
8.2.5 Condition Variable Queries
A condition variable is a pthread synchronization object used in conjunction
with a mutex. A condition variable is used when a thread has locked a mutex to gain
access to data and then finds it must wait for some other thread to change some
aspect of the data before it can continue.
DBX Mode
show_condition_variable_command : show condition [ condition_id_list ] [ condition_state_filter ] condition_id_list : condition_id ,... | (condition_id ,...) condition_id : integer_constant condition_state_filter : with state eq condition_state condition_state : wait
Use the show condition command to list information about currently
available condition variables. If you supply one or more condition
identifiers, the debugger displays information about the condition variables
you specify, provided that the list matches the identities of currently available condition variables. If you omit
the condition variable specification, the debugger displays information about
all the condition variables currently available.
Use the show condition with state == wait command to display
information only for condition variables that have one or more threads waiting.
If $verbose is set to 1, the sequence numbers of the threads waiting
on the condition are displayed.
The following example shows output from a simple
show condition command:
DBX Mode
(idb) show condition
Cond Name Mutex Type Waiters (+Count)
------ ------------------------- ------ ----- ---------------------------------
1 _exc_read_mutex+72(0x3ffc
2 _exc_read_mutex+112(0x3ff
3 cond_var(0x140000720) 49 2, 3, 4, 5, 6
4 curr_worker(0x140000748)
If the application being debugged has no pthreads, or if the
$threadlevel is set to
native, an appropriate message is issued.
8.2.6 Other Thread Commmands
You can use the
where command to display the
stack trace of current threads. You can specify one or more threads or all threads.
The print command evaluates an optional
expression in the context of the current thread and displays the result.
The call command evalutes an expression in the context
of the current thread and makes the call in the context of the current thread.
The printregs command prints the registers for the
current thread.
8.2.7 Undocumented pthread Support
You can pass an undocumented string directly into the undocumented
pthread debugging support. This is an internal debugging aid, not intended for
general use.
DBX Mode
pthread_command : pthread string
8.3 Looking at the Call Stack
Most programming languages have some concept of functions, routines, or subroutines, capturing the notion of code that is invoked from many places. A running program needs a call stack of call frames for the called functions. Each call frame contains both the information needed to return to its caller and the information needed to contain the local variables of the function.
The machine code generated for these functions maintains this call stack. Some of this maintenance is done before the call, some at the start of the called function, some at the end of the called function, and some after the call.
Non-optimized machine code is usually very easy to correlate with the source code, but optimized machine code can be tricky. See Call Frames and Optimized Code and Call Frames and Machine Code Correlation for more information.
The debugger controls the call stacks of all the threads; you can use it to examine and manipulate call stacks, and use them as a basis for further queries:
call_stack_command : show_stack_command | change_stack_frame_command | pop_stack_frame_command
When your process is stopped by the debugger, you can show the call stack of the thread that caused the stoppage, or the call stack of any other thread.
The following commands show the most recent call frames on the call stack of the current or specified threads:
DBX Mode
show_stack_command : where [ expression ] [ thread_specifier ] thread_specifier : thread thread_id ,... | thread all thread_id : expression
GDB Mode
show_stack_command : backtrace | where | info stack | bt [ expression ]
If specified, the expression must evaluate to a nonnegative integer. You can specify the number of call frames to show. If not specified, all the call frames for the thread are shown.
DBX Mode
If specified, the
thread_specifier specifies the
threads whose call stacks are to be shown. If not specified, just the
current thread is used.
When large and complex values are passed by value to a routine on the
stack, the output of the where command can be
voluminous. You can set the control variable
$stackargs to 0
to suppress the output of argument values in the where
command.
The stack trace provides the following information for each call level:
| Call level | The number used to refer to a call level on the stack. The function entered most recently is at level 0. Its caller is at level 1. |
| Memory address | The address of the next instruction to be executed at this level. |
| Function name | The name of the function for the memory address. |
| File name | The source file for the memory address. |
| Line number | The number of the next source line of the memory address. |
If your call stack seems to be missing routines, you may be seeing the result of a compiler optimization known as "tail calls".
If your call stack is corrupted, you may see random numbers without any routine names. In this case, it is likely that your application has gotten lost. Typically, this type of call stack display means that your application has lost track of the real stack and real code location, and is now executing random bits of memory, interpreting them as instructions.
If you are coding in C++, one of the most common ways to get a corrupt stack is for your code to try to execute a method on an invalid object. If the object has already been deleted, has not yet been initialized, is not there, or is of a completely different type, then the virtual function table will not be correct, and the application will be treating random memory as the virtual function table and calling a random place.
GDB Mode
Note: You should change the current thread to the thread whose call stack you want to examine.
8.3.1 Navigating the Call Stack
You can select one of the call frames as the starting point for examining variables. This call frame provides the current scope in the program for which variables exist, and tells the debugger which instance of those variables whose values you want to see.
DBX Mode
change_stack_frame_command : up [ expression ] | down [ expression ] | func [ loc ]
GDB Mode
change_stack_frame_command : up [ expression ] | up-silently [ expression ] | down [ expression ] | down-silently [ expression ] | frame [ expression ]
Use the up command or the down command without
the expression to change to the call frame
located one level up or down the stack.
Specify an expression that evaluates to an integer to change the
call frame up or down the specified number of levels. If
the number of levels exceeds the number of active calls on the stack in the
specified direction, the
debugger issues a warning message and the call frame does not change.
When the current call frame changes, the debugger displays the source line corresponding to the last instruction executed in the function executing the selected call frame.
DBX Mode
When large and complex values are passed by value to a routine on the
stack, the output of the up and
down commands can be
voluminous. You can set the control variable
$stackargs to 0
to suppress the output of argument values in the up and
down commands.
Use the func command without the loc to display the
current function.
To change the function scope to a function that has a call frame in the
call stack, specify the loc either as the name of the function or as an integer
expression evaluating to
the call level. If you specify the name, the most-recently entered call
frame for that function becomes the current call frame.
If no frames are available to select from, the debugger context is set to the static context of the named function. The current scope and current language are set based on that function. Types and static variables local to that function are now visible and can be evaluated.
If you enter an integer expression, the debugger moves to the frame at
level n, just as if you had entered up n
at the level 0 function.
GDB Mode
up-silently and down-silently
commands are similar to up and down
respectively. But they work without invoking a new frame.
The frame command selects frame by given number
or address. If there is no argument the command displays info about current stack frame.
In the following example, the current call frame is changed
to one for method Planet::print so that a variable in that instance
of print() can be displayed:
DBX Mode
(idb) where 4
#0 0x804cd72 in ((Planet*)0x80e6008)->Planet::print(i=2) "solarSystemSrc/planet.cxx":19
#1 0x804c772 in ((HeavenlyBody*)0x80e6008)->HeavenlyBody::printBodyAndItsSatellites(i=2) "solarSystemSrc/heavenlyBody.cxx":62
>2 0x804c7a7 in ((HeavenlyBody*)0x80e5fb0)->HeavenlyBody::printBodyAndItsSatellites(i=1) "solarSystemSrc/heavenlyBody.cxx":68
#3 0x804c50a in main() "solarSystemSrc/main/solarSystem.cxx":120
(idb) list $curline - 5: 10
63
64 // Recursively deal with the satellites. Redeclare i for scoping examples.
65 //
66 unsigned int j = 1;
67 for (HeavenlyBody* i = _firstSatellite; i; i = i->_outerNeighbor) {
> 68 i->printBodyAndItsSatellites(j++);
69 }
70 }
(idb) whatis i
struct HeavenlyBody* i
(idb) print i
0x80e6008
(idb) func Planet::print
virtual void Planet::print(unsigned int) in solarSystemSrc/planet.cxx line No. 19:
19 std::cout << "(" << i
(idb) where 4
>0 0x804cd72 in ((Planet*)0x80e6008)->Planet::print(i=2) "solarSystemSrc/planet.cxx":19
#1 0x804c772 in ((HeavenlyBody*)0x80e6008)->HeavenlyBody::printBodyAndItsSatellites(i=2) "solarSystemSrc/heavenlyBody.cxx":62
#2 0x804c7a7 in ((HeavenlyBody*)0x80e5fb0)->HeavenlyBody::printBodyAndItsSatellites(i=1) "solarSystemSrc/heavenlyBody.cxx":68
#3 0x804c50a in main() "solarSystemSrc/main/solarSystem.cxx":120
(idb) list $curline - 5: 10
14 {
15 }
16
17 void Planet::print(unsigned int i) const
18 {
> 19 std::cout << "(" << i
20 << ") Planet [" << HeavenlyBody::name() << "]; ";
21 printOrbitalParameters();
22 std::cout << std::endl;
23 }
(idb) whatis i
unsigned int i
(idb) print i
2
In the previous example, instead of entering
func Planet::print, you can enter
down 2. (You would use down in this case
because the current call frame at the start of the example was not the bottommost
frame.) Note that the final stack trace in this example lists
a call frame for function Planet::print as the current call frame
(denoted by the > character).
GDB Mode
There are some commands to print info about the selected stack frame:
-
info frame
The command prints following info about the current frame:- the address of the frame
- the address of the next frame down (called by this frame)
- the address of the next frame up (caller of this frame)
- the language in which the source code corresponding to this frame is written
- the address of the frame's arguments
- the address of the frame's local variables
- the program counter saved in it (the address of execution in the caller frame)
- which registers were saved in the frame
-
info frame addr
The command prints a verbose description of the frame at addressaddr, without selecting that frame. -
info args
The command prints the arguments of the selected frame, each on a separate line. -
info locals
The command prints the local variables of the selected frame, each on a separate line. These are all variables (declared either static or automatic) accessible at the point of execution of the selected frame. -
info catch
The command prints a list of all the exception handlers that are active in the current stack frame at the current point of execution.
8.3.2 The pop Command
The pop command removes one or more call frames from the call
stack:
DBX Mode
pop_stack_frame_command : pop [ expression ]
The default is one call frame. The pop command undoes the work
already done by the removed execution frames. It does not, however, reverse
side effects, such as changes to global variables.
Note: Because it is extremely
unlikely this will fix all the effects of a half-executed call, this command
is not recommended for general use. Furthermore, the pop command does
not provide a way to specify a return value when the frame being discarded corresponds
to a function that should return a value. You may need to use the
assign
command to restore the values of global variables.
Instead of the pop command, you may want to use the
return command, which finishes the
call corresponding to the selected frame.
GDB Mode
pop_stack_frame_command : return [ expression ]
When you use return, the selected stack frame is discarded
(and all frames within it). If you wish to specify a value to be returned,
give that value as the argument to return.
The return command does not resume execution.
It leaves the program stopped in the state that would exist if the function had just returned.
In contrast, the finish command
resumes execution until the selected stack frame returns naturally.
8.3.3 Call Frames and Optimized Code
When optimized machine code is generated by the compilers, the compiler generates code that maintains the call stack, but sometimes the function boundaries are changed in one of two ways:
- Inlining is when the compiler completely eliminates the call by instead generating the instructions for the called function at the call site, usually followed by merging those instructions with the other instructions surrounding the call site.
- Outlining is when the compiler creates a function where one did not exist explicitly in the source. For example, the compiler turns a loop body into a function, so that it can generate code that uses threads to execute the different iterations in parallel; or the compiler creates a single shared function to replace several sections of the source that are similar.
Depending on the information the compiler makes available to the debugger, inlined calls may or may not show up in the call stack display. Outlined calls will show up, and will be correlated to the code they came from. The compiler will probably have supplied the debugger with some invented name for the function.
8.3.4 Call Frames and Machine Code Correlation
On a RISC processor the following is the machine code typically generated for a call to a function:
-
The machine code before the call
performs the following operations:
- Sets some context registers
- Puts the parameters either in registers or memory
- Loads the address of the function into a register
- Loads the address to return to into a register
- Branches to the function
-
The machine code at the start of the called function
performs the following operations:
- Sets some context registers
- Allocates stack space
- Saves some registers in the stack space
- Performs some setup of the local variables
-
The machine code at the end of the called function
performs the following operations:
- Restores the saved registers from the stack space
- Deallocates the stack space
- Branches to the address to return to
- The machine code at the return address of the call frame sets some context registers.
When the thread is partway through the call frame creation or tear-down, the debugger will still show the call frame, but will not be able to show correct values for the variables or parameters.
8.3.5 Special C++ Issues
For nonstatic member functions, the implicit this pointer is displayed as the address on the stack trace along with the class type of the object, as shown in the following example:
DBX Mode
(idb) stop in List<Node>::print
[#3: stop in void List<Node>::print(void) ]
(idb) cont
[3] stopped at [void List<Node>::print(void):162 0x804aad2]
162 Node* currentNode = _firstNode;
(idb) where 2
>0 0x804aad2 in ((List<Node>*)0xbfffecfc)->List<Node>::print() "x_list.cxx":162
#1 0x804a53a in main() "x_list.cxx":203
GDB Mode
() break List<Node>::print Breakpoint 3 at 0x804aad2: file x_list.cxx, line 162. (idb) continue Continuing. Breakpoint 3, List<Node>::print (this=0xbfffecec) at x_list.cxx:162 162 Node* currentNode = _firstNode; (idb) backtrace 2 >0 0x804aad2 in ((List<Node>*)(const class List<Node> *) 0xbfffecec)->List<Node>::print(this=(const class List<Node> *) 0xbfffecec) "x_list.cxx":162 #1 0x804a53a in main() "x_list.cxx":203
8.4 Looking at the Data
After you have seen the call stack
(show_stack_command), selected the call
frame containing the variables you wish to examine
(change_stack_frame_command),
and looked at the source this function is executing
(looking at the source),
you usually want to examine some of the
variables or even evaluate some expressions.
You can use the print command and the
call command to do this. You can also
use the following commands to help you determine what to look at and what you are
seeing:
DBX Mode
look_around_command : various_print_command | c++_look_around_command | call_command | whatis_command | whereis_command | which_command
various_print_command : print_command | printf_command | printi_command | print_registers_command | printt_command | dump_command
GDB Mode
look_around_command : print_command | info_registers_command | call_command | whatis_command
8.4.1 The print Command
You can print the values of one or more expressions or all local variables. You can also use the
print
command to evaluate complex expressions involving typecasts, pointer
dereferences, multiple variables, constants, and any legal operators allowed by
the language of the program you are debugging:
DBX Mode
print_command : print [ expression ,... ] | print rescoped_expression | print printable-type | printb [ expression ,... ] | printd [ expression ,... ] | printo [ expression ,... ] | printx [ expression ,... ] rescoped_expression : filename ` qual_symbol | ` qual_symbol qual_symbol : expression | qual_symbol ` expression
For an array, the debugger prints every cell in the array if you do not specify a specific cell.
Use the $hexints, $decints, or
$octints variables to
select a radix for the output of the print command. If you do not
want to change the radix permanently, use the
printx, printd, printo
, and printb
commands to print expressions in hexadecimal, decimal, octal, or binary base format, respectively.
GDB Mode
print_command : print [/format specifier][expression] format specifier : x | d | u | o | t | a | c | f
By default, GDB prints a value according to its data type.
But user might want to print a number in hex, or a pointer in decimal.
Or user might want to view data in memory at a certain address as a character string
or as an instruction. In this case user should specify an output format.
To specify how to print a value already computed a user should print after the
print command a slash and a format letter.
The format letters supported are:
x
Regard the bits of the value as an integer, and print the integer in hexadecimald
Print as integer in signed decimal.u
Print as integer in unsigned decimal.o
Print as integer in octal.t
Print as integer in binary. The letter `t' stands for "two".a
Print as an address, both absolute in hexadecimal and as an offset from the nearest preceding symbol.c
Regard as an integer and print it as a character constant.f
Regard the bits of the value as a floating point number and print using typical floating point syntax.
For an array, the debugger prints every cell in the array if you do not specify a specific cell.
Consider the following declarations in a C++ program:
DBX Mode
(idb) list 59: 2
59 const unsigned int biggestCount = 10;
60 static Moon *biggestMoons[biggestCount];
GDB Mode
(idb) list 59,+2 59 const unsigned int biggestCount = 10; 60 static Moon *biggestMoons[biggestCount];
The following example uses the print command to display a
nonstring array:
DBX Mode
(idb) print biggestMoons [0] = 0x80cf928,[1] = 0x80cfc88,[2] = 0x80cf988,[3] = 0x80cf868,[4] = 0x80cf688,[5] = 0x80cf8c8,[6] = 0x80d0048,[7] = 0x80cff28,[8] = 0x80cfc28,[9] = 0x80cff88
GDB Mode
(idb) print biggestMoons
$4 = {(class Moon *) 0x80d2708, (class Moon *) 0x80d2a68, (class Moon *) 0x80d2768, (class Moon *) 0x80d2648, (class Moon *) 0x80d2468, (class Moon *) 0x80d26a8, (class Moon *) 0x80d2e28, (class Moon *) 0x80d2d08, (class Moon *) 0x80d2a08, (class Moon *) 0x80d2d68}
The following example shows how to print individual values of an array:
DBX Mode
(idb) print biggestMoons[3]
0x80cf868
(idb) print *biggestMoons[3]
struct Moon {
_radius = 1815;
_name = 0x808e47c="Io"; // class Planet::HeavenlyBody
_innerNeighbor = 0x0; // class Planet::HeavenlyBody
_outerNeighbor = 0x80cf8c8; // class Planet::HeavenlyBody
_firstSatellite = 0x0; // class Planet::HeavenlyBody
_lastSatellite = 0x0; // class Planet::HeavenlyBody
_primary = 0x80cf808; // class Planet::Orbit
_distance = 422; // class Planet::Orbit
_name = 0x80cf900="Jupiter 1"; // class Planet::Orbit
}
GDB Mode
(idb) print biggestMoons[3]
$7 = (class Moon *) 0x80d2648
(idb) print *biggestMoons[3]
$8 = {<Planet> = {<HeavenlyBody> = {_name = 0x808e17c "Io", _innerNeighbor = 0x0, _outerNeighbor = 0x80d26a8, _firstSatellite = 0x0, _lastSatellite = 0x0}, <Orbit> = {_primary = 0x80d25e8, _distance = 422, _name = 0x80d26e0 "Jupiter 1"}, }, _radius = 1815}
8.4.1.1 Dereferencing Pointers
Pointers are variables that contain addresses. By dereferencing a pointer in the command interface, you can print the value at the address pointed to by the pointer. In C and C++ programs, variables containing a pointer are dereferenced using the * operator. The following example shows how to dereference a pointer in C++ programs:
(idb) whatis newNode
class IntNode* newNode
(idb) print newNode
0x80b9740
(idb) print *newNode
class IntNode {
_data = 1;
_nextNode = 0x0; // class Node
}
8.4.1.2 Printing C Strings
The debugger does not print more than the first
$maxstrlen characters
of a null-terminated string. Change this debugger variable if it is
showing either more or less than you wish to see.
8.4.1.3 Printing Floating Point Numbers
Floating point numbers are represented inside the computer in binary floating point. They are converted to decimal floating point when printed. The two formats are not the same, and some numbers are easily represented in decimal but not in binary (for example the number 1.1). The internal binary form for such numbers is an approximation, the closest that can be made given the number of bits available.
Normally, when a binary floating point number is printed, the shortest decimal number
which would be represented by that binary number is used as the number to print, as it
is a legitimate representation of the internal binary number.
However, to see a more exact (extended form) representation of a binary floating point number,
you can set the $floatshrinking
debugger variable to 0 (zero).
The following example shows the result of converting 1.1 (shortened form) to the closest long double binary floating point number (extended form).
(idb) p $floatshrinking 1 (idb) p 1.1 1.1 (idb) set $floatshrinking = 0 (idb) p 1.1 1.10000000000000000000000000000000008
Currently, the extended forms are only available for long double variables and expressions.
For more detail on floating point representation, see ANSI IEEE standard 754-1985.
8.4.1.4 Restrictions on the print Command
Expressions containing labels are not supported. Variables involving static anonymous unions and enumerated types may not be able to be printed. Printing a structure that is declared but not defined in a compilation unit may generate an error message indicating that the structure is opaque.
8.4.2 The printf Command
Use the printf command to format and display a complex
structure. The first argument is a string expression of characters and
conversion specifications using the same format specifiers as the
printf C function. The printf command requires
a running target program because it uses libc.
printf_command : printf [ format_string [ , expression ,... ] ]
For example:
(idb) printf "The PC is 0x%x", $pc The PC is 0x804a53a
8.4.3 The printi Command
The printi command takes one or more numerical expressions and interprets each one as
an assembly instruction, printing out the instruction, and its arguments when applicable. This command
is typically used by engineers performing machine-level debugging.
printi_command : printi [ expression ,... ]
For example:
(idb) $curpc/1i CompoundNode::CompoundNode(float, int): x_list.cxx [line 103, 0x804a60e] _ZN12CompoundNodeC1Efi(...)+0x18: addl $-8, %esp (idb) $curpc/1dd 0x804a60e: -1946631037 (idb) printi $pc _ZN12CompoundNodeC1Efi(...)+0x32: hlt
8.4.4 The printregs Command
Use the printregs command to
display
the values of all the hardware registers. The list of registers displayed by the debugger is
machine-dependent. By default, most values are displayed in decimal radix. To display the
register values in hexadecimal radix, set the $hexints variable
to 1.
print_registers_command : printregs
For example:
(idb) printregs $eax 0x80b0c14 134941716 $ecx 0x40018000 1073840128 $edx 0x0 0 $ebx 0x401ae9e4 1075505636 $esp [$sp] 0xbffff58c -1073744500 $ebp 0xbffff668 -1073744280 $esi 0x40016b64 1073834852 $edi 0xbffff6dc -1073744164 $eip [$pc] 0x804a3e2 134521826 $eflags 0x286 646 $cs 0x23 35 $ss 0x2b 43 $ds 0x2b 43 $es 0x2b 43 $fs 0x0 0 $gs 0x0 0 $orig_eax 0xffffffff -1 $fctrl 0x37f 895 $fstat 0x0 0 $ftag 0x0 0 $fiseg 0x23 35 $fioff 0x805badf 134593247 $foseg 0x2b 43 $fooff 0xbffff368 -1073745048 $fop 0x1bd 445 $f0 0x000000000000ffff0000000000000000 -inf $f1 0x000000000000ffff0000000000000000 -inf $f2 0x000000000000ffff0000000000000000 -inf $f3 0x000000000000ffff0000000000000000 -inf $f4 0x000000000000ffff0000000000000000 -inf $f5 0x000000000000ffff0000000000000000 -inf $f6 0x000000000000ffff0000000000000000 -inf $f7 0x0000000000004002a1f7cf0000000000 10.123 $xmm0 0x00000000000000000000000000000000 $xmm1 0x00000000000000000000000000000000 $xmm2 0x00000000000000000000000000000000 $xmm3 0x00000000000000000000000000000000 $xmm4 0x00000000000000000000000000000000 $xmm5 0x00000000000000000000000000000000 $xmm6 0x00000000000000000000000000000000 $xmm7 0x00000000000000000000000000000000 $mxcsr 0x1f80 8064 $vfp 0xbffff668 0xbffff668
8.4.5 The printt Command
The printt command takes one or more numerical expressions and interprets
each one as the number of seconds since the Epoch (00:00:00 UTC 1 Jan 1970; see ctime(3)
for more information).
printt_command : printt [ expression ,... ]
For example:
(idb) printt 0 (UTC) Thu Jan 1 00:00:00 1970 (idb) printt 978325200 (UTC) Mon Jan 1 05:00:00 2001
8.4.6 The dump Command
Use the dump command without an argument to list the parameters and
local variables in the current function. To list the parameters and local
variables in an active function, specify it as an argument.
Use the dump . command (include the dot) to list the parameters and
local variables for all functions active on the stack:
dump_command : dump qual_symbol | dump .
For example:
(idb) dump
>0 0x804a53a in main() "x_list.cxx":203
cNode=0x80b9750
cNode1=0x80b9768
cNode2=0x80b97a0
newNode=0x80b9740
newNode2=0x80b9790
nodeList=class List<Node> { ... }
When large and complex values are passed by value to a routine on the
stack, the output of the dump command can be
voluminous. You can set the control variable
$stackargs to 0
to suppress the output of argument values in the dump command.
8.4.7 The call Command
After a breakpoint or a signal suspends program execution, you can execute a
single function in your program by using the call command, or by
including a function call in the expression argument of a debugger command.
Calling a function lets you test the function's operation with a specific set
of parameters.
call_command : call call-expression
Specify the function as if you were calling it from within the program. If the
function has no parameters, specify empty parentheses (()).
For multithreaded applications, the call is made in the context of the current
thread. For C++ applications, when you set the
$overloadmenu debugger variable to 1 and call an
overloaded function, the debugger lists the overloaded functions and calls the
function you specify.
When the function you call completes normally, the debugger restores the stack
and the current context that existed before the function was called.
While the program counter is saved and restored, calling a function does not shield the program state from alteration if the function you call allocates memory or alters global variables. If the function affects global program variables, for instance, those variables will be changed permanently.
Functions compiled without the debugger option to include debugging information may lack important parameter information and are less likely to yield consistent results when called.
The call command executes the specified function with the parameters
you supply and then returns control to you (at the debugger prompt) when the
function returns. The call command discards the return value of the
function. If you embed the function call in the expression argument of a
print command, the debugger prints the return value after the
function returns. The following example shows both methods of calling a function:
(idb) call earth->distance() (idb) print earth->distance() 149600
In the previous example, the call command results in the return value being
discarded while the embedded call passes the return value of the function to
the print command, which in turn prints the value. You can also
embed the call within a more involved expression, as shown in the following
example:
(idb) print earth->distance() - 100000 49600 (idb) print mars->distance() - earth->distance() 78340 (idb) call io->print(3) (3) Moon [Io], radius [1815] km; <Jupiter 1> orbits at 422 Megameters
All breakpoints or tracepoints defined and enabled during the session are active when a called function is executing. When program execution halts during function execution, you can examine program information, execute one line or instruction, continue execution of the function, or call another function.
When you call a function when execution is suspended in a called function, you are nesting function calls, as shown in the following example:
(idb) where 2
>0 0x804bb6b in buildOurSolarSystem(sun=0x80cf4d0) "solarSystemSrc/main/solarSystem.cxx":55
#1 0x804c4f2 in main() "solarSystemSrc/main/solarSystem.cxx":119
(idb) stop in Planet::print
[#2: stop in virtual void Planet::print(unsigned int) ]
(idb) call mars->print(1)
[2] stopped at [virtual void Planet::print(unsigned int):19 0x804cd72]
19 std::cout << "(" << i
(idb) where
>0 0x804cd72 in ((Planet*)0x80cf6e8)->Planet::print(i=1) "solarSystemSrc/planet.cxx":19
#1 0x4004b1a4 in __do_global_ctors_aux(...) in /lib/i686/libm.so.6
#2 0x80cf6e8
(idb) next
stopped at [virtual void Planet::print(unsigned int):20 0x804cdc6]
20 << ") Planet [" << HeavenlyBody::name() << "]; ";
(idb) stop in Orbit::distance
[#3: stop in Megameters Orbit::distance(void) ]
(idb) print distance()
[3] stopped at [Megameters Orbit::distance(void):41 0x804cac7]
41 return _distance;
(idb) where
>0 0x804cac7 in ((Orbit*)0x80cf700)->Orbit::distance() "solarSystemSrc/orbit.cxx":41
#1 0x4004b1a4 in __do_global_ctors_aux(...) in /lib/i686/libm.so.6
#2 0x80cf700
(idb) disable 3
(idb) cont
Called Procedure Returned
stopped at [virtual void Planet::print(unsigned int):20 0x804cdc6]
20 << ") Planet [" << HeavenlyBody::name() << "]; ";
(idb) where
>0 0x804cdc6 in ((Planet*)0x80cf6e8)->Planet::print(i=1) "solarSystemSrc/planet.cxx":20
#1 0x4004b1a4 in __do_global_ctors_aux(...) in /lib/i686/libm.so.6
#2 0x80cf6e8
(idb) cont
(1) Planet [Mars]; <Sol 4> orbits at 227940 Megameters
Called Procedure Returned
stopped at [void buildOurSolarSystem(struct Star*):55 0x804bb6b]
55 Planet *pluto = new Planet("Pluto", 5913520, sun);
8.4.7.1 Restrictions on the call Command
The debugger supports function calls and expression evaluations that call functions, with the following limitations:
- The debugger does not support passing and returning structures by value.
- The debugger does not implicitly construct temporary objects for call parameters.
-
Optimization can prevent the debugger from knowing the type of a function
return. Therefore, the debugger assumes returns are of the type
intif the functions are optimized. If the returns are a different type, it may be necessary to cast the result when calling the optimized functions.
8.4.8 The whatis Command
You can print information about the basic nature of a
whatis_expression.
The expression can be a normal language expression or the name of a type, function,
or other language entity. The debugger shows you information about the
entity rather than evaluating it. However, it will evaluate any contained expressions,
such as pointers, needed to determine the entity to which you are referring.
whatis_command : whatis whatis_expression
The following example uses the whatis command to determine the
storage representation for the data member _classification:
(idb) whatis sun->_classification
const enum StellarClass Star::_classification
(idb) whatis StellarClass
enum StellarClass {O, B, A, F, G, K, M, R, N, S}
(idb) print sun->_classification
G
8.4.9 The whereis Command
The whereis command lists all declarations of a variable and
each declaration's fully qualified scope information.
The scope information of a variable usually consists of the name of the source
file that contains the function in which the variable is declared, the name of that
function, and the name of the variable. The components of the scope information are
separated by back-quotes (`).
whereis_command : whereis whereis_name | whereis whereis_string whereis_name : identifier_or_typedef_name | ( identifier_or_typedef_name ) whereis_string : string
You can use the whereis command with the
whereis_name
to obtain information needed to differentiate overloaded identifiers that are in different units, or within
different routines in the same unit. The following example shows how to set
breakpoints in two C++ methods, both named print:
(idb) whereis print
"solarSystemSrc/derived_class_includes/planet.h"`Planet::print(unsigned int)
"solarSystemSrc/derived_class_includes/planet.h"`Moon::print(unsigned int)
"solarSystemSrc/base_class_includes/heavenlyBody.h"`HeavenlyBody::print(unsigned int)
"solarSystemSrc/derived_class_includes/star.h"`Star::print(unsigned int)
(idb) stop in "solarSystemSrc/derived_class_includes/planet.h"`Planet::print
Select from
----------------------------------------------------
1 planet.h containing Moon
2 planet.h containing Moon
3 planet.h containing __dt__6PlanetXv
4 None of the above
----------------------------------------------------
1
[#2: stop in virtual void Planet::print(unsigned int) ]
(idb) stop in "solarSystemSrc/derived_class_includes/star.h"`Star::print
Select from
----------------------------------------------------
1 star.h containing O
2 star.h containing O
3 None of the above
----------------------------------------------------
1
[#3: stop in virtual void Star::print(unsigned int) ]
See also the which command for another example of the
whereis command.
If you are not sure how to spell a symbol, you can use the whereis
command with the whereis_string to search the symbol table for
the regular expression represented by the quoted string. All symbols that match
the rules of the regular expression are displayed in ascending order. For
example:
(idb) whereis planet
Symbol not found
(idb) whereis "[Pp]lanet"
"solarSystemSrc/derived_class_includes/planet.h"`Moon::Moon(char*, Megameters, Kilometers, class Planet*)
"solarSystemSrc/derived_class_includes/planet.h"`Planet
"solarSystemSrc/derived_class_includes/planet.h"`Planet
"solarSystemSrc/derived_class_includes/planet.h"`Planet
"solarSystemSrc/derived_class_includes/planet.h"`Planet::Planet(char*, Megameters, class HeavenlyBody*)
"solarSystemSrc/derived_class_includes/planet.h"`Planet::Planet(char*, Megameters, class HeavenlyBody*)
"solarSystemSrc/derived_class_includes/planet.h"`Planet::print(unsigned int)
"solarSystemSrc/derived_class_includes/planet.h"`__INTER__Moon_Moon_Orbit_Planet_Xv
"solarSystemSrc/derived_class_includes/planet.h"`__INTER__Planet_Planet_Orbit_Xv
"solarSystemSrc/derived_class_includes/planet.h"`__dt__6PlanetXv
__T_6Planet
__cxxexsig6Planet
__vtbl_5Orbit6Planet
__vtbl_5Orbit6Planet4Moon
__vtbl_6Planet
solarSystemSrc/derived_class_includes/planet.h
solarSystemSrc/derived_class_includes/planet.h
solarSystemSrc/derived_class_includes/planet.h
solarSystemSrc/planet.cxx
(idb) whereis "^Planet$"
"solarSystemSrc/derived_class_includes/planet.h"`Planet
"solarSystemSrc/derived_class_includes/planet.h"`Planet
"solarSystemSrc/derived_class_includes/planet.h"`Planet
"solarSystemSrc/derived_class_includes/planet.h"`Planet::Planet(char*, Megameters, class HeavenlyBody*)
(idb) whereis Planet
"solarSystemSrc/derived_class_includes/planet.h"`Planet
"solarSystemSrc/derived_class_includes/planet.h"`Planet
"solarSystemSrc/derived_class_includes/planet.h"`Planet
"solarSystemSrc/derived_class_includes/planet.h"`Planet::Planet(char*, Megameters, class HeavenlyBody*)
(idb) which Planet
"solarSystemSrc/derived_class_includes/planet.h"`Planet
(idb) whatis Planet
class Planet : HeavenlyBody, Orbit {
Planet(char*, Megameters, class HeavenlyBody*);
virtual void print(unsigned int);
}
You can use the $symbolsearchlimit debugger
variable to specify the maximum number of symbols that will be returned by the
whereis command for a regular expression
search. The default value for the $symbolsearchlimit variable is
100; a value of 0 indicates no limit.
8.4.10 The which Command
Use the which command to determine which declaration an identifier
resolves to. The which command shows the fully qualified scope
information for the instance of the specified expression visible from the current scope.
The scope information of a variable usually consists of the name of the source
file that contains the function in which the variable is declared, the name of that
function, and the name of the variable. The components of the scope information are
separated by back-quotes (`).
which_command : which which_name which_name : identifier_or_typedef_name | ( identifier_or_typedef_name )
The following example shows how to use the whereis and
which
commands to determine a variable's scope:
(idb) where 4 >0 0x804cd72 in ((Planet*)0x80e6008)->Planet::print(i=2) "solarSystemSrc/planet.cxx":19 #1 0x804c772 in ((HeavenlyBody*)0x80e6008)->HeavenlyBody::printBodyAndItsSatellites(i=2) "solarSystemSrc/heavenlyBody.cxx":62 #2 0x804c7a7 in ((HeavenlyBody*)0x80e5fb0)->HeavenlyBody::printBodyAndItsSatellites(i=1) "solarSystemSrc/heavenlyBody.cxx":68 #3 0x804c50a in main() "solarSystemSrc/main/solarSystem.cxx":120 (idb) which i "solarSystemSrc/planet.cxx"`Planet::print(unsigned int)`i (idb) assign i = 10 (idb) print i 10 (idb) whereis i "solarSystemSrc/heavenlyBody.cxx"`HeavenlyBody::printBodyAndItsSatellites(unsigned int)`i "solarSystemSrc/heavenlyBody.cxx"`HeavenlyBody::printBodyAndItsSatellites(unsigned int)`i "solarSystemSrc/heavenlyBody.cxx"`HeavenlyBody::satelliteNumber(struct HeavenlyBody*)`i "solarSystemSrc/main/solarSystem.cxx"`main`i "solarSystemSrc/main/solarSystem.cxx"`printBiggestMoons`i "solarSystemSrc/main/solarSystem.cxx"`trackBiggestMoons(struct Moon*)`i "solarSystemSrc/planet.cxx"`Moon::print(unsigned int)`i "solarSystemSrc/planet.cxx"`Planet::print(unsigned int)`i "solarSystemSrc/star.cxx"`Star::print(unsigned int)`i (idb) func HeavenlyBody::printBodyAndItsSatellites Error: no value for symbol this Evaluating 'HeavenlyBody::printBodyAndItsSatellites' failed! The scope HeavenlyBody does not have a field named 'printBodyAndItsSatellites'! (idb) which i Symbol not found in current scope (idb) print i Symbol "i" is not defined.
8.4.11 Notes on C++ Debugging
The following sections describe the debugger commands specific to debugging C++ programs.
8.4.11.1 Setting the Class Scope Using the class Command
The debugger maintains the concept of a current context in which to perform lookup of program variable names. The current context includes a file scope and either a function scope or a class scope. The debugger automatically updates the current context when program execution suspends.
The class command lets you set the scope to a class in the program
you are debugging:
c++_look_around_command : class [ class_name ]
If class_name is not specified, the class command displays the
current class context.
Setting the class scope nullifies the function scope and vice versa. To return to the
default (current function) scope, use the command func 0.
Explicitly setting the debugger's current context to a class enables you to view a class to:
- Set a breakpoint in a member function
- Print static data members
- Examine any data member's type
After the class scope is set, you can set breakpoints in the class's
member functions and examine data without explicitly mentioning the class name.
If you do not want to affect the current context, you can use the scope
resolution operator (::) to access a class whose members are not currently
visible. Use the class command without an argument to display the
current class scope. Specify an argument to change the class scope. After the
class scope is set, refer to members of the class by omitting the
classname:: prefix.
The following example shows the use of the class command to set the
class scope to List<Node> in order to make member function append visible
so a breakpoint can be set in append:
(idb) stop in append
Symbol "append" is not defined.
append has no valid breakpoint address
Warning: Breakpoint not set
(idb) class List<Node>
struct List<Node> {
struct Node* _firstNode;
List(void);
void append(struct Node* const);
void print(void);
~List(void);
}
(idb) stop in append
[#1: stop in void List<Node>::append(struct Node* const) ]
8.4.11.2 Displaying Class Information
The whatis and print commands display
information on a class.
Use the whatis command to display static information about the classes.
Use the print command to view dynamic information about class objects.
The whatis command displays the class type declaration, including the
following:
- Data members
- Member functions
- Constructors
- Destructors
- Static data members
- Static member functions
For classes that are derived from other classes, the data members and member functions inherited from the base class are not displayed. Any member functions that are redefined from the base class are displayed.
The print command lets you display the value of data members and
static members. Information regarding the public, private, or protected status
of class members is not provided, because the debugger relaxes the related
access rules to be more helpful to users.
The type signatures of member functions, constructors, and destructors are displayed in a form that is appropriate for later use in resolving references to overloaded functions.
The following example shows the whatis and print
commands in
conjunction with a class:
(idb) list 43: 12
43 // Compound Node - contains integer and float data items
44 //
45 class CompoundNode : public IntNode {
46 public:
47 CompoundNode (float fdata, int idata);
48
49 void printNodeData() const;
50
51 private:
52 float _fdata;
53 };
54
(idb) whatis CompoundNode
struct CompoundNode : IntNode {
float _fdata;
CompoundNode(float, int);
virtual void printNodeData(void);
}
(idb) whatis CompoundNode::CompoundNode
CompoundNode::CompoundNode(float, int)
(idb) stop in CompoundNode::printNodeData
[#1: stop in virtual void CompoundNode::printNodeData(void) ]
(idb) run
The list is:
Node 1 type is integer, value is 1
[1] stopped at [virtual void CompoundNode::printNodeData(void):109 0x804a654]
109 cout << " type is compound, value is ";
(idb) print _fdata
12.3450003
8.4.11.3 Displaying Object Information
The whatis and print commands display information on
instances of classes (objects). Use the whatis command to display the
class type of an object. Use the print command to display the current
value of an object.
You can also display individual object members using the member access
operators, period (.) and right arrow (->), in a print command.
You can use the scope resolution operator (::) to refer to global variables, to refer to hidden members in base classes, to explicitly refer to a member that is inherited, or to name a member hidden by the current context.
When you are in the context of a nested class, you must use the scope resolution operator to access members of the enclosing class.
The following example shows how to use the whatis and
print
commands to display object information:
(idb) whatis this
const struct CompoundNode* const this
(idb) whatis *this
struct CompoundNode : IntNode {
float _fdata;
CompoundNode(float, int);
virtual void printNodeData(void);
}
(idb) print *this
struct CompoundNode {
_fdata = 12.3450003;
_data = 2; // class IntNode
_nextNode = 0x80b0f68; // class IntNode::Node
}
(idb) print _fdata, _data
12.3450003 2
(idb) print this->_fdata, this->_data
12.3450003 2
8.4.11.4 Displaying Static and Dynamic Type Information
When displaying object information for C++ class pointers or references, you have the option of viewing either static type information or dynamic type information.
The static type of a class pointer or reference is its type as defined in the source code, and thus cannot change. The dynamic type is the type of the object being referenced, before any casts were made to that object, and thus may change during program execution.
The debugger provides a debugger variable,
$usedynamictypes, which allows
you to control which form of the type information is displayed. The
default value for this variable is true (1), which indicates that the dynamic
type information is displayed. Setting this variable to false (0)
instructs the debugger to display static type information. The output of the
print, trace, tracei, and
whatis commands are affected.
The display of dynamic type information is supported for C++ class pointers and references. All other types display static type information. In addition, if the dynamic type of an object cannot be determined, the debugger defaults to the use of static type information.
This debugger functionality does not relax the C++ visibility rules regarding object member access through a pointer/reference (only members of the static type are accessible). For more information about the C++ visibility rules, see The Annotated C++ Reference Manual (by Margaret E. Ellis and Bjarne Stroustrup, 1990, Addison-Wesley Publishing Company).
In order for dynamic type information to be displayed, the object's static type must have at least one virtual function defined as part of its interface (either one it introduced or one it inherited from a base class). If no virtual functions are present for an object, only the static type information for that object is available for display.
The following example shows debugger output with $usedynamictypes
set to 0 (false):
(idb) print $usedynamictypes
0
(idb) whatis *this
struct HeavenlyBody {
const char* const _name;
struct HeavenlyBody* _innerNeighbor;
struct HeavenlyBody* _outerNeighbor;
struct HeavenlyBody* _firstSatellite;
struct HeavenlyBody* _lastSatellite;
HeavenlyBody(char*);
void addSatellite(struct HeavenlyBody*);
const char* name(void);
virtual void print(unsigned int);
void printBodyAndItsSatellites(unsigned int);
unsigned int satelliteNumber(struct HeavenlyBody*);
}
(idb) print *this
struct HeavenlyBody {
_name = 0x808e4a0="Moon";
_innerNeighbor = 0x0;
_outerNeighbor = 0x0;
_firstSatellite = 0x0;
_lastSatellite = 0x0;
}
The following example displays debugger output with $usedynamictypes
set to 1 (true). The output is for the same object as the previous example,
at the same point in program execution:
(idb) print $usedynamictypes
1
(idb) whatis *this
struct HeavenlyBody {
const char* const _name;
struct HeavenlyBody* _innerNeighbor;
struct HeavenlyBody* _outerNeighbor;
struct HeavenlyBody* _firstSatellite;
struct HeavenlyBody* _lastSatellite;
HeavenlyBody(char*);
void addSatellite(struct HeavenlyBody*);
const char* name(void);
virtual void print(unsigned int);
void printBodyAndItsSatellites(unsigned int);
unsigned int satelliteNumber(struct HeavenlyBody*);
}
(idb) print *this
struct HeavenlyBody {
_name = 0x808e4a0="Moon";
_innerNeighbor = 0x0;
_outerNeighbor = 0x0;
_firstSatellite = 0x0;
_lastSatellite = 0x0;
}
8.4.11.5 Displaying Virtual and Inherited Class Information
When you use the print command to display information on an instance
of a derived class, the debugger displays both the new class members as well as the
members inherited from a base class. Pointers to members of a class are not supported.
When you use the print command to display the format of C++ classes,
the class name (or structure/union name) is displayed at the top of the output.
Data members of a class that are inherited from another class are commented
using a double slash (//). Only those data members that are inherited within
the current class being printed are commented.
The following example shows how the debugger uses C++ style comments to identify inherited class members. In the example, class CompoundNode inherits from class IntNode, which inherits from class Node. When printing a class CompoundNode object, the data member _data is commented with "// class IntNode", signifying that it is inherited from class IntNode. The member _nextNode is commented with "// class IntNode::Node", showing that it is inherited from class IntNode, which inherits it from class Node. This commenting is also provided for C++ structs.
(idb) where 3
>0 0x804a628 in ((CompoundNode*)<bad value>)->CompoundNode::CompoundNode(=<no value>, =<no value>) "x_list.cxx":103
#1 0x804a0ae in main() "x_list.cxx":189
#2 0x400a2507 in __libc_start_main(...) in /lib/i686/libc.so.6
(idb) whatis *this
Symbol "this" is not defined.
(idb) print *this
Symbol "this" is not defined.
(idb) up 1
>1 0x804a0ae in main() "x_list.cxx":189
189 CompoundNode* cNode = new CompoundNode(12.345, 2);
(idb) whatis *this
Symbol "this" is not defined.
(idb) print *this
Symbol "this" is not defined.
(idb) up 1
>2 0x400a2507 in __libc_start_main(...) in /lib/i686/libc.so.6
(idb) whatis *this
Symbol "this" is not defined.
(idb) print *this
Symbol "this" is not defined.
If two members in an object have the same name but different base class types (multiple inheritance), you can refer to the members using the following syntax:
object.class::member
or
object->class::member
This syntax is more effective than using the object.member and
object->member syntaxes, which can be ambiguous. In all cases,
the debugger uses the C++ language rules as defined in
The Annotated C++ Reference Manual to determine which member you are
specifying.
The following example shows a case in which the expanded syntax can be used:
(idb) print *jupiter
struct Planet {
_name = 0x808e480="Jupiter"; // class HeavenlyBody
_innerNeighbor = 0x80cf6e8; // class HeavenlyBody
_outerNeighbor = 0x80cfa48; // class HeavenlyBody
_firstSatellite = 0x80cf868; // class HeavenlyBody
_lastSatellite = 0x80cf9e8; // class HeavenlyBody
_primary = 0x80cf4d0; // class Orbit
_distance = 778330; // class Orbit
_name = 0x80cf8a0="Sol 5"; // class Orbit
}
(idb) print jupiter->_name
Overloaded Values
0x80cf8a0="Sol 5"
0x808e480="Jupiter"
(idb) print jupiter->HeavenlyBody::_name
0x808e480="Jupiter"
(idb) print jupiter->Orbit::_name
0x80cf8a0="Sol 5"
8.4.11.6 Member Functions on the Stack Trace
The implicit this pointer, which is a part of all nonstatic member functions,
is displayed as the address on the stack trace. The class type of the object
is also given.
Sometimes the debugger does not see class type names with internal linkage. When this happens, the debugger issues the following error message:
Name is overloaded.
Trying to examine an inlined member function that is not called results in the following error:
Member function has been inlined.
The debugger will report this error regardless of the setting of the -noinline_auto compilation flag. As a workaround, include a call to
the given member function somewhere in your program. (The call does not need to be executed.)
If a program is not compiled with the -g flag, a breakpoint set on an inlined member function may confuse the debugger.
8.4.11.7 Resolving Ambiguous References to Overloaded Functions
In most cases, the debugger works with one specific function at a time. In the
case of overloaded function names, you must specify the desired overloaded
function. Following are two ways to resolve references to overloaded function names,
both under the control of the
$overloadmenu debugger variable (the
default setting of this debugger variable is 1):
-
Choose the correct reference from a selection menu.
If the
$overloadmenuvariable is set to 1 (the default), whenever you specify a function name that is overloaded, a menu appears with all the possible functions; you must select from this menu. In this example, a breakpoint is set infoo, which is overloaded:(idb) set $overloadmenu = 1 (idb) stop in C::foo Select from ---------------------------------------------------- 1 int C::foo(double*) 2 void C::foo(float) 3 void C::foo(int) 4 void C::foo(void) 5 None of the above ---------------------------------------------------- 1 [#10: stop in int C::foo(double*) ] -
Enter the function name with its full type signature.
If you prefer this method, set the
$overloadmenuvariable to 0. To see the possible type signatures for the overloaded function, first display all the declarations of an overloaded function by using thewhatiscommand.You cannot select a version of an overloaded function that has a type signature containing ellipsis points (...). Pointers to functions with type signatures that contain the list parameter or ellipsis points are not supported.
Use the specific function type signature to refer to the desired version of the overloaded function. If a function has no parameter, include the void parameter as the function's type signature. In the following example, the function context is set to
foo(double *), asfoois overloaded:(idb) func foo Error: foo is overloaded (idb) func foo(double *) int C::foo(double*) in x_overload.cxx line No. 25: 25 int C::foo(double *) { return state;}
8.4.11.8 Advanced Program Information — Verbose Mode
By default, the debugger gives no information on virtual base class pointers for the following:
- Derived classes
- Virtual pointer tables for virtual functions
- Compiler-generated function members
- Compiler-generated temporary variables
- Implicit parameters in member functions
By setting the $verbose debugger variable to 1, you can request that this
information be printed in subsequent debugger responses. When the $verbose debugger variable is set to 1
and you display the contents of a class using the
whatis command, several of the class members listed
are not in the source code of the original class definition. The following line shows specific output from the
whatis command for one of the additional members:
line: 41 Unable to parse input as legal command or C expression.
The __vptr variable contains the addresses of all virtual functions associated
with the class. The compiler generates several other class members for internal use.
The compiler generates additional parameters for nonstatic member functions. When the
$verbose debugger variable is set to 1, these extra parameters are displayed
as part of each member function's type signature. If you specify a version of an overloaded
function by entering its type signature and the variable is set to 1, you must include
these parameters. Do not include these parameters if the variable is set to 0.
When the $verbose variable is set to 1, the output of the
dump command includes not only standard program variables but also compiler-generated temporary variables.
The following example prints class information using the whatis
command under different settings of the $verbose variable:
(idb) set $verbose = 0
(idb) whatis CompoundNode
struct CompoundNode : IntNode {
float _fdata;
CompoundNode(struct CompoundNode*, float, int);
virtual void printNodeData(const struct CompoundNode* const);
}
(idb) set $verbose = 1
(idb) whatis CompoundNode
struct CompoundNode : IntNode {
float _fdata;
CompoundNode(struct CompoundNode*, float, int);
virtual void printNodeData(const struct CompoundNode* const);
}
8.5 Looking at the Generated Code
This section discusses the following topics:
8.5.1 Memory Display and Search Commands
You can use the following commands to read arbitrary memory locations in your program:
machinecode_level_command : examine_command : search_command examine_command : address_expression / [ count ] [ mode ] | address_expression ? [ count ] [ mode ] | address_expression , address_expression / [ mode ] search_command : address_expression / [ count ] search_mode value mask | address_expression ? [ count ] search_mode value mask | address_expression , address_expression / search_mode value mask count : integer_constant mode : d Print a short word in decimal | dd Print a 32-bit (4-byte) decimal display | D Print a long word in decimal | u Print a short word in unsigned decimal | uu Print a 32-bit (4-byte) unsigned decimal display | U Print a long word in unsigned decimal | o Print a short word in octal | oo Print a 32-bit (4-byte) octal display | O Print a long word in octal | x Print a short word in hexadecimal | xx Print a 32-bit (4-byte) hexadecimal display | X Print a long word in hexadecimal | b Print a byte in hex | c Print a byte as a character | s Print a string of characters (a C-style string ending in null) | C Print a wide character as a character | S Print a null terminated string of wide characters | f Print a single precision real number | g Print a double precision real number | L Print a long double precision real number | i Disassemble machine instructions search_mode : m 32-bit search mode | M 64-bit search mode value : integer_constant mask : integer_constant
The first examine_command displays the count number of memory values in the requested format,
starting at address_expression. If count is not specified, 1 is assumed.
The count value must be a positive value.
If you wish to see memory values leading up to the address_expression,
use the second examine_command. The second examine_command displays
count number of memory values in
the requested format ending at the address_expression. If count is not specified,
1 is assumed. The count value must be a positive value.
The third examine_command displays memory values in the requested format starting at
the smaller of the two address_expressions and ending at the larger
address_expression.
You can display stored values in the following formats by specifying mode. If mode
is not specified, the mode used in the previous /
command is assumed. If no previous /
command exists, X is assumed.
When disassembling machine instructions, use the $regstyle
variable to
customize how the registers are displayed.
The search_commands allow you to search memory. Use the address_expression and
count to determine the range of
memory to search. Use the search_mode to specify whether you want to search 32 or 64-bit chunks.
The debugger will start
at the specified starting address and read a chunk of memory (either 32 or 64 bits in size) and apply
the mask
and comparison on that chunk of memory. For example, if you want to search memory for a particular
instruction
or search an array of either integer or floating-point values, the 32-bit search would be efficient
because machine instructions
and integer and floating-point data types are 32 bits in length. Use the value to specify
the memory value to seek.
Use the mask to specify those bits that
must match the same bits in the specified value. To ensure that a possible match will be found, the
debugger applies the mask to the input
value prior to starting the search, to remove any bits that could prevent a match from occurring.
Then, for each memory location searched,
the debugger applies the mask to the memory value and then compares it with this new
input value.
If a match is found, then the address and memory value are displayed.
For example, suppose the user wishes to check an array of 100 integers in memory to see if any values are NULL (0):
(idb) array,&(array[99])/m 0x0 0xfffffff 0x1400005d0: 0x00000000
Suppose the user wishes to search for the trapb instruction:
(idb) printi 0x63ff0000 trapb (idb) main/1000m 0x63ff0000 0xfffffff 0x12561314: 0x63ff0000
Use the debugger variable $memorymatchall to cause the debugger to output all matches in the
specified range. Suppose you want to search a long integer array of 100 values for the first value
over 80, and then want to find all values in the array over 80:
(idb) printx 80 0x50 (idb) longarray/100M 0x50 0x50 0x140002680: 0x0000000000000050 (idb) set $memorymatchall (idb) longarray/100M 0x50 0x50 0x140002680: 0x0000000000000050 0x140002688: 0x0000000000000051 0x140002690: 0x0000000000000052 0x140002698: 0x0000000000000053 0x1400026a0: 0x0000000000000054 0x1400026a8: 0x0000000000000055 0x1400026b0: 0x0000000000000056 0x1400026b8: 0x0000000000000057 0x1400026c0: 0x0000000000000058 0x1400026c8: 0x0000000000000059 0x1400026d0: 0x000000000000005a 0x1400026d8: 0x000000000000005b 0x1400026e0: 0x000000000000005c 0x1400026e8: 0x000000000000005d 0x1400026f0: 0x000000000000005e 0x1400026f8: 0x000000000000005f (idb)
8.5.2 Machine-Level Debugging
The debugger lets you debug your programs at the machine-code level as well as at the source-code level. Using debugger commands, you can examine and edit values in memory, print the values of all machine registers, and step through program execution one machine instruction at a time.
Only those users familiar with machine-language programming and executable file code structure will find low-level debugging useful.
For more information on machine-level debugging, see Machine-Level Debugging in Part III.
8.6 Looking at Shared Libraries
shared_library_command : listobj | readsharedobj filename | delsharedobj filename
Use the listobj command to list all loaded objects,
including the main image and the shared libraries.
For each object, the information listed consists of the full
object name (with pathname) and the starting and ending
addresses for the .text, .data, and .bss sections.
Use the readsharedobj command to read in the symbol table
information for the specified shared object. This object
must be a shared library.
You can use the command only when you specify the debuggee; that is, either
the debugger has been invoked with it, or
the debuggee was loaded by the load command.
Conversely, use the delsharedobj command to remove the
symbol table information for the shared object from the debugger.
Chapter 9 — Modifying the Process
In addition to the normal side effects of evaluating expressions, including calls, you can explicitly modify the memory of the current process and also modify the actual loadable file (either executable file or shared library) that has been mapped into memory.
The following sections discuss these commands.
9.1 The assign and the set variable Commands
Use
the assign(dbx) and
the set variable(gdb)
commands to change the value associated with a variable,
memory address, or expression that is accessible according to the scope and visibility
rules of the language. The expression can be any expression that is valid in the
current context.
DBX Mode
modifying_command : assign target = expression | patch target = expression target : unary_expression
GDB Mode
modifying_command
: set [ variable ] expression
The set variable command evaluates the specified expression. If expression
includes assignment operator, it executes like all other operators. This is the way to change
memory.
The only difference between the set variable and
the print commands is printing the value —
the set variable does not print anything.
Note:
The variable can be omitted if the beginning of
expression does not confuse the debugger, for example, does not look
like a valid subcommand for the set command.
The following example shows how to deposit the value 5 into the data
member _data of a C++ object:
DBX Mode
(idb) print node->_data 2 (idb) assign node->_data = 5 (idb) print node->_data 5
GDB Mode
(idb) print node->_data $2 = 2 (idb) set node->_data = 5 (idb) print node->_data $3 = 5
The following example shows how to change the value associated with a variable and the value associated with an expression:
DBX Mode
(idb) print *node
struct CompoundNode {
_fdata = 12.3450003;
_data = 5; // class IntNode
_nextNode = 0x0; // class IntNode::Node
}
(idb) assign node->_data = -32
(idb) assign node->_fdata = 3.14159 * 4.2 * 4.2
(idb) assign node->_nextNode = _firstNode
(idb) print *node
struct CompoundNode {
_fdata = 55.4176483;
_data = -32; // class IntNode
_nextNode = 0x80c0fe0; // class IntNode::Node
}
GDB Mode
(idb) print *node
$6 = {<IntNode> = {<Node> = {_nextNode = 0x0}, _data = 5}, _fdata = 12.345}
(idb) set node->_data = -32
(idb) set node->_fdata = 3.14159 * 4.2 * 4.2
(idb) set node->_nextNode = _firstNode
(idb) print *node
$7 = {<IntNode> = {<Node> = {_nextNode = 0x80b98e0}, _data = -32}, _fdata = 55.41765}
For C++, use
the assign(dbx) and
the set variable(gdb)
commands to modify static and object data
members in a class, and variables declared as reference types, type const, or
type static. You cannot change the address referred to by a reference type, but
you can change the value at that address.
assign [classname::]member = ["filename"] `expression assign [object.]member = ["filename"] `expression
Note:
Do not use
the assign(dbx) and
the set variable(gdb)
commands to change the PC.
When you change the PC, no adjustment to the contents
of registers or memory is made. This means that if
you adjust the PC forward, the skipped instructions are
not executed and any changes they would have made will
not have happened. It means that if you adjust the PC
backward, the instructions you backed up over are not
undone, and any changes they made will be in effect when
execution continues again.
Because most instructions change registers or memory in ways that can impact the meaning of the application, changing the PC is very likely to cause your application to do incorrect calculations and arrive at the wrong answer. Access violations and other errors and signals may result from changing the value in the PC.
9.1.1 The assign and the set variable Commands in Machine-Level Debugging
You can use
the assign(dbx) and
the set variable(gdb)
commands to alter the contents of memory
specified by an address as shown in the following example:
DBX Mode
(idb) set $address = &(node->_data) (idb) print $address 0x80c0ff8 (idb) print *(int *)($address) -32 (idb) assign *(int *)($address) = 1024 (idb) print *(int *)($address) 1024
GDB Mode
(idb) set $address = &(node->_data) (idb) print $address $11 = (int *) 0x80b98f8 (idb) print *(int *)($address) $12 = 32 (idb) set *(int *)($address) = 1024 (idb) print *(int *)($address) $13 = 1024
See Machine-Level Debugging for more information.
9.2 The patch Command (DBX Mode only)
Use the patch command to correct bad data or instructions in executable disk
files. You can patch the text, initialized data, or read-only data areas. You cannot patch
the bss segment, or stack and register locations,
because they do not exist on disk files.
Use this command exclusively when you need to change the on-disk binary. Use the
assign command when you need only to modify debuggee memory. If the
image is executing when you issue the patch command, the corresponding
location in the debuggee address space is updated as well. (The debuggee is
updated regardless of whether the patch to disk succeeded, as long as the
source and destination expressions can be processed by the assign
command.) If your program is loaded but not yet started, the patch to disk
is performed without the corresponding assign to memory.
(idb) run [1] stopped at [int main(void):24 0x120001324] 24 return 0; (idb) patch i = 10 0x1400000d0 = 10 (idb) patch j = i + 12 0x1400000d8 = 22 (idb)
Note: When you use the patch
command, the original binary
is not overwritten, but is saved with the string ~backup appended
to the file name.
This allows you to revert to the original binary if necessary. A file with the
string ~temp appended
to the file name may also be created. It may be deleted after the
debugging session is over.
Chapter 10 — Continuing Execution of the Process
Before continuing the process, you should decide whether or not to make a snapshot, in case you want to revert to that snapshot state and try a different set of steps. After creating the snapshot, use the following commands to continue executing the program:
continue_command : step_into_command | step_over_command | step_out_of_command | cont_command | cont_from_place_command | finish_command
10.1 The step and stepi Commands
Use the step command to execute a line of source code. When the
line being stepped contains a function call, the step command
steps into the function and stops at the first executable statement.
Use the stepi command to step into the next machine instruction. When
the instruction contains a function call, the stepi command steps
into the function being called.
For multithreaded applications, use these commands to step the current thread while putting all other threads on hold.
If you supply the optional expression argument, the debugger evaluates the expression as a positive integer that specifies the number of times to execute the command. The expression can be any expression that is valid in the current context.
step_into_command : step [ step_number ] | stepi [ step_number ]
step_number : expression
In the following example, two step commands
continue executing a C++ program:
DBX Mode
(idb) step
stopped at [void List<Node>::append(struct Node* const):151 0x805801d]
151 Node* currentNode = _firstNode;
(idb) step
stopped at [void List<Node>::append(struct Node* const):152 0x8058025]
152 while (currentNode->getNextNode())
GDB Mode
(idb) step 151 Node* currentNode = _firstNode; (idb) step 152 while (currentNode->getNextNode())
The following example shows stepping by
instruction (stepi). To see stepping into calls, see the
next example.
DBX Mode
(idb) $curpc/4i
void List<Node>::append(struct Node* const): x_list.cxx
*[line 156, 0x8058087] append(struct Node* const)+0x83: leave
[line 156, 0x8058088] append(struct Node* const)+0x84: ret
[line 156, 0x8058089] append(struct Node* const)+0x85: nop
[line 156, 0x805808a] append(struct Node* const)+0x86: nop
(idb) stepi
stopped at [void List<Node>::append(struct Node* const):156 0x8058088] append(struct Node* const)+0x84: ret
(idb) return
stopped at [int main(void):190 0x804a110]
190 nodeList.append(cNode);
GDB Mode
(idb) x /4i $pc Dump of assembler code for function void List<Node>::append(class List<Node> * const, class Node * const): 0x804aac7 <append(class List<Node> * const, class Node * const)+131>: leave 0x804aac8 <append(class List<Node> * const, class Node * const)+132>: ret 0x804aac9 <append(class List<Node> * const, class Node * const)+133>: nop 0x804aaca <append(class List<Node> * const, class Node * const)+134>: nop (idb) stepi (idb) finish main () at x_list.cxx:190 190 nodeList.append(cNode);
10.2 The next and nexti Commands
Use the next command to execute a line of source code. When the next
line to be executed contains a function call, the next command executes
the function being called and stops the process at the line immediately after the function
call.
Use the nexti command to execute a machine instruction. When the
instruction contains a function call, the nexti command executes the
function being called and stops the process at the instruction immediately after the
call instruction.
For multithreaded applications, use these commands to step the current thread while putting all other threads on hold.
If you supply the optional expression argument, the debugger evaluates the expression as a positive integer that specifies the number of times to execute the command. The expression can be any expression that is valid in the current context.
step_over_command : next [ step_number ] | nexti [ step_number ] step_number : expression
For example:
DBX Mode
(idb) next
stopped at [int main(void):192 0x804a113]
192 CompoundNode* cNode1 = new CompoundNode(3.1415, 7);
(idb) next
stopped at [int main(void):193 0x804a1ba]
193 nodeList.append(cNode1);
GDB Mode
(idb) next 192 CompoundNode* cNode1 = new CompoundNode(3.1415, 7); (idb) next 193 nodeList.append(cNode1);
The following example shows the difference between
stepi and nexti over the same call:
DBX Mode
(idb) cont
[2] stopped at [void List<Node>::append(struct Node* const):152 0x8058025]
152 while (currentNode->getNextNode())
(idb) $curpc/4i
void List<Node>::append(struct Node* const): x_list.cxx
*[line 152, 0x8058025] append(struct Node* const)+0x21: pushl %edi
[line 152, 0x8058026] append(struct Node* const)+0x22: movl -4(%ebp), %eax
[line 152, 0x8058029] append(struct Node* const)+0x25: movl %eax, (%esp)
[line 152, 0x805802c] append(struct Node* const)+0x28: call getNextNode
(idb) stepi 3
stopped at [void List<Node>::append(struct Node* const):152 0x805802c] append(struct Node* const)+0x28: call getNextNode
(idb) stepi
stopped at [struct Node* Node::getNextNode(void):81 0x804a554] getNextNode: pushl %ebp
(idb) cont
[2] stopped at [void List<Node>::append(struct Node* const):152 0x8058056]
152 while (currentNode->getNextNode())
(idb) nexti
stopped at [void List<Node>::append(struct Node* const):152 0x8058057] append(struct Node* const)+0x53: movl -4(%ebp), %eax
(idb) nexti
stopped at [void List<Node>::append(struct Node* const):152 0x805805a] append(struct Node* const)+0x56: movl %eax, (%esp)
GDB Mode
(idb) continue
Continuing.
Breakpoint 2, List<Node>::append (this=0xbfffecdc, node=0x80b9768) at x_list.cxx:152
152 while (currentNode->getNextNode())
(idb) x /4i $pc
Dump of assembler code for function void List<Node>::append(class List<Node> * const, class Node * const):
0x804aa65 <append(class List<Node> * const, class Node * const)+33>: pushl %edi
0x804aa66 <append(class List<Node> * const, class Node * const)+34>: movl -4(%ebp), %eax
0x804aa69 <append(class List<Node> * const, class Node * const)+37>: movl %eax, (%esp)
0x804aa6c <append(class List<Node> * const, class Node * const)+40>: call 0x804a684 <getNextNode(class Node * const)>
(idb) stepi 3
152 while (currentNode->getNextNode())
(idb) stepi
Node::getNextNode (this=(class Node *) 0xbfffecdc) at x_list.cxx:81
81 Node* Node::getNextNode() {return _nextNode; }
(idb) continue
Continuing.
Breakpoint 2, List<Node>::append (this=0xbfffecdc, node=0x80b9768) at x_list.cxx:152
152 while (currentNode->getNextNode())
(idb) nexti
152 while (currentNode->getNextNode())
(idb) nexti
152 while (currentNode->getNextNode())
10.3 The return Command
Use the return(dbx) and
finish(gdb)
command without an argument to continue execution of the
current function until it returns to its caller.
Use return function_name(dbx)
to continue the execution until control is returned to the specified function.
The function must be active on the call stack.
DBX Mode
step_out_of_command : return | return [qual_symbol_opt] qual_symbol_opt : expression | qual_symbol_opt ` expression
GDB Mode
step_out_of_command : finish
In the following example, the next command is
used to step through process execution in the append method.
The return(dbx) /
finish(gdb) command
finishes the append method and returns control to the caller.
DBX Mode
(idb) next
stopped at [void List<Node>::append(struct Node* const):154 0x805806f]
154 currentNode->setNextNode(node);
(idb) return
stopped at [int main(void):193 0x804a1d2]
193 nodeList.append(cNode1);
GDB Mode
(idb) next 154 currentNode->setNextNode(node); (idb) finish main () at x_list.cxx:193 193 nodeList.append(cNode1);
The return(dbx) /
finish(gdb) command
is sensitive to the user's location in the call stack.
Suppose function A calls function B, which calls function C. Execution has stopped in
function C, and you entered the up command, so you were now in function B,
at the point where it called function C. Using the return command here
would return you to function A, at the point where function A called function B.
Functions B and C will have completed execution.
10.4 The cont Command
Use the cont(dbx) and
continue(gdb)
command without a parameter value to resume process
execution until a breakpoint, a signal, an error, or normal process termination is
encountered. Specify a signal parameter value to send an operating system
signal to the process.
DBX Mode
cont_command : cont [ in loc ] | cont [ signal ] [ to_source_line ] | number_expression cont [ signal ] | conti to address_expression to_source_line : to line_specifier number_expression : expression signal : integer_constant | signal_name
GDB Mode
cont_command : continue [number_expression] | until [place_detector]
When you use the cont(dbx) and
continue(gdb)
command, the debugger resumes execution of the
entire process.
In the following example, a cont(dbx) /
continue(gdb)
command resumes process execution
after it was suspended by a breakpoint.
DBX Mode
(idb) list $curline - 5: 10
188
189 CompoundNode* cNode = new CompoundNode(12.345, 2);
190 nodeList.append(cNode);
191
192 CompoundNode* cNode1 = new CompoundNode(3.1415, 7);
> 193 nodeList.append(cNode1);
194
195 nodeList.append(new IntNode(3));
196
197 IntNode* newNode2 = new IntNode(4);
(idb) stop at 198
[#3: stop at "x_list.cxx":198 ]
(idb) cont
[3] stopped at [int main(void):198 0x804a31e]
198 nodeList.append(newNode2);
GDB Mode
(idb) list 183 184 // add entries to list 185 // 186 IntNode* newNode = new IntNode(1); 187 nodeList.append(newNode); 188 189 CompoundNode* cNode = new CompoundNode(12.345, 2); 190 nodeList.append(cNode); 191 192 CompoundNode* cNode1 = new CompoundNode(3.1415, 7); 193 nodeList.append(cNode1); 194 195 nodeList.append(new IntNode(3)); 196 197 IntNode* newNode2 = new IntNode(4); 198 nodeList.append(newNode2); 199 200 CompoundNode* cNode2 = new CompoundNode(10.123, 5); 201 nodeList.append(cNode2); 202 (idb) break 198 Breakpoint 3 at 0x804a44e: file x_list.cxx, line 198. (idb) continue Continuing. Breakpoint 3, main () at x_list.cxx:198 198 nodeList.append(newNode2);
DBX Mode
The signal parameter value can be either a signal number or a string name (for example, SIGSEGV). The default is 0, which allows the process to continue execution without specifying a signal. If you specify a signal parameter value, the process continues execution with that signal.
Use the in argument to continue until the named function is reached.
The function name must be valid. If the function name is overloaded and you do not
resolve the scope of
the function in the command line, the debugger prompts you with the list of
overloaded functions bearing that name from which to choose.
Use the to parameter value to resume execution and then
halt when the specified source line is reached.
The form of the optional to parameter must be either:
-
quoted_filename:line_number, which explicitly identifies both the source file and the line number where execution is to be halted. -
line_number, a positive numeric, which indicates the line number of the current source file where execution is to be halted.
You can repeat the cont command
(n +1) times by entering
n cont.
You can set a one-time breakpoint on an instruction address before continuing
by entering conti to address_expression.
GDB Mode
Use the optional argument number_expression
of the continue command to specify a further number
of times to ignore a breakpoint at this location.
The until command continues running until a source line
past the current line, in the current stack frame, is reached.
This command is used to avoid single stepping through a loop more than once.
If place_detector is specified the command
continues running until either the specified location is reached, or the current
stack frame returns.
10.5 The goto Command
DBX Mode
The goto(dbx)
command is intended for advanced users who want to 'skip over' the execution
of a portion of source code. In general, its usage is not recommended.
cont_from_place_command : goto line_expression line_expression : expression
Chapter 11 — Using Snapshots as an Undo Mechanism
DBX Mode
You can save the current state of the debuggee process in a snapshot, and later revert to that state and try a different set of steps. Conceptually speaking, this feature is similar to the undo function in text editors, except that with snapshots you have control of the granularity of each undo. See the Introduction for a quick overview.
snapshot_command : save_snapshot_command | clone_snapshot_command | show_snapshot_command | delete_snapshot_command
The following sections discuss these commands and address the limitations of snapshots.
11.1 The save snapshot Command
Use the save snapshot command to save the state of the current process
in a snapshot. Snapshots are numbered sequentially starting from 1.
save_snapshot_command : save snapshot
In the following example, the first line of the save snapshot
message
shows the snapshot_number (1), the time it is saved,
and the ID number of the process that implements the snapshot.
The next two lines show the status of the snapshot.
(idb) save snapshot
# 1 saved at 13:27:54 (PID: 29077).
stopped at [int main(void):182 0x1200023f8]
182 List<Node> nodeList;
11.2 The clone snapshot Command
Use the clone snapshot command to revert the state of the
debuggee process to that of a previously saved snapshot. By doing this,
you can conveniently return to the state saved in the snapshot as opposed
to rerunning the process and re-entering the debugger command sequence
that brought you to that state.
Note that rerun and clone snapshot
are different in that
rerun always executes the process from the beginning, whereas
clone snapshot does not execute the process at all; it simply
duplicates the saved snapshot (using a mechanism similar to the fork system
call) and behaves as though the process execution has stopped at the point when the
snapshot was saved.
The clone snapshot command clones the snapshot specified by
snapshot_id. If no snapshot_id is
specified, the most-recently saved existing snapshot is cloned.
clone_snapshot_command : clone snapshot [ snapshot_id ] snapshot_id : expression
Cloning a snapshot has two side effects:
-
The snapshots created after the cloned snapshot are deleted. For example, suppose four snapshots are saved from a process. Cloning the second snapshot results in the deletion of the third and fourth snapshots.
-
The current process is killed and replaced by the clone process. Thus, if you enter
show processafter cloning a snapshot, you will see that the process ID of the current process has changed to that of the cloned process. For example:(idb) show process >localhost:29013 (/usr/examples/x_list) paused. (idb) clone snapshot Process has exited Process 29089 cloned from Snapshot 1. # 1 saved at 13:27:54 (PID: 29077). stopped at [int main(void):182 0x1200023f8] 182 List<Node> nodeList; (idb) show process >localhost:29089 (/usr/examples/x_list) paused.
11.3 The show snapshot Command
Use the show snapshot * and show snapshot all commands to
display all the snapshots that have been saved from the current process. Use
show snapshot snapshot_id_list to display the snapshots
specified. If no snapshots are specified, the most-recently saved existing
snapshot is displayed.
show_snapshot_command : show snapshot [ snapshot_id_list ] snapshot_id_list : snapshot_id ,... | all | * snapshot_id : expression
For example:
(idb) show snapshot all
# 1 saved at 13:27:54 (PID: 29077).
stopped at [int main(void):182 0x1200023f8]
182 List<Node> nodeList;
11.4 The delete snapshot Command
Use the delete snapshot * and delete snapshot all commands to
delete all the snapshots that have been saved from the current process. Use
delete snapshot snapshot_id_list to delete the specified
snapshots. If no snapshots are specified, the most-recently saved existing
snapshot is deleted.
delete_snapshot_command : delete snapshot [ snapshot_id_list ] snapshot_id_list : snapshot_id ,... | all | * snapshot_id : expression
For example:
(idb) show snapshot all
# 1 saved at 13:27:54 (PID: 29077).
stopped at [int main(void):182 0x1200023f8]
182 List<Node> nodeList;
(idb) delete snapshot
(idb) show snapshot all
No snapshots have been saved.
11.5 Snapshot Limitations
Snapshots have the following limitations:
- Snapshots are implemented by causing the process to fork. The state saved in a snapshot does not include I/O and forks. In other words, when you clone a snapshot, the I/O that has been done since the snapshot was saved is not undone; likewise, the child processes that have been spawned since the snapshot was saved are not killed.
-
The
save snapshotcommand saves the state of the current process only. If you are doing multiprocess debugging, you might want to save a snapshot for each process. - Snapshots on a multithreaded process are not supported.
- Snapshots are not supported for core file debugging.
Chapter 12 — Debugging Optimized Code
TBD
Chapter 13 — Support Limitations
This chapter contains sections which describe the limitations on support for the following languages:
13.1 Limitations on Support for C++
The debugger interprets C++ names and expressions using the language rules described in The Annotated C++ Reference Manual (Ellis and Stroustrup, 1990, Addison-Wesley). C++ is a distinct language, rather than a superset of C. Where the semantics of C and C++ differ, the debugger provides the interpretation appropriate for the language of the program being debugged.
To make the debugger more useful, it relaxes some standard C++ name visibility rules. For example, you can reference public, protected, and private class members.
The following limitations apply to debugging a C++ program:
- If a program is not compiled to include debug information, do not set a breakpoint on an inline member function; it may confuse the debugger.
- When you use the debugger to display virtual and inherited class information, the debugger does not support pointers to members of a class.
-
The debugger does not support calling the C++ constructs
newanddelete. As alternatives, use themalloc()andfree()routines from C. - Sometimes the debugger does not see class type names with internal linkage, and it issues an error message stating that the name is overloaded.
- You cannot select a version of an overloaded function that has a type signature containing ellipsis points (...).
- Pointers to functions with type signatures that contain parameter list or ellipsis arguments are not supported.
Limitations for debugging templates include the following:
- You cannot specify a template by name in a debugger command. You must use the name of an instantiation of the template.
- Setting a breakpoint at a line number that is inside a template function will not necessarily stop at all instantiations of the function within the given file, but only at a randomly chosen few.
13.2 Limitations on Support for Fortran
The debugger and the operating system support the Fortran language with certain limitations, which are described in the following sections.
Be aware of the following data-type limitations when you debug a Fortran program:
- The debugger does not allow setting a breakpoint on a program routine named MAIN.
- Substring notation is not supported.
The following limitations apply only to Fortran 90:
- Fortran 90 array constructors, structure constructors, adjustable arrays, and vector subscripts are not supported.
- Fortran 90 user-defined (derived) operators are not supported.
- The debugger does not handle variables of 16-bit character data types.
13.2.1 Limitations on Procedure Invocations
Following are the limitations on Fortran procedure invocations:
- The debugger does not support invocations of user-defined procedures unless they have been compiled with debug information.
- The debugger does not support complex or real*16 procedure return values.
- The debugger does not support real*16 or complex*32 procedure arguments.
-
Of the Fortran intrinsic procedures, the debugger currently supports only:
- the mathematical functions (for example, ACOS, ACOSD, SIN, SQRT, and so on)
- the kind type functions (KIND, SELECTED_INT_KIND, SELECTED_REAL_KIND)
Part III
Advanced Topics
Part III provides information to make advanced use of the debugger by expanding on topics presented in Part II.
It is intended to be used as a reference and therefore contains a wide variation in the level of information provided in each section.
Chapter 14 — Preparing Your Program for Debugging
This chapter describes how you can modify your program to wait for the debugger.
14.1 Modifying Your Program to Wait for the Debugger
To modify your program to wait for the debugger, complete the following steps:
-
Add some code similar to the following :
void loopForDebugger() { if (!getenv("loopForDebugger")) return; static volatile int debuggerPresent = 0; while (!debuggerPresent); } -
Call this function at some convenient point.
-
Use the debugger's
attachcapability to get the process under control.
When you have the process under debugger control, you can assign a non-zero value to debuggerPresent, and continue your program. For example:
% setenv loopForDebugger "" % a.out arg1 arg2 & % idb -pid 1709 a.out ^C (idb) assign debuggerPresent = 1 ... (idb) cont
Chapter 15 — Debugger's Command Processing Structure
This chapter is divided into the following sections:
15.1 Lexical Elements of Commands
After the debugger assembles complete lines of input from the characters it
reads from stdin or
from the file specified in the source command
(as described in Part II), each line is
then converted into a sequence of lexical elements known as
lexemes. For example, print(a++); is converted into the
following lexemes:
-
print -
( -
a -
++ -
) -
;
The sequence of lexemes is then recognized as debugger commands containing language-specific expressions by a process known as parsing. The recognition is based on a set of rules known as a grammar. The debugger uses a single grammar for commands regardless of the current program's language, but it has language-specific subgrammars for some of the pieces of commands, such as names, expressions, and so on.
15.1.1 Lexical States
The debugger starts processing each line according to the rules of the LKEYWORD lexical state. It recognizes the longest lexeme it can, according to these rules. After recognizing the lexeme, it may stay in the same state, or it may change to a different lexical state with different rules.
The debugger moves between the following lexical states as it recognizes the lexemes:
| Lexical State | Description |
|---|---|
| LBPT | Breakpoint commands have lexemes that change the lexical state to LBPT. |
| LEXPORT |
The command export changes the lexical state to
LEXPORT. This state recognizes an evironment variable identifier.
|
| LFILE |
Commands that require file names have lexemes that change the
lexical state to LFILE so that things like mysrc/foo.txt are
recognized as
a file name, and not as a variable mysrc being divided by a
structure data member foo.txt.
|
| LFINT | Commands that require either a file name or a process ID have lexemes to change the lexical state to LFINT. |
| LKEYWORD |
All but one of the debugger commands begin with one or more
keywords. The exception is the examine command.
The debugger recognizes the '{' and ';' lexemes that must precede a
command, and uses those to reset to the LKEYWORD state for the beginning of
the next command.
|
| LLINE | Commands that require arbitrary character input have lexemes that change the lexical state to LLINE. |
| LNORM | Language expressions involve language-specific lexemes. The lexemes that precede an expression change the lexical state to LNORM, and then LNORM recognizes the language-specific lexemes. |
| LSETENV |
The command setenv changes the lexical state to
LSETENV. This state recognizes an evironment variable identifier.
|
| LSIGNAL | Commands that require signal names have lexemes that change the lexical state to LSIGNAL. |
| LWORD | Commands that require shell words have lexemes that change the lexical state to LWORD. |
The rules that each lexical state uses are described in the following sections, in a format known as a lex regular expression. Rather than repeating some of descriptions, a set of common subrules is described first. After the common subrules, we describe the initial state, the rules, and for each recognized token, the next lexical state.
15.1.2 Identifiers
All languages have a concept of an identifier, composed of letters, digits, and other special characters. The debugger also uses keywords composed of letters; therefore, rules are required to determine which identifiers are actually debugger keywords.
All debugger commands, except
examine, begin with
leading keywords. Because the
examine
command
begins with an expression, all identifiers must be recognized as such
from both the LKEYWORD state
that starts commands and the LNORM state
that the debugger uses for processing expressions.
Some debugger commands have keywords embedded in them
following expressions, and the ends of expressions are hard to recognize.
You can use identifiers that have the same spelling as an embedded keyword
simply by enclosing the whole expression in parentheses (()).
For more information on using keywords within commands, see
Section 4.4.4.
Furthermore, the C and C++ grammars need to know whether an identifier is a
typedef or struct/class identifier. The debugger currently
makes the determination at the time the
whole command is parsed, rather than deferring the determination to when the
expression itself is being evaluated. This can result in a misidentification of the
identifier.
When in the following four lexical states, the debugger can recognize identifiers:
- LKEYWORD, LNORM, LBPT
The state is changed to LNORM to process the rest of the expression.Language Regular Expression C, C++, Fortran {LT}({LT}|{DG})* - LSIGNAL
The state is left as LSIGNAL to process the next signal.Language Regular Expression All {LT}({LT}|{DG})*
{LT} equates to {LTI18N}.
15.1.3 Embedded Keywords
The complete set of embedded keywords follows:
| Lexeme | Representation | Initial Lexical State | Changed Lexical State | Language Specific? |
ANY |
any |
LNORM | LNORM |
Shared by all |
AT |
at |
LBPT, LNORM
| LNORM |
Shared by all |
CHANGED |
changed |
LNORM | LNORM |
Shared by all |
IF |
if |
LBPT | LNORM |
Shared by all |
IN |
in |
LBPT, LNORM
| LNORM |
Shared by all |
IN_ALL |
in{Whitespace}all
{Whitespace} |
LBPT, LNORM
| LNORM |
Shared by all |
POLICY |
policy |
LNORM | LNORM |
Shared by all |
PRIORITY |
priority |
LNORM | LNORM |
Shared by all |
READ |
read |
LNORM | LNORM |
Shared by all |
THREAD |
thread |
LNORM | LNORM |
Shared by all |
THREAD_ALL |
thread{Whitespace}all
|
LNORM | LNORM |
Shared by all |
TO |
to |
LNORM | LNORM |
Shared by all |
WITH_STATE |
with{Whitespace}state |
LNORM | LNORM |
Shared by all |
WITHIN |
within |
LNORM | LNORM |
Shared by all |
WRITE |
write |
LNORM | LNORM |
Shared by all |
NOTE: THREAD is both a leading and an embedded keyword.
15.1.4 Leading Keywords
Leading keywords are recognized only at the beginning of commands. You do not need to use parentheses (()) to use them as a normal identifier,
unless they occur at the start of an examine command.
Leading keywords may differ between languages. The complete set follows:
| Lexeme | Representation (Some May Be Language Specific) |
Initial Lexical State | Changed Lexical State | Language Specific? |
ALIAS |
alias |
LKEYWORD | LNORM |
Shared by all |
ASSIGN |
assign |
LKEYWORD | LNORM |
Shared by all |
ATTACH |
attach |
LKEYWORD | LNORM |
Shared by all |
CALL |
call |
LKEYWORD | LNORM |
Shared by all |
CATCH |
catch |
LKEYWORD | LSIGNAL |
Shared by all |
CATCH_UNALIGN |
catch{Whitespace}unaligned |
LKEYWORD | LNORM |
Shared by all |
CLASS |
class |
LKEYWORD | LNORM |
C++ Special Case |
CLONE_SNAPSHOT |
clone{Whitespace}snapshot |
LKEYWORD | LNORM |
Shared by all |
CONDITION |
condition |
LKEYWORD | LNORM |
Shared by all |
CONT |
cont |
LKEYWORD | LNORM |
Shared by all |
CONTI |
conti |
LKEYWORD | LNORM |
Shared by all |
CONT_THREAD |
cont{Whitespace}thread |
LKEYWORD | LNORM |
Shared by all |
DELETE |
delete |
LKEYWORD | LNORM |
Shared by all, also used for C++ special case |
DELETE_ALL |
delete{Whitespace}*
|
LKEYWORD | LNORM |
Shared by all |
DELSHAREDOBJ |
delsharedobj |
LKEYWORD | LFILE |
Shared by all |
DETACH |
detach |
LKEYWORD | LNORM |
Shared by all |
DISABLE |
disable |
LKEYWORD | LNORM |
Shared by all |
DISABLE_ALL |
disable{Whitespace}*
|
LKEYWORD | LNORM |
Shared by all |
DOWN |
down |
LKEYWORD | LNORM |
Shared by all |
DUMP |
dump |
LKEYWORD | LNORM |
Shared by all |
EDIT |
edit |
LKEYWORD | LFILE |
Shared by all |
ELSE |
else |
LKEYWORD | LKEYWORD |
Shared by all |
ENABLE |
enable |
LKEYWORD | LNORM |
Shared by all |
ENABLE_ALL |
enable{Whitespace}*
|
LKEYWORD | LNORM |
Shared by all |
EXPAND_AGGREGATED_MESSAGE |
expand{Whitespace}aggregated{Whitespace}message |
LKEYWORD | LNORM |
Shared by all |
EXPORT |
export |
LKEYWORD | LNORM |
Shared by all |
FILECMD |
file |
LKEYWORD | LFILE |
Shared by all |
FILEEXPR |
fileexpr |
LKEYWORD | LFILE |
Shared by all |
FOCUS |
focus |
LKEYWORD | LNORM |
Shared by all |
FOCUS_ALL |
focus{Whitespace}*
focus{Whitespace}all |
LKEYWORD | LNORM |
Shared by all |
FUNC |
func |
LKEYWORD | LNORM |
Shared by all |
GOTO |
goto |
LKEYWORD | LNORM |
Shared by all |
HELP |
help |
LKEYWORD | LLINE |
Shared by all |
HISTORY |
history |
LKEYWORD | LNORM |
Shared by all |
HPFGET |
hpfget |
LKEYWORD | LNORM |
Fortran |
IF |
if |
LKEYWORD | LNORM |
Shared by all |
IGNORE |
ignore |
LKEYWORD | LSIGNAL |
Shared by all |
IGNORE_UNALIGN |
ignore{Whitespace}unaligned |
LKEYWORD | LNORM |
Shared by all |
INFO |
info |
LKEYWORD | LKEYWORD |
Shared by all |
INPUT |
input |
LKEYWORD | LFILE |
Shared by all |
IO |
io |
LKEYWORD | LFILE |
Shared by all |
KILL |
kill |
LKEYWORD | LNORM |
Shared by all |
KPS |
kps |
LKEYWORD | LNORM |
Shared by all |
LIST |
list |
LKEYWORD | LNORM |
Shared by all |
LISTOBJ |
listobj |
LKEYWORD | LNORM |
Shared by all |
LOAD |
load |
LKEYWORD | LFILE |
Shared by all |
MAP_SOURCE_DIRECTORY |
map{Whitespace}source{Whitespace}directory |
LKEYWORD | LNORM |
Shared by all |
MUTEX |
mutex |
LKEYWORD | LNORM |
Shared by all |
NEXT |
next |
LKEYWORD | LNORM |
Shared by all |
NEXTI |
nexti |
LKEYWORD | LNORM |
Shared by all |
OUTPUT |
output |
LKEYWORD | LFILE |
Shared by all |
PATCH |
patch |
LKEYWORD | LNORM |
Shared by all |
PLAYBACK |
playback |
LKEYWORD | LKEYWORD |
Shared by all |
POP |
pop |
LKEYWORD | LNORM |
Shared by all |
PRINT |
print |
LKEYWORD | LNORM |
Shared by all |
PRINTB |
printb |
LKEYWORD | LNORM |
Shared by all |
PRINTD |
printd |
LKEYWORD | LNORM |
Shared by all |
PRINTENV |
printenv |
LKEYWORD | LNORM |
Shared by all |
PRINTF |
printf |
LKEYWORD | LNORM |
Shared by all |
PRINTI |
printi |
LKEYWORD | LNORM |
Shared by all |
PRINTO |
printo |
LKEYWORD | LNORM |
Shared by all |
PRINTT |
printt |
LKEYWORD | LNORM |
Shared by all |
PRINTX |
printx |
LKEYWORD | LNORM |
Shared by all |
PRINTREGS |
printregs |
LKEYWORD | LNORM |
Shared by all |
PROCESS |
process |
LKEYWORD | LNORM |
Shared by all |
PROCESS_ALL |
process{Whitespace}*
|
LKEYWORD | LNORM |
Shared by all |
PTHREAD |
pthread |
LKEYWORD | LNORM |
Shared by all |
QUESTION |
? |
LKEYWORD | LNORM |
Shared by all |
QUIT |
quit |
LKEYWORD | LNORM |
Shared by all |
READSHAREDOBJ |
readsharedobj |
LKEYWORD | LFILE |
Shared by all |
RECORD |
record |
LKEYWORD | LKEYWORD |
Shared by all |
RERUN |
rerun |
LKEYWORD | LWORD |
Shared by all |
RETURN |
return |
LKEYWORD | LNORM |
Shared by all |
RUN |
run |
LKEYWORD | LWORD |
Shared by all |
SAVE_SNAPSHOT |
save{Whitespace}snapshot |
LKEYWORD | LNORM |
Shared by all |
SET |
set |
LKEYWORD | LNORM |
Shared by all |
SETENV |
setenv |
LKEYWORD | LNORM |
Shared by all |
SH |
sh |
LKEYWORD | LNORM |
Shared by all |
SHOW |
show |
LKEYWORD | LKEYWORD |
Shared by all |
SHOW_AGGREGATED_MESSAGE |
show{Whitespace}aggregated{Whitespace}message |
LKEYWORD | LNORM |
Shared by all |
SHOW_AGGREGATED_MESSAGE_ALL |
show{Whitespace}aggregated{Whitespace}message{Whitespace}*
show{Whitespace}aggregated{Whitespace}message{Whitespace}all |
LKEYWORD | LNORM |
Shared by all |
SHOW_PROCESS_SET |
show{Whitespace}process{Whitespace}set |
LKEYWORD | LNORM |
Shared by all |
SHOW_PROCESS_SET_ALL |
show{Whitespace}process{Whitespace}set{Whitespace}*
show{Whitespace}process{Whitespace}set{Whitespace}all |
LKEYWORD | LNORM |
Shared by all |
SHOW_SOURCE_DIRECTORY |
show{Whitespace}source{Whitespace}directory
|
LKEYWORD | LNORM |
Shared by all |
SHOW_ALL_SOURCE_DIRECTORY |
show{Whitespace}all{Whitespace}source{Whitespace}directory |
LKEYWORD | LNORM |
Shared by all |
SLASH |
/ |
LKEYWORD | LNORM |
Shared by all |
SNAPSHOT |
snapshot |
LKEYWORD | LNORM |
Shared by all |
SNAPSHOT_ALL |
snapshot all |
LKEYWORD | LNORM |
Shared by all |
SNAPSHOT_* |
snapshot * |
LKEYWORD | LNORM |
Shared by all |
SOURCE |
source |
LKEYWORD | LFILE |
Shared by all |
STATUS |
status |
LKEYWORD | LNORM |
Shared by all |
STEP |
step |
LKEYWORD | LNORM |
Shared by all |
STEPI |
stepi |
LKEYWORD | LNORM |
Shared by all |
STOP |
stop |
LKEYWORD | LBPT |
Shared by all |
STOPI |
stopi |
LKEYWORD | LNORM |
Shared by all |
THREAD |
thread |
LKEYWORD | LNORM |
Shared by all |
TRACE |
trace |
LKEYWORD | LNORM |
Shared by all |
TRACEI |
tracei |
LKEYWORD | LNORM |
Shared by all |
UNALIAS |
unalias |
LKEYWORD | LNORM |
Shared by all |
UNLOAD |
unload |
LKEYWORD | LNORM |
Shared by all |
UNMAP_SOURCE_DIRECTORY |
unmap{Whitespace}source{Whitespace}directory |
LKEYWORD | LNORM |
Shared by all |
UNRECORD |
unrecord |
LKEYWORD | LNORM |
Shared by all |
UNSET |
unset |
LKEYWORD | LNORM |
Shared by all |
UNSETENV |
unsetenv |
LKEYWORD | LNORM |
Shared by all |
UNSETENV_ALL |
unsetenv{Whitespace}* |
LKEYWORD | LNORM |
Shared by all |
UNUSE |
unuse |
LKEYWORD | LFILE |
Shared by all |
UP |
up |
LKEYWORD | LNORM |
Shared by all |
USE |
use |
LKEYWORD | LFILE |
Shared by all |
VERSION |
version |
LKEYWORD | LNORM |
Shared by all |
WATCH |
watch |
LKEYWORD | LNORM |
Shared by all |
WATCH_MEMORY |
watch{Whitespace}memory |
LKEYWORD | LNORM |
Shared by all |
WATCH_VARIABLE |
watch{Whitespace}variable |
LKEYWORD | LNORM |
Shared by all |
WHATIS |
whatis |
LKEYWORD | LNORM |
Shared by all |
WHEN |
when |
LKEYWORD | LBPTChapter |
Shared by all |
WHENI |
wheni |
LKEYWORD | LNORM |
Shared by all |
WHERE |
where |
LKEYWORD | LNORM |
Shared by all |
WHEREIS |
whereis |
LKEYWORD | LNORM |
Shared by all |
WHERE_THREAD |
where{Whitespace}thread |
LKEYWORD | LNORM |
Shared by all |
WHERE_THREAD_ALL |
where{Whitespace}thread{Whitespace}*
|
LKEYWORD | LNORM |
Shared by all |
WHICH |
which |
LKEYWORD | LNORM |
Shared by all |
15.1.5 Reserved Identifiers
Some identifiers are recognized as reserved words, regardless of whether they
are inside parentheses (()).
The reserved words may differ between languages. The complete set follows:
| Lexeme | Representation (Some May Be Language Specific) |
Initial Lexical State | Changed Lexical | Language Specific? |
CHAR |
char |
LNORM | LNORM |
C, C++ |
CLASS |
class |
LNORM | LNORM |
C++ |
CONST |
const |
LNORM | LNORM |
C, C++ |
DELETE |
delete |
LNORM | LNORM |
C++ |
DOUBLE |
double |
LNORM | LNORM |
C, C++ |
ENUM |
enum |
LNORM | LNORM |
C, C++ |
FLOAT |
float |
LNORM | LNORM |
C, C++ |
INT |
int |
LNORM | LNORM |
C, C++ |
LONG |
long |
LNORM | LNORM |
C, C++ |
NEW |
new |
LNORM | LNORM |
C++ |
OPERATOR |
operator |
LNORM | LNORM |
C++ |
SHORT |
short |
LNORM | LNORM |
C, C++ |
SIGNED |
signed |
LNORM | LNORM |
C, C++ |
SIZEOF |
sizeof |
LNORM | LNORM |
C, C++, Fortran |
STRUCT |
struct |
LNORM | LNORM |
C, C++ |
UNION |
union |
LNORM | LNORM |
C, C++ |
UNSIGNED |
unsigned |
LNORM | LNORM |
C, C++ |
VOID |
void |
LNORM | LNORM |
C, C++ |
VOLATILE |
volatile |
LNORM | LNORM |
C, C++ |
15.1.6 Lexemes Shared by All Languages
Because the debugger supports multiple languages, some of the rules must be language specific. To distinguish between the characters used for a particular language to represent a lexeme and the lexeme itself, the debugger names the lexemes, rather than using any one language's representation. For example, the lexeme GE corresponds to Fortran's '.GE.', and to C's '>='.Some lexemes have the same representation in all languages, especially those that form part of the debugger commands apart from the language-specific expressions.
15.1.6.1 Common Elements of Lexemes
The following tables list common elements of lexemes.| Concept | Rule | Representation | Description |
| Decimal digit | DG | [0-9] |
One character from '0'..'9'. |
| Octal digit | OC | [0-7] |
One character from '0'..'7'. |
| Hexadecimal digit | HX | [0-9a-fA-F] |
Any of the characters '0'..'9' and any of the letters 'A'..'F' and 'a'..'f'. |
| Single letter | LT | [A-Za-z_$] |
Any of the characters 'A'..'Z', 'a'..'z', and the underscore (_) and dollar sign ($) characters. |
| Single letter
from the International Character Set |
LT18N | [A-Za-z_$\200-\377] |
Any of the characters 'A'..'Z', 'a'..'z', the underscore (_) and dollar sign ($) characters, and any character in the top half of the 8-bit character set. |
| Shell 'word' | WD | [^ \t;\n<>'"] |
Any character except space, tab, semicolon (;), linefeed, less than (<), greater than (>), and quotes (' or "). |
| File name | FL | [^ \t\n\}\;\>\<] |
Any character except space, tab, semicolon (;), linefeed, right brace (}), less than (<), greater than (>), and tick (`). |
| Optional exponent | Exponent | [eE][+-]?{DG}+ |
Numbers often allow an optional exponent. It is represented as an 'e' or 'E' followed by an optional plus (+) or minus (-), and then one or more decimal digits. |
| Whitespace | Whitespace | [ \t]+ |
Whitespace is often used to separate two lexemes that would
otherwise be misconstrued as a single lexeme. For example, stop in is two
keywords, but stopin is an identifier. Apart from this separating property,
Whitespace is usually ignored. Whitespace is a sequence of one or more tabs or
spaces.
|
| String literal | stringChar | ([^"\\\n]|([\\]({simpleEscape}|
|
Any character except the terminating quote character ("), or a newline (\n). If the character is a backslash (\), it is followed by an escaped sequence of characters. |
| Character literal | charChar | ([^'\\\n]|([\\]({simpleEscape}|
|
Any character except the terminating quote (') character, or a newline (\n). If the character is a backslash (\), it is followed by an escaped sequence of characters. |
| Environment variable identifier | EID | [^ \t\n<>;='"&\|] |
Any character except space, tab, linefeed, less-than (<), greater-than (>), semicolon (;), equal sign (=), quotes (' or "), ampersand (&), backslash (\), and bar (|). |
| Universal character name | UCN | \\u{HX}{4}|\\U{HX}{8} |
A universal character name is a backslash (\) followed by either a lowercase 'u' and 4 hexadecimal digits, or an uppercase 'U' and 8 hexadecimal digits. |
The escaped sequence of characters can be one of following three forms:
| Concept | Rule | Representation | Description |
| Simple escape | simpleEscape | ([A-Za-z'"?#*\\])
|
One of 'A'-'Z' or 'a'-'z'. Some of these have special meanings, the most common being 'n' for newline and 't' for tab. Can be a quote (' or ") character that does not finish the literal, a question mark (?), a pound sign (#), an asterisk (*), or a backslash (\), which then becomes part of the string literal rather than causing a further escape sequence. |
| Octal escape | octalEscape | (OC{1,3})
|
1 to 3 octal digits, the combined numeric value of which is the character that becomes part of the string literal. |
| Hexadecimal escape | hexEscape | ([xX]HX{1,8})
|
An 'x' or an 'X' followed by 1 to 8 hexadecimal digits, the combined numeric value of which is the character that becomes part of the string literal. |
15.1.6.2 Whitespace and Command-Separating Lexemes Shared by All Languages
In all lexical states, unescaped newlines produce the NEWLINE token and change the lexical state to be LKEYWORD.In all lexical states except LLINE, a semicolon also changes the lexical state to be LKEYWORD.
| Initial State: | LKEYWORD, LNORM, LFILE, LLINE, LWORD, LSIGNAL, LBPT |
| Regular Expression: | [\n] |
| Lexeme: | NEWLINE |
| Change to State: | LKEYWORD |
This is because SEMICOLON is the command separator.
| Initial State: | LKEYWORD, LNORM, LFILE, LSIGNAL, LBPT, LWORD |
| Regular Expression: | ";" |
| Lexeme: | SEMICOLON |
| Change to State: | LKEYWORD |
Commands can be nested, and the following transitions support this:
| Initial State: | LNORM |
| Regular Expression: | "{" |
| Lexeme: | LBRACE |
| Change to State: | LKEYWORD |
| Initial State: | LKEYWORD, LNORM, LFILE, LSIGNAL, LBPT |
| Regular Expression: | "}" |
| Lexeme: | RBRACE |
| Change to State: | LKEYWORD |
In most lexical states, the spaces, tabs, and escaped newlines are ignored. In the LLINE state, the spaces and tabs are part of the line, but escaped newlines are still ignored. In the LWORD state, the spaces and tabs are ignored, but escaped newlines are not.
| Initial State: | LKEYWORD, LNORM, LFILE, LSIGNAL, LBPT |
| Regular Expression: | [ \t] |
| Lexeme: | Ignored |
| Change to State: | Unchanged |
| Initial State: | LLINE |
| Regular Expression: | \\\n |
| Lexeme: | Ignored |
| Change to State: | Unchanged |
| Initial State: | LWORD |
| Regular Expression: | [ \t] |
| Lexeme: | Ignored |
| Change to State: | Unchanged |
15.1.6.3 LNORM Lexemes Shared by All Languages
The state stays in LNORM.| Lexeme | Regular Expression |
ANY |
any |
AT |
at |
ATSIGN |
"@" |
CHANGED |
changed |
CHARACTERconstant |
[lL][']{charChar}+['] |
COLON |
":" |
COMMA |
"," |
DOLLAR |
"$" |
DOT |
"." |
GE |
">=" |
GREATER |
">" |
HASH |
unknown |
IF |
if |
IN |
in |
IN_ALL |
in{Whitespace}all{Whitespace} |
LE |
"<=" |
LESS |
"<" |
LPAREN |
"(" |
POLICY |
policy |
PRIORITY |
priority |
RPAREN |
")" |
READ |
read |
SLASH |
"/" |
STAR |
"*" |
STATE |
state |
STRINGliteral |
["]{stringChar}*["] |
THREAD |
thread |
THREAD_ALL |
thread{Whitespace}all
thread{Whitespace}"*" |
TICK |
"`" |
TO |
to |
WIDECHARACTERconstant |
[lL][']{charChar}+['] |
WIDESTRINGliteral |
[lL]["]{stringChar}*["] |
WITH |
with |
WITHIN |
within |
WRITE |
write |
15.1.6.4 LBPT Lexemes Shared by All Languages
| Lexeme | Regular Expression | Initial Lexical State | Changed Lexical State |
IN |
in |
LBPT | LNORM |
IN_ALL |
in{Whitespace}all |
LBPT | LNORM |
AT |
at |
LBPT | LNORM |
PC_IS |
pc |
LBPT | LNORM |
SIGNAL |
signal |
LBPT | LNORM |
UNALIGNED |
unaligned |
LBPT | LNORM |
VARIABLE |
variable |
LBPT | LNORM |
MEMORY |
memory |
LBPT | LNORM |
EVERY_INSTRUCTION |
every{Whitespace}instruction | LBPT | LNORM |
EVERY_PROC_ENTRY |
every{Whitespace}proc[edure]{Whitespace}entry |
LBPT | LNORM |
QUIET |
quiet |
LBPT | LBPT |
15.1.6.5 LFILE Lexemes Shared by All Languages
Files are one or more characters that can appear in a file name.
The state is left as LFILE, so that commands such as use and
unuse can have lists of files.
| Lexeme | Regular Expression |
FILENAME |
{FL}+ |
15.1.6.6 LKEYWORD Lexemes Shared by All Languages
The state remains in LKEYWORD.| Lexeme | Regular Expression |
INTEGERconstant |
"0"{OC}+ |
15.1.6.7 LLINE Lexemes Shared by All Languages
All characters up to the next newline are assembled into a STRINGliteral.15.1.6.8 LWORD Lexemes Shared by All Languages
Once the lexical state has been set to LWORD, it will stay there until a NEWLINE or a SEMICOLON is found. Both of these cause the lexical state to become LKEYWORD again. The individual words recognized can be any of the following, but in each case, the state stays LWORD.| Lexeme | Regular Expression |
GREATER |
">" |
LESS |
"<" |
GREATERAMPERSAND |
">&" |
ONEGREATER |
"1>" |
TWOGREATER |
"2>" |
STRINGliteral |
[']{charChar}*['] |
STRINGliteral |
{WD}* that does not end in a backslash |
WIDECHARACTERconstant |
[lL][']{charChar}+['] |
WIDESTRINGliteral |
[lL]["]{stringChar}*["] |
15.1.6.9 LSIGNAL Lexemes Shared by All Languages
The state stays in LSIGNAL.| Lexeme | Regular Expression |
INTEGERconstant |
{DG}+ |
IDENTIFIER |
{LT}({LT}|{DG})* |
15.1.6.10 LSETENV and LEXPORT Lexemes Shared by All Languages
| Lexeme | Regular Expression |
ENVARID |
{EID}+ |
15.1.7 Lexemes That Are Represented Differently in Each Language
| Lexeme | Representation (Some May Be Language Specific) |
Initial Lexical State | Changed Lexical State | Language Specific? |
AMPERSAND |
"&" |
LNORM | Unchanged | C, C++, Fortran |
ANDAND |
"&" |
LNORM | Unchanged | C, C++ |
ANDassign |
"&=" |
LNORM | Unchanged | C, C++ |
ARROW |
"->" |
LNORM | Unchanged | C, C++ |
ARROWstar |
"->*" |
LNORM | Unchanged | C++ |
ASSIGNOP |
"=" |
LNORM | Unchanged | C, C++, Fortran |
BRACKETS |
"[]" |
LNORM | Unchanged | C, C++ |
CLCL |
"::" |
LNORM | Unchanged | C++ |
DECR |
"--" |
LNORM | Unchanged | C, C++ |
DIVassign |
"/=" |
LNORM | Unchanged | C, C++ |
DOTstar |
".*" |
LNORM | Unchanged | C++ |
ELLIPSIS |
"..." |
LNORM | Unchanged | C++ |
EQ |
"=="
|
LNORM | Unchanged | C, C++, Fortran
Fortran |
ERassign |
"^=" |
LNORM | Unchanged | C, C++ |
GE |
".GE." |
LNORM | Unchanged | Fortran
|
GREATER |
".GT." |
LNORM | Unchanged | Fortran
|
HAT |
"^" |
LNORM | Unchanged | C, C++ |
INCR |
"++" |
LNORM | Unchanged | C, C++ |
LBRACKET |
"[" |
LNORM | Unchanged | C, C++, Fortran |
LE |
".LE." |
LNORM | Unchanged | Fortran
|
LESS |
".LT." |
LNORM | Unchanged | Fortran
|
LOGAND |
".AND." |
LNORM | Unchanged | Fortran |
LOGEQV |
".EQV." |
LNORM | Unchanged | Fortran |
LOGNEQV |
".NEQV." |
LNORM | Unchanged | Fortran |
LOGNOT |
".NOT." |
LNORM | Unchanged | Fortran |
LOGOR |
".OR." |
LNORM | Unchanged | Fortran |
LOGXOR |
".XOR." |
LNORM | Unchanged | Fortran |
LS |
"<<" |
LNORM | Unchanged | C, C++ |
LSassign |
"<<=" |
LNORM | Unchanged | C, C++ |
MINUS |
"-" |
LNORM | Unchanged | C, C++, Fortran |
MINUSassign |
"-=" |
LNORM | Unchanged | C, C++ |
MOD |
"%" |
LNORM | Unchanged | C, C++ |
MODassign |
"%=" |
LNORM | Unchanged | C, C++ |
MULTassign |
"*=" |
LNORM | Unchanged | C, C++ |
NE |
"!="
|
LNORM | Unchanged | C, C++
Fortran |
NOT |
"!" |
LNORM | Unchanged | C, C++ |
OPENSLASH |
"(/" |
LNORM | Unchanged | Fortran |
OR |
"|" |
LNORM | Unchanged | C, C++ |
OROR |
"||" |
LNORM | Unchanged | C, C++ |
ORassign |
"|=" |
LNORM | Unchanged | C, C++ |
PARENS |
"()" |
LNORM | Unchanged | C++ |
PERCENT |
"%" |
LNORM | Unchanged | Fortran |
PLUS |
"+" |
LNORM | Unchanged | C, C++, Fortran |
PLUSassign |
"+=" |
LNORM | Unchanged | C, C++ |
QUESTION |
"?" |
LNORM | Unchanged | C, C++ |
RBRACKET |
"]" |
LNORM | Unchanged | C, C++, Fortran |
RS |
">>" |
LNORM | Unchanged | C, C++ |
RSassign |
">>=" |
LNORM | Unchanged | C, C++ |
SLASHCLOSE |
"/)" |
LNORM | Unchanged | Fortran |
SLASHSLASH |
"//" |
LNORM | Unchanged | Fortran |
STARSTAR |
"**" |
LNORM | Unchanged | Fortran |
TWIDDLE |
"~" |
LNORM | Unchanged | C, C++ |
15.1.7.1 LKEYWORD Lexemes Specific to C++
If a C++ identifier is followed by a "::", it is assumed to be a class or namespace identifier.If a C++ identifier is followed by a "<", complex and dubious checks are made to try to match a complete template instance specifier.
15.1.7.2 LNORM Lexemes Specific to C and C++
The lexemes in the following table are specific to C and C++. The state stays in LNORM.| Lexeme | Representation | Language |
ARROW |
"->" |
C, C++ |
INCR |
"++" |
C, C++ |
DECR |
"--" |
C, C++ |
LS |
"<<" |
C, C++ |
RS |
">>" |
C, C++ |
EQ |
"==" |
C, C++ |
NE |
"!=" |
C, C++ |
ANDAND |
"&&" |
C, C++ |
OROR |
"||" |
C, C++ |
MULTassign |
"*=" |
C, C++ |
DIVassign |
"/=" |
C, C++ |
MODassign |
"%=" |
C, C++ |
PLUSassign |
"+=" |
C, C++ |
MINUSassign |
"-=" |
C, C++ |
LSassign |
"<<=" |
C, C++ |
RSassign |
">>=" |
C, C++ |
ANDassign |
"&=" |
C, C++ |
ERassign |
"^=" |
C, C++ |
ORassign |
"|=" |
C, C++ |
PLUS |
"+" |
C, C++ |
MINUS |
"-" |
C, C++ |
MOD |
"%" |
C, C++ |
HAT |
"^" |
C, C++ |
AMPERSAND |
"&" |
C, C++ |
OR |
"|" |
C, C++ |
TWIDDLE |
"~" |
C, C++ |
NOT |
"!" |
C, C++ |
BRACKETS |
"[]" |
C, C++ |
ASSIGNOP |
"=" |
C, C++ |
LBRACKET |
"[" |
C, C++ |
RBRACKET |
"]" |
C, C++ |
QUESTION |
"?" |
C, C++ |
CHAR |
char |
C, C++ |
DOUBLE |
double |
C, C++ |
FLOAT |
float |
C, C++ |
INT |
int |
C, C++ |
LONG |
long |
C, C++ |
SHORT |
short |
C, C++ |
SIGNED |
signed |
C, C++ |
UNSIGNED |
unsigned |
C, C++ |
VOID |
void |
C, C++ |
CONST |
const |
C, C++ |
VOLATILE |
volatile |
C, C++ |
SIZEOF |
sizeof |
C, C++ |
ENUM |
enum |
C, C++ |
STRUCT |
struct |
C, C++ |
UNION |
union |
C, C++ |
INTEGERconstant |
"0"{OC}+
|
C, C++ |
FLOATINGconstant |
{DG}*"."{DG}*
|
C, C++ |
IDENTIFIER, TYPEDEFname |
{LT}|{UCN})({LT}|{UCN}|{DG})* |
C, C++ |
The lexemes in the following table are specific to C++. The state stays in LNORM.
| Lexeme | Representation | Language |
OPERATOR |
operator |
C++ |
NEW |
new |
C++ |
DELETE |
delete |
C++ |
CLASS |
class |
C++ |
ELLIPSIS |
"..." |
C++ |
CLCL |
"::" |
C++ |
THIS |
this |
C++ |
DOTstar |
".*" |
C++ |
ARROWstar |
"->*" |
C++ |
PARENS |
"()" |
C++ |
15.1.7.3 LNORM Lexemes Specific to Fortran
The lexemes in the following table are specific to Fortran. The state stays in LNORM.| Lexeme | Representation |
PLUS |
"+" |
MINUS |
"-" |
STARSTAR |
"**" |
LESS |
".LT." |
LE |
".LE." |
EQ |
".EQ." |
NE |
".NE." |
GE |
".GE." |
GREATER |
".GT." |
EQ |
"==" |
NE |
"/=" |
LOGNOT |
".NOT." |
LOGAND |
".AND." |
LOGOR |
".OR." |
LOGEQV |
".EQV." |
LOGNEQV |
".NEQV." |
LOGXOR |
".XOR." |
PERCENT |
"%" |
ASSIGNOP |
"=" |
SLASHSLASH |
"//" |
OPENSLASH |
"(/" |
SLASHCLOSE |
"/)" |
LBRACKET |
"[" |
RBRACKET |
"]" |
AMPERSAND |
"&" |
SIZEOF |
sizeof |
INTEGERconstant |
".TRUE."
|
IDENTIFIER, TYPEDEFname |
{LT}({LT}|{DG})* |
FortranName |
[A-Za-z$]({LT}|{DG})*
|
FortranNamedKind |
"_"{FortranName} |
FortranNumericKind |
"_"{DG}+
|
FortranKind |
{FortranNamedKind} |
FortranCharacterNamedKind |
{FortranName}"_" |
FortranCharacterNumericKind |
{DG}+"_" |
FortranCharacterKind |
{FortranCharacterNamedKind} |
RealWithDecimal |
({DG}+"."DG}*) |
ExponentVal |
[+-]?{DG}+ |
RealEExponent |
[Ee]{ExponentVal}
|
RealDExponent |
[Dd]{ExponentVal} |
RealQExponent |
[Qq]{ExponentVal} |
RealSingleConstant |
(({DG}+{RealEExponent}) |
RealDoubleConstant |
({DG}+|{RealWithDecimal}){RealDExponent}
|
RealQuadConstant |
({DG}+|{RealWithDecimal}){RealQExponent}
|
RealConstant |
{RealSingleConstant} |
REALconstantWithKind |
RealConstant |
FortranBinaryValue |
[Bb]((['][01]+['])|(["][01]+["])) |
FortranOctalValue |
[Oo](([']{OC}+['])|(["]{OC}+["])) |
FortranHexValue |
[Zz](([']{HX}+['])|(["]{HX}+["])) |
FortranOctalValueAlternative |
(([']{OC}+['])|(["]{OC}+["]))[Oo] |
FortranHexValueAlternative |
(([']{HX}+['])|(["]{HX}+["]))[Xx] |
INTEGERconstantWithKind |
{DG}+{FortranKind} |
LOGICALconstantWithKind |
".TRUE."{FortranKind}? |
CharSingleDelim |
[^'\\\n]|('') |
CharDoubleDelim |
[^"\\\n]|("") |
FortranOctalEscape |
{OC}{1,3} |
FortranHexEscape |
[Xx]{HX}{1,2} |
FortranEscapeChar |
[\\]([AaBbFfNnRrTtVv]|{FortranOctalEscape} |
StringSingleDelim |
[']({CharSingleDelim}|[\\])*['] |
StringDoubleDelim |
["]({CharDoubleDelim}|[\\])*["] |
FortranString |
{StringSingleDelim} |
CStringSingleDelim |
[']({CharSingleDelim}|{FortranEscapeChar})*['] |
CStringDoubleDelim |
["]({CharDoubleDelim}|{FortranEscapeChar})*["] |
FortranCString |
({CStringSingleDelim}|{CStringDoubleDelim})[Cc] |
CHARACTERconstantWithKind |
{FortranString} |
15.2 Grammar of Commands
Most of the grammar for commands has already been given in previous sections. This section concentrates on the grammar for expressions.15.2.1 Names and Expressions Within Commands
The exact syntax of expressions is specific to the current language.expression : expression for C | expression for C++ | expression for FortranOften you can omit an expression from a command or use a convenient default instead, to change the meaning of a command.
expression-opt : [ expression ]
Identifiers, Keyword, and Typedef Names
The debugger uses the normal language lookup rules for identifiers, (obeying scopes, and so on,) but also extends those rules as follows:- All global variables are visible.
- If the debugger
cannot find the identifier within the current lexical scopes, it will successively search the
lexical scopes of each of the first
$framesearchlimit(default is 0) callers.
NOTE: The debugger does not know where in the scope a declaration occurred, so all lookups consider all identifiers in the scope, whether or not they occurred before the current line.
The lexical tokens for identifiers are specific to the current language, and also to the current lexical state.
IDENTIFIER : identifier for LSIGNAL lexical state | identifier for C | identifier for C++ | identifier for Fortran
TYPEDEFnames are lexically just identifiers, but when looking them up in the
current scope, the debugger determines that they refer to types, such as
TYPEDEFs, classes, or structs. This information is needed to
correctly parse C and C++ expressions.
TYPEDEFname : IDENTIFIERA few lexical tokens act as embedded keywords in some positions within expressions, but the debugger generally tries to accept them as though they were normal identifiers.
identifier-or-key-word : IDENTIFIER | embedded-key-word embedded-key-word : ANY | CHANGED | READ | WRITEIn other contexts, the debugger is also prepared to accept
TYPEDEFnames
(for example, int or the name of a class).
identifier-or-typedef-name : identifier-or-typedef-name for C | identifier-or-typedef-name for C++ | identifier-or-typedef-name for Fortran
Integer Constants
The lexical tokens for integer constants are specific to the current language.integer_constant : INTEGERconstant for C and C++ | INTEGERconstant for Fortran
Macros
The debugger does not currently understand usages of macros, for example, uses of C and C++ preprocessor#define macros, and so on.
Calls
You can call any function whose address can be taken, provided that the parameters can also be passed, and the result returned.call-expression : call-expression for C | call-expression for C++ | call-expression for Fortran
Parameters
Each language may impose its own restrictions on exactly what can be passed as a parameter.Any expression can be passed 'by value', but C++ constructors and destructors will not be invoked. Evaluating parameters can involve evaluating nested calls.
Anything whose address can be taken can be passed 'by reference'.
The debugger has very limited understanding of array descriptors.
Comma is both the argument separator and a valid operator in C and C++. Hence,
argument lists are comma-separated
assignment-expressions rather than
full expressions.
argument-expression-list : assignment-expression | assignment-expression COMMA argument-expression-list arg-expression-list-opt : [ argument-expression-list ] assignment-expression : assignment-expression for C | assignment-expression for C++ | assignment-expression for Fortran
Return Results
Any scalar or structure type can be the return result of a called function. Some simple array types are also supported, but the general cases are not.The C++ constructors and destructors are not invoked, which may cause problems.
Addresses
You can take the addresses of variables and other data that are in memory, and functions that have had code generated for them. You can also take the address of a line of source code.Some variables may be in registers; you cannot take their addresses.
The optimizing compilers may move variables from one memory location to another, in which case you will obtain the address of the current memory location of the variable.
The optimizing compilers may eliminate unused functions, as well as functions that have had all calls inlined. Static functions in header files may result in multiple copies of the code, and the address will be of only one of those copies.
The optimizing compilers and linkers may skip some instructions on the way in during a call, so a breakpoint on the first few instructions may not be hit. When you set a breakpoint on a function, the debugger sets it deeper in the function, at the end of the entry sequence, to try to avoid this.
The address of a line of source code is the address of the first instruction in memory that came from this line, but this instruction may be branched around, so it might not be executed before any other instruction from the same line.
Address of a Source Line
The debugger has extended the syntax of most languages to allow you to get the address of the first instruction that a source line generates. If you do not specify a file via thestring, then the current file is used. If you specify a
DOLLAR as
the line-number, then the last line in
the file that generated any instructions is used.
line-address : ATSIGN string COLON line-number | ATSIGN line-number line-number : INTEGERconstant | DOLLAR
Other Modified Forms of Expressions
Thewhatis_command supports supersets
of the normal expression syntax of the
language.
whatis-expressions : whatis-expressions for C | whatis-expressions for C++ | whatis-expressions for FortranSome commands (notably the
examine command
and the
cont command) have a syntax that inhibits the use of
a full expression. In this case, a more limited form of expression is still allowed.
address-exp : address-exp for C | address-exp for C++ | address-exp for FortranThe
cont command and
the change_stack_frame_commands
have a form that specifies where to continue to, or where to cut the stack back to.
loc : loc for C | loc for C++ | loc for FortranThe
target of a
modifying_command
can only be a subset of the possible expressions,
known as a unary-expression.
unary-expression : unary-expression for C | unary-expression for C++ | unary-expression for Fortran
Strings
The syntax of strings is sensitive to the current lexical state and language.string : LNORM string | LLINE string | LWORD stringMost of the languages have places where they allow a series of string literals to be equivalent to a single string formed of their concatenated characters.
string-literal-list : string-literal-list for C | string-literal-list for C++
Rescoped Expressions
Sometimes the normal language visibility rules are not sufficient for specifying the variable, function, and so on, to which you may want to refer. The debugger extends the language's idea of an expression with an additional possibility called a rescoped expression.
Rescoped expressions cause the debugger to look up the
identifiers and so on in the qual-symbol-opt,
as though it were in the source file specified by the preceding
filename-tick or
qual-symbol-opt.
rescoped-expression : filename-tick qual-symbol-opt | TICK qual-symbol-opt rescoped-typedef : filename-tick qual-typedef-opt | TICK qual-typedef-opt filename-tick : string-tick string-tick : string TICK qual-symbol-opt : expression /* Base (global) name */ | qual-symbol-opt TICK expression /* Qualified name */ qual-typedef-opt : qual-typedef-opt for C | qual-typedef-opt for C++ | qual-typedef-opt for FortranIn the following example, rescoped expressions are used to distinguish which
x the user is querying, because there are two variables named
x (one local to main and one global):
(idb) list $curline - 10: 20
1 long x = 5; // global x
2
3 int main()
4 {
5 int x = 7; // local x
6 int y = x - ::x;
> 7 return (y);
8 }
By default, a local variable is found before a global one,
so that the plain x refers to the local variable.
(idb) whatis x int x (idb) which x "x_rescoped.cxx"`main`x (idb) whatis "x_rescoped.cxx"`main`x int xYou may use the C++
:: operator to specify the global
x in C++ code or rescoped expressions in any language.
(idb) whatis ::x long x (idb) whatis "x_rescoped.cxx"`x long x (idb) print "x_rescoped.cxx"`x 5
In the following example,
the x variable is used in the following places to
demonstrate how rescoping expressions can find the correct variable:
- As a variable local to
main - As a member variable of the class
Foo - As a global variable
- As a local variable to
Foo's member functionSetandGet - As a local variable to the
CastAndAddfunction, but visible as a parameter
(idb) list $curline - 10: 20
10 double x = 3.1415;
11
12 int CastAndAdd(char x) {
13 int result = ((int)::x) + x;
14 return result;
15 }
16
17 float Foo::SetandGet() { // multiple scopes!
18 long x = (long)::x; // local x = global x
19 Foo::x = (float)x; // member x = local x
> 20 return Foo::x; // return member x
21 }
22
23 int main () {
24 int x = 7;
25 x -= CastAndAdd((char)1);
26
27 Foo thefoo;
28 x -= (int)thefoo.SetandGet();
29 return x;
(idb) whatis x
long x
(idb) which x
"x_rescoped2.cxx"`Foo::SetandGet`x
(idb) whatis ::x
double x
(idb) whatis Foo::x
float Foo::x
(idb) whatis main`x
int x
(idb) whatis CastAndAdd`x
char x
Printable Types
The lexical tokens for printable types are specific to the current language.printable-type : printable-type for C | printable-type for C++ | printable-type for Fortran
15.2.2 Expressions Specific to C
The debugger has an almost complete understanding of C expressions, given the general restrictions.expression : assignment-expression constant-expression : conditional-expression
C Identifiers
The lookup rules are almost always correct for C.identifier-or-typedef-name : identifier-or-key-word | TYPEDEFname
C Constants
The numeric constants are treated exactly the same as in C. The enumeration constant identifiers go though the same grammar paths as variable identifiers, which has basically the same effect as the C semantics.primary-expression : identifier-or-key-word | constant | string-literal-list | LPAREN expression RPAREN | process_set | LPAREN process_range RPAREN string-literal-list : string | string-literal-list string constant : FLOATINGconstant | INTEGERconstant | CHARACTERconstant | WIDECHARACTERconstant | WIDESTRINGliteral
C Rescoped Expressions
The C implementation of rescoped expressions is the following:qual-typedef-opt : TYPEDEFname | qual-typedef-opt TICK TYPEDEFname whatis-expressions : expression | rescoped-expression | printable-type
C Calls
Following is the C implementation of calls.call-expression : expression function-call : postfix-expression LPAREN [arg-expression-list] RPARENRestrictions and limits are documented here.
C Addresses
Following is the C implementation of addresses.address : AMPERSAND postfix-expression | line-address | postfix-expression address-exp : address | address-exp PLUS address | address-exp MINUS address | address-exp STAR addressRestrictions and limits are documented here.
C Loc Specifications
The C implementation ofloc is the following:
loc : expression | rescoped-expression
C Types
The debugger understands the full C type specification grammar.type-specifier : basic-type-specifier | struct-union-enum-type-specifier | typedef-type-specifier basic-type-specifier : basic-type-name | type-qualifier-list basic-type-name | basic-type-specifier type-qualifier | basic-type-specifier basic-type-name type-qualifier-list : type-qualifier | type-qualifier-list type-qualifier type-qualifier : CONST | VOLATILE basic-type-name : VOID | CHAR | SHORT | INT | LONG | FLOAT | DOUBLE | SIGNED | UNSIGNED printable-type : rescoped_typedef | type_name struct-union-enum-type-specifier : elaborated-type-name | type-qualifier-list elaborated-type-name | struct-union-enum-type-specifier type-qualifier typedef-type-specifier : TYPEDEFname | type-qualifier-list TYPEDEFname | typedef-type-specifier type-qualifier elaborated-type-name : struct-or-union-specifier | enum-specifier struct-or-union-specifier : struct-or-union opt-parenthesized-identifier-or-typedef-name opt-parenthesized-identifier-or-typedef-name : identifier-or-typedef-name | LPAREN opt-parenthesized-identifier-or-typedef-name RPAREN struct-or-union : STRUCT | UNION enum-specifier : ENUM identifier-or-typedef-name type-name : type-specifier | type-specifier abstract-declarator | type-qualifier-list // Implicit "int" | type-qualifier-list abstract-declarator // Implicit "int" type-name-list : type-name | type-name COMMA type-name-list abstract-declarator : unary-abstract-declarator | postfix-abstract-declarator | postfixing-abstract-declarator postfixing-abstract-declarator : array-abstract-declarator | LPAREN RPAREN array-abstract-declarator : BRACKETS | LBRACKET constant-expression RBRACKET | array-abstract-declarator LBRACKET constant-expression RBRACKET unary-abstract-declarator : STAR | STAR type-qualifier-list | STAR abstract-declarator | STAR type-qualifier-list abstract-declarator postfix-abstract-declarator : LPAREN unary-abstract-declarator RPAREN | LPAREN postfix-abstract-declarator RPAREN | LPAREN postfixing-abstract-declarator RPAREN | LPAREN unary-abstract-declarator RPAREN postfixing-abstract-declarator
C Other Forms of Expressions
The following expressions all have their usual C semantics:assignment-expression : conditional-expression | unary-expression ASSIGNOP assignment-expression | unary-expression MULTassign assignment-expression | unary-expression DIVassign assignment-expression | unary-expression MODassign assignment-expression | unary-expression PLUSassign assignment-expression | unary-expression MINUSassign assignment-expression | unary-expression LSassign assignment-expression | unary-expression RSassign assignment-expression | unary-expression ANDassign assignment-expression | unary-expression ERassign assignment-expression | unary-expression ORassign assignment-expression conditional-expression : logical-OR-expression | logical-OR-expression QUESTION expression COLON conditional-expression logical-OR-expression : logical-AND-expression | logical-OR-expression OROR logical-AND-expression logical-AND-expression : inclusive-OR-expression | logical-AND-expression ANDAND inclusive-OR-expression inclusive-OR-expression : exclusive-OR-expression | inclusive-OR-expression OR exclusive-OR-expression exclusive-OR-expression : AND-expression | exclusive-OR-expression HAT AND-expression AND-expression : equality-expression | AND-expression AMPERSAND equality-expression equality-expression : relational-expression | equality-expression EQ relational-expression | equality-expression NE relational-expression relational-expression : shift-expression | relational-expression LESS shift-expression | relational-expression GREATER shift-expression | relational-expression LE shift-expression | relational-expression GE shift-expression shift-expression : additive-expression | shift-expression LS additive-expression | shift-expression RS additive-expression additive-expression : multiplicative-expression | additive-expression PLUS multiplicative-expression | additive-expression MINUS multiplicative-expression multiplicative-expression : cast-expression | multiplicative-expression STAR cast-expression | multiplicative-expression SLASH cast-expression | multiplicative-expression MOD cast-expression cast-expression : unary-expression | LPAREN type-name RPAREN cast-expression unary-expression : postfix-expression | INCR unary-expression | DECR unary-expression | AMPERSAND cast-expression | STAR cast-expression | PLUS cast-expression | MINUS cast-expression | TWIDDLE cast-expression | NOT cast-expression | SIZEOF unary-expression | SIZEOF LPAREN type-name RPAREN | line-address postfix-expression : primary-expression | postfix-expression LBRACKET expression RBRACKET | function-call | postfix-expression LPAREN type-name-list RPAREN | postfix-expression DOT identifier-or-typedef-name | postfix-expression ARROW identifier-or-typedef-name | postfix-expression INCR | postfix-expression DECR
15.2.3 Expressions Specific to C++
C++ is a complex language, with a rich expression system. The debugger understands much of the system, but it does not understand how to evaluate some complex aspects of a C++ expression. It can correctly debug these when they occur in the source code.The aspects of the expression system not processed properly during debugger expression evaluation include the following:
- Many of the implicit conversions
- Program-defined operators
- Calling constructors and destructors during the debugger's own evaluation of expressions
There are also some minor restrictions in the following grammar, compared with the full C++ expression grammar, to make it unambiguous:
expression : assignment-expression constant-expression : conditional-expression
C++ Identifiers
The debugger correctly augments the general lookup rules when inside class member functions, to look up the members correctly.
The debugger has only a limited understanding of namespaces. It correctly processes
names such as UserNameSpace::NestedNamespace::userIdentifier, as
well as C++ use-declarations, which introduce a new
identifier into a scope.
The debugger does not currently understand C++ using-directives.
The debugger understands the relationship between struct and class identifiers and
typedef identifiers.
id-or-keyword-or-typedef-name : identifier-or-key-word | TYPEDEFname
C++ Constants
The debugger treats numeric constants the same as C++ does. The enumeration constant identifiers go though the same grammar paths as variable identifiers, which has basically the same effect as the C++ semantics.constant : FLOATINGconstant | INTEGERconstant | CHARACTERconstant | WIDECHARACTERconstant | WIDESTRINGliteral
C++ Calls
The debugger does not understand the following aspects of C++ calls:- Invoking C++ constructors and destructors to create and destroy temporaries containing the value of parameters and results.
- Default parameters.
- Many of the implicit conversions that may be needed for the parameters.
- Overloading resolution. Instead, the debugger queries the user.
call-expression : expressionRestrictions and limits are documented here.
C++ Addresses
Following is the C++ implementation of addresses:address : AMPERSAND postfix-expression /* Address of */ | line-address | postfix-expression address-exp : address | address-exp PLUS address | address-exp MINUS address | address-exp STAR addressRestrictions and limits are documented here.
C++ Loc
Following is the C++ implementation ofloc:
loc : expression | rescoped-expression
C++ Other Modified Forms of Expressions
whatis-expressions : expression | printable-type
C++ Rescoped Expressions
The C++ implementation of rescoped expressions is as follows:qual-typedef-opt : type-name | qual-typedef-opt TICK type-name
C++ Strings
The C++ implementation of strings is as follows:string-literal-list : string | string-literal-list string
C++ Identifier Expressions
The debugger understands nested names. Namespaces go through the same paths as classes, hence the unusual use of TYPEDEFname.id-expression : id-expression-internals id-expression-internals : qualified-id | id-or-keyword-or-typedef-name | operator-function-name | TWIDDLE id-or-keyword-or-typedef-name qualified-id : nested-name-specifier qualified-id-follower qualified-type : nested-name-specifier TYPEDEFname nested-name-specifier : CLCL | TYPEDEFname CLCL | nested-name-specifier TYPEDEFname CLCL qualified-id-follower : identifier-or-key-word | operator-function-name | TWIDDLE id-or-keyword-or-typedef-name
C++ Types
The debugger understands the full C++ type specification grammar.type-specifier : basic-type-specifier | struct-union-enum-type-specifier | typedef-type-specifier type-qualifier-list : type-qualifier | type-qualifier-list type-qualifier type-qualifier : CONST | VOLATILE basic-type-specifier : basic-type-name basic-type-name | basic-type-name type-qualifier | type-qualifier-list basic-type-name | basic-type-specifier type-qualifier | basic-type-specifier basic-type-name struct-union-enum-type-specifier : elaborated-type-name | type-qualifier-list elaborated-type-name | struct-union-enum-type-specifier type-qualifier typedef-type-specifier : TYPEDEFname type-qualifier | type-qualifier-list TYPEDEFname | typedef-type-specifier type-qualifier basic-type-name : VOID | CHAR | SHORT | INT | LONG | FLOAT | DOUBLE | SIGNED | UNSIGNED elaborated-type-name : aggregate-name | enum-name printable-type : rescoped-typedef | type-name aggregate-name : aggregate-key opt-parenthesized-identifier-or-typedef-name | aggregate-key qualified-type opt-parenthesized-identifier-or-typedef-name : id-or-keyword-or-typedef-name | LPAREN opt-parenthesized-identifier-or-typedef-name RPAREN aggregate-key : STRUCT | UNION | CLASS enum-name : ENUM id-or-keyword-or-typedef-name parameter-type-list : PARENS type-qualifier-list-opt type-name : type-specifier | qualified-type | basic-type-name | TYPEDEFname | type-qualifier-list | type-specifier abstract-declarator | basic-type-name abstract-declarator | qualified-type abstract-declarator | TYPEDEFname abstract-declarator | type-qualifier-list abstract-declarator abstract-declarator : unary-abstract-declarator | postfix-abstract-declarator | postfixing-abstract-declarator postfixing-abstract-declarator : array-abstract-declarator | parameter-type-list array-abstract-declarator : BRACKETS | LBRACKET constant-expression RBRACKET | array-abstract-declarator LBRACKET constant-expression RBRACKET unary-abstract-declarator : STAR | AMPERSAND | pointer-operator-type | STAR abstract-declarator | AMPERSAND abstract-declarator | pointer-operator-type abstract-declarator postfix-abstract-declarator : LPAREN unary-abstract-declarator RPAREN | LPAREN postfix-abstract-declarator RPAREN | LPAREN postfixing-abstract-declarator RPAREN | LPAREN unary-abstract-declarator RPAREN postfixing-abstract-declarator pointer-operator-type : TYPEDEFname CLCL STAR type-qualifier-list-opt | STAR type-qualifier-list | AMPERSAND type-qualifier-list
C++ Other Forms of Expressions
The following expressions all have the usual C++ semantics:primary-expression : constant | string-literal-list | THIS | LPAREN expression RPAREN | operator-function-name | identifier-or-key-word | qualified-id | process_set | LPAREN process_range RPAREN operator-function-name : OPERATOR operator-predefined | OPERATOR basic-type-name | OPERATOR TYPEDEFname | OPERATOR LPAREN type-name RPAREN | OPERATOR type-qualifier | OPERATOR qualified-type operator-predefined : PLUS | MINUS | STAR | ... | DELETE | COMMA type-qualifier-list-opt : [ type-qualifier-list ] postfix-expression : primary-expression | postfix-expression LBRACKET expression RBRACKET | postfix-expression PARENS | postfix-expression LPAREN argument-expression-list RPAREN | postfix-expression LPAREN type-name-list RPAREN | postfix-expression DOT id-expression | postfix-expression ARROW id-expression | postfix-expression INCR | postfix-expression DECR | TYPEDEFname LPAREN argument-expression-list RPAREN | TYPEDEFname LPAREN type-name-list RPAREN | basic-type-name LPAREN assignment-expression RPAREN type-name-list : type-name | type-name COMMA type-name-list | type-name comma-opt-ellipsis | ELLIPSIS comma-opt-ellipsis : ELLIPSIS | COMMA ELLIPSIS unary-expression : postfix-expression | INCR unary-expression | DECR unary-expression | line-address | AMPERSAND cast-expression | STAR cast-expression | MINUS cast-expression | PLUS cast-expression | TWIDDLE LPAREN cast-expression RPAREN | NOT cast-expression | SIZEOF unary-expression | SIZEOF LPAREN type-name RPAREN | allocation-expression allocation-expression : operator-new LPAREN type-name RPAREN operator-new-initializer | operator-new LPAREN argument-expression-list RPAREN LPAREN type-name RPAREN operator-new-initializer operator-new : NEW | CLCL NEW operator-new-initializer : [ PARENS ] | [ LPAREN argument-expression-list RPAREN ] cast-expression : unary-expression | LPAREN type-name RPAREN cast-expression deallocation-expression : cast-expression | DELETE deallocation-expression | CLCL DELETE deallocation-expression | DELETE BRACKETS deallocation-expression | CLCL DELETE BRACKETS deallocation-expression point-member-expression : deallocation-expression | point-member-expression DOTstar deallocation-expression | point-member-expression ARROWstar deallocation-expression multiplicative-expression : point-member-expression | multiplicative-expression STAR point-member-expression | multiplicative-expression SLASH point-member-expression | multiplicative-expression MOD point-member-expression additive-expression : multiplicative-expression | additive-expression PLUS multiplicative-expression | additive-expression MINUS multiplicative-expression shift-expression : additive-expression | shift-expression LS additive-expression | shift-expression RS additive-expression relational-expression : shift-expression | relational-expression LESS shift-expression | relational-expression GREATER shift-expression | relational-expression LE shift-expression | relational-expression GE shift-expression equality-expression : relational-expression | equality-expression EQ relational-expression | equality-expression NE relational-expression AND-expression : equality-expression | AND-expression AMPERSAND equality-expression exclusive-OR-expression : AND-expression | exclusive-OR-expression HAT AND-expression inclusive-OR-expression : exclusive-OR-expression | inclusive-OR-expression OR exclusive-OR-expression logical-AND-expression : inclusive-OR-expression | logical-AND-expression ANDAND inclusive-OR-expression logical-OR-expression : logical-AND-expression | logical-OR-expression OROR logical-AND-expression conditional-expression : logical-OR-expression | logical-OR-expression QUESTION expression COLON conditional-expression assignment-expression : conditional-expression | unary-expression ASSIGNOP assignment-expression | unary-expression MULTassign assignment-expression | unary-expression DIVassign assignment-expression | unary-expression MODassign assignment-expression | unary-expression PLUSassign assignment-expression | unary-expression MINUSassign assignment-expression | unary-expression LSassign assignment-expression | unary-expression RSassign assignment-expression | unary-expression ANDassign assignment-expression | unary-expression ERassign assignment-expression | unary-expression ORassign assignment-expression
15.2.4 Expressions Specific to Fortran
This section contains expressions specific to Fortran.Fortran Identifiers
The Fortran implementation of identifiers is as follows:identifier-or-typedef-name : identifier-or-key-word | TYPEDEFname | PROCEDUREname
Fortran Constants
real-or-imag-part : real_constant | PLUS real_constant | MINUS real_constant | integer_constant | PLUS integer_constant | MINUS integer_constant
constant : real_constant | integer_constant | complex-constant | character_constant | LOGICALconstantWithKind
character_constant : CHARACTERconstantWithKind | string
complex-constant : LPAREN real-or-imag-part COMMA real-or-imag-part RPAREN
Fortran Rescoped Expressions
The Fortran implementation of rescoped expressions is as follows:qual-typedef-opt : TYPEDEFname /* Base (global) name */ | qual-typedef-opt TICK TYPEDEFname /* Qualified name */ whatis-expressions : expression | rescoped-expression | printable_type
Fortran Calls
The Fortran implementation of calls is as follows:call-expression : call-stmt call-stmt : named-subroutine | named-subroutine LPAREN RPAREN | named-subroutine LPAREN actual-arg-spec-list RPAREN
Fortran Addresses
The Fortran implementation of addresses is as follows:address : line-address | primary address-exp : address | address-exp PLUS address | address-exp MINUS address | address-exp STAR addressRestrictions and limits are documented here.
Fortran Loc
The Fortran implementation of loc is as follows:loc : expression | rescoped-expression
Fortran Types
The Fortran implementation of types is as follows:type-name : TYPEDEFname printable-type : rescoped-typedef | type-name
Other Forms of Fortran Expressions
expression : expr | named-procedure assignment-expression : expr constant-expression : constant unary-expression : variable expr : level-5-expr | expr defined-binary-op level-5-expr level-5-expr : equiv-operand | level-5-expr LOGEQV equiv-operand | level-5-expr LOGNEQV equiv-operand | level-5-expr LOGXOR equiv-operand equiv-operand : or-operand | equiv-operand LOGOR or-operand or-operand : and-operand | or-operand LOGAND and-operand and-operand : level-4-expr | LOGNOT and-operand level-4-expr : level-3-expr | level-3-expr LESS level-3-expr | level-3-expr GREATER level-3-expr | level-3-expr LE level-3-expr | level-3-expr GE level-3-expr | level-3-expr EQ level-3-expr | level-3-expr NE level-3-expr level-3-expr : level-2-expr | level-3-expr SLASHSLASH level-2-expr level-2-expr : add-operand | level-2-expr PLUS add-operand | level-2-expr MINUS add-operand add-operand : add-operand-f90 | add-operand-dec | unary-expr-dec add-operand-f90 : mult-operand-f90 | add-operand-f90 STAR mult-operand-f90 | add-operand-f90 SLASH mult-operand-f90 mult-operand-f90 : level-1-expr | level-1-expr STARSTAR mult-operand-f90 add-operand-dec : mult-operand-dec | add-operand-f90 STAR mult-operand-dec | add-operand-f90 SLASH mult-operand-dec | add-operand-f90 STAR unary-expr-dec | add-operand-f90 SLASH unary-expr-dec mult-operand-dec : level-1-expr STARSTAR mult-operand-dec | level-1-expr STARSTAR unary-expr-dec unary-expr-dec : PLUS add-operand | MINUS add-operand level-1-expr : primary | defined-unary-op primary defined-unary-op : DOT_LETTERS_DOT primary : constant | variable | function-reference | LPAREN expr RPAREN | AMPERSAND variable | process_set | LPAREN process_range RPAREN defined-binary-op : DOT_LETTERS_DOT int-expr : expr scalar-int-expr : int-expr variable : named-variable | subobject named-variable : variable-name subobject : array-elt-or-sect | structure-component | known-substring known-substring : disabled-array-elt-or-sect LPAREN substring-range RPAREN | hf-array-abomination substring-range : scalar-int-expr COLON scalar-int-expr | scalar-int-expr COLON | COLON scalar-int-expr | COLON hf-array-abomination : named-variable LPAREN section-subscript-list RPAREN LPAREN section-subscript RPAREN | structure PERCENT any-identifier LPAREN section-subscript-list RPAREN LPAREN section-subscript RPAREN | structure DOT any-identifier LPAREN section-subscript-list RPAREN LPAREN section-subscript RPAREN disabled-array-elt-or-sect : DISABLER array-elt-or-sect array-elt-or-sect : named-variable LPAREN section-subscript-list RPAREN | structure PERCENT any-identifier LPAREN section-subscript-list RPAREN | structure DOT any-identifier LPAREN section-subscript-list RPAREN section-subscript-list : section-subscript | section-subscript COMMA section-subscript-list subscript : scalar-int-expr section-subscript : subscript | subscript-triplet subscript-triplet : subscript COLON subscript COLON stride | subscript COLON COLON stride | COLON subscript COLON stride | COLON COLON stride | subscript COLON subscript | subscript COLON | COLON subscript | COLON stride : scalar-int-expr structure-component : structure PERCENT any-identifier | structure DOT any-identifier structure : named-variable | structure-component | array-elt-or-sect function-reference : SIZEOF LPAREN expr RPAREN | named-function LPAREN RPAREN | named-function LPAREN actual-arg-spec-list RPAREN named-procedure : PROCEDUREname named-function : PROCEDUREname named-subroutine : PROCEDUREname actual-arg-spec-list : actual-arg-spec | actual-arg-spec COMMA actual-arg-spec-list actual-arg-spec : actual-arg actual-arg : expr any-identifier : variable-name | PROCEDUREname variable-name : identifier-or-key-word PROCEDUREname : IDENTIFIER
Chapter 16 — Debugging Core Files
When the operating system encounters an unrecoverable error while running a
process, for example a segmentation violation (SEGV),
the system creates a file named core and places it in the current directory.
The core file is not an executable file; it is a snaphot of the state of
your process at the time the error occurred. It allows you to analyze the
process at the point it crashed.
This chapter discusses the following topics:
It also contains a core file debugging example and a quick reference for transporting a core file.
16.1 Invoking the Debugger on a Core File
You can use the debugger to examine the process information in a core file. Use the following debugger command syntax to invoke the debugger on a core file:
% idb executable_file core_file
or
(idb) load executable_file core_file
The executable file is that which was being executed at the time the core file was generated.
16.2 Debugging a Core File
When debugging a core file, you can use the debugger to obtain a stack trace and the values of some variables just as you would for a stopped process.
The stack trace lists the functions in your program that were active when the
dump occurred. By examining the values of a few variables along with
the stack trace, you may be able to pinpoint the process state and the cause
of the core dump. Core files cannot be executed; therefore the rerun,
step, cont and so on commands will not work until you create
a process using the run command.
In addition, if the program is multithreaded, you can examine the thread
information with the
show thread and
thread
commands. You can
examine the stack trace for a particular thread or for all threads with the
where thread command.
The following example uses a null pointer reference in the factorial function.
This reference causes the process to abort and dump the core when it is
executed. The dump command prints the value of the x variable
as a null, and the print *x command reveals that you cannot
dereference a null pointer.
% cat testProgram.c
#include <stdio.h>
int factorial(int i)
main() {
int i,f;
for (i=1 ; i<3 ; i++) {
f = factorial(i);
printf("%d! = %d\en",i,f);
}
}
int factorial(int i)
int i;
{
int *x;
x = 0;
printf("%d",*x);
if (i<=1)
return (1);
else
return (i * factorial(i-1) );
}
% cc -o testProgram -g testProgram.c
% testProgram
Memory fault - core dumped.
% idb testProgram core
Welcome to the debugger Version n
------------------
object file name: testProgram
core file name: core
Reading symbolic information ...done
Core file produced from executable testProgram
Thread terminated at PC 0x120000dc4 by signal SEGV
(idb) where
>0 0x120000dc4 in factorial(i=1) testProgram.c:13
#1 0x120000d44 in main() testProgram.c:4
(idb) dump
>0 0x120000dc4 in factorial(i=1) testProgram.c:13
printf("%d",*x);
(idb) print *x
Cannot dereference 0x0
Error: no value for *x
(idb)
16.3 Transporting a Core File
Transporting core files is usually necessary to debug a core file on a system other than that which produced it. It is sometimes possible to debug a core file on a system other than that which produced it if the current system is sufficiently similar to the original system, but it will not work correctly in general.
16.3.1 Procedure for Transporting Core Files
The following procedure (see also quick reference)
shows how to transport the core files.
In this example, a.out is the name of the executable and
core is the name of the core file.
You need to collect a variety of files from the original system. These
include the executable, the core file, shared libraries used by the
executable, and /usr/shlib/libpthreaddebug.so if the POSIX Threads
Library is involved.
Do the following steps (1 through 4) on the original system:
-
Determine the shared objects in use:
% idb a.out core (idb) listobj (idb) quit
-
Cut, paste and edit the result into a list of file names. Most will probably begin with
/usr/shlib/. -
If
/usr/shlib/libpthread.sois one of the files, add/usr/shlib/libpthreaddebug.soto the list. (If you have a privately deliveredlibpthread.so, there should be a privately delivered correspondinglibpthreaddebug.so; use the privately delivered one.) -
Package the
a.out,coreand shared objects, for example, into atarfile. Be sure to use thetar hoption to forcetarto follow symbolic links as if they were normal files or directories.% tar cfvh mybug.tar
Then do the following steps (5 through 14) on the current system:
On the current system, the executable and core file are generally put in the
current working directory, the shared objects are put in an "application"
subdirectory, and libpthreaddebug.so is put in a "debugger"
subdirectory.
-
Create a directory for debugging the transported core files:
% mkdir mybug
-
Move to that directory:
% cd mybug
-
Get the package:
% mv <wherever>/mybug.tar .
-
Create the subdirectories
applibsanddbglibs:% mkdir applibs dbglibs
-
Unpackage the tar files. Be sure to use the
tar soption to strip off any leading slashes from pathnames during extraction.% tar xfvs mybug.tar
-
Move the shared objects (that were originally in
/usr/shliband are now inusr/shlib) intoapplibs:% mv usr/shlib/* applibs
If the
tar xfvsoutput in step 9 moved shared objects into other directories, move them intoapplibsas well. -
Make
libpthreaddebug.soexist in thedbglibsdirectory, for example, by linking it to the file in theapplibsdirectory.% ln -s ../applibs/libpthreaddebug.so dbglibs/libpthreaddebug.so
-
Set the IDB_COREFILE_LIBRARY_PATH environment variable to the application subdirectory. This directs the debugger to look for shared objects (by their base names) in the application subdirectory before trying the system directories. If the POSIX Threads Library is involved, set the LD_LIBRARY_PATH environment variable to the debugger subdirectory so that the debugger will use the correct
libpthreaddebug.so.% env IDB_COREFILE_LIBRARY_PATH=applibs \ LD_LIBRARY_PATH=dbglibs \ idb a.out core
-
Determine that the shared objects are in the
applibssubdirectory rather than in/usr/shlib/:(idb) listobj
For an alternative method when the debugger cannot be run on the original system, see the
corefile_listobj.cexample. -
Debug as usual:
(idb)
16.4 Core File Debugging Example
The following is a complete example, from core creation, through transporting and core file debugging:
-
Create the core file:
% a.out -segv Segmentation fault (core dumped)
-
Determine the shared objects using the debugger on the original system:
% idb a.out core Welcome to the debugger Version n ------------------ object file name: a.out core file name: core Reading symbolic information ...done Core file produced from executable a.out Thread 0x5 terminated at PC 0x3ff8058b448 by signal SEGV (idb) listobj section Start Addr End Addr ------------------------------------------------------------------------------ a.out .text 0x120000000 0x120003fff .data 0x140000000 0x140001fff /usr/shlib/libpthread.so .text 0x3ff80550000 0x3ff8058bfff .data 0x3ffc0180000 0x3ffc018ffff .bss 0x3ffc0190000 0x3ffc01901af /usr/shlib/libmach.so .text 0x3ff80530000 0x3ff8053ffff .data 0x3ffc0170000 0x3ffc0173fff /usr/shlib/libexc.so .text 0x3ff807b0000 0x3ff807b5fff .data 0x3ffc0210000 0x3ffc0211fff /usr/shlib/libc.so .text 0x3ff80080000 0x3ff8019ffff .data 0x3ffc0080000 0x3ffc0093fff .bss 0x3ffc0094000 0x3ffc00a040f (idb) quit -
Cut, paste, and edit the result into a list of file names. Note that
libpthread.sois included, so add/usr/shlib/libpthreaddebug.soto the list. -
Create a tar file:
% tar cfv mybug.tar a.out core \ /usr/shlib/libpthread.so /usr/shlib/libmach.so \ /usr/shlib/libexc.so /usr/shlib/libc.so \ /usr/shlib/libpthreaddebug.so a a.out 128 Blocks a core 2128 Blocks a /usr/shlib/libpthread.so 928 Blocks a /usr/shlib/libmach.so 208 Blocks a /usr/shlib/libexc.so 96 Blocks a /usr/shlib/libc.so symbolic link to ../../shlib/libc.so a /usr/shlib/libpthreaddebug.so 592 BlocksNote that
libc.sois a symbolic link. Therefore, use thetarhoption to forcetarto follow symbolic links as if they were normal files or directories:% tar hcfv mybug.tar a.out core \ /usr/shlib/libpthread.so /usr/shlib/libmach.so \ /usr/shlib/libexc.so /usr/shlib/libc.so \ /usr/shlib/libpthreaddebug.so a a.out 128 Blocks a core 2128 Blocks a /usr/shlib/libpthread.so 928 Blocks a /usr/shlib/libmach.so 208 Blocks a /usr/shlib/libexc.so 96 Blocks a /usr/shlib/libc.so 3193 Blocks a /usr/shlib/libpthreaddebug.so 592 BlocksNow you have a package that you can transport.
-
On the current system, create a directory for debugging, move to that directory, and get the package.
% mkdir mybug % cd mybug % mv <wherever>/mybug.tar .
-
Create the necessary subdirectories and unpackage the
tarfile using thesoption:% mkdir applibs dbglibs % tar xfvs mybug.tar blocksize = 256 x a.out, 65536 bytes, 128 tape blocks x core, 1089536 bytes, 2128 tape blocks x usr/shlib/libpthread.so, 475136 bytes, 928 tape blocks x usr/shlib/libmach.so, 106496 bytes, 208 tape blocks x usr/shlib/libexc.so, 49152 bytes, 96 tape blocks x usr/shlib/libc.so, 1634400 bytes, 3193 tape blocks x usr/shlib/libpthreaddebug.so, 303104 bytes, 592 tape blocks
-
Move the original shared objects into
applibs, and makelibpthreaddebug.soexist in thedbglibsdirectory, for example, by linking it to the file in theapplibsdirectory:% mv usr/shlib/* applibs % ln -s ../applibs/libpthreaddebug.so dbglibs/libpthreaddebug.so
In this example, all shared objects were in
usr/shlib/, so no other moving is needed. -
Observe the file system:
% ls -lR total 4904 -rwxr-xr-x 1 user1 groupXX 65536 Sep 17 11:20 a.out* drwxrwxr-x 2 user1 groupXX 8192 Sep 17 11:36 applibs/ -rw------- 1 user1 groupXX 1089536 Sep 17 11:21 core drwxrwxr-x 2 user1 groupXX 8192 Sep 17 11:24 dbglibs/ -rw-rw-r-- 1 user1 groupXX 3737600 Sep 17 11:23 mybug.tar drwxrwxr-x 3 user1 groupXX 8192 Sep 17 11:36 usr/ ./applibs: total 2632 -rw-r--r-- 1 user1 groupXX 1634400 Dec 7 1998 libc.so -rw-r--r-- 1 user1 groupXX 49152 Jun 26 1998 libexc.so -rw-r--r-- 1 user1 groupXX 106496 Dec 29 1997 libmach.so -rw-r--r-- 1 user1 groupXX 475136 Dec 7 1998 libpthread.so -rw-r--r-- 1 user1 groupXX 303104 Dec 7 1998 libpthreaddebug.so ./dbglibs: total 0 lrwxrwxrwx 1 user1 groupXX 29 Sep 17 11:24 libpthreaddebug.so@ -> ../applibs/libpthreaddebug.so ./usr: total 8 drwxrwxr-x 2 user1 groupXX 8192 Sep 17 11:36 shlib/ ./usr/shlib: total 0 %
If other files need to be moved into
applibs, do that as well and then re-observe the file system. In this example, there are none. -
Now set the environment variables as indicated:
% env IDB_COREFILE_LIBRARY_PATH=applibs \ LD_LIBRARY_PATH=dbglibs \ idb a.out core Welcome to the debugger Version n ------------------ object file name: a.out core file name: core Reading symbolic information ...done Core file produced from executable a.out Thread 0x5 terminated at PC 0x3ff8058b448 by signal SEGV
-
Issue the
listobjcommand to ensure the application libraries are coming fromapplibs/. Find any that are not, either from the original system, or unpacked from the tar file but not yet moved intoapplibs.(idb) listobj section Start Addr End Addr ------------------------------------------------------------------------------ a.out .text 0x120000000 0x120003fff .data 0x140000000 0x140001fff applibs/libpthread.so .text 0x3ff80550000 0x3ff8058bfff .data 0x3ffc0180000 0x3ffc018ffff .bss 0x3ffc0190000 0x3ffc01901af applibs/libmach.so .text 0x3ff80530000 0x3ff8053ffff .data 0x3ffc0170000 0x3ffc0173fff applibs/libexc.so .text 0x3ff807b0000 0x3ff807b5fff .data 0x3ffc0210000 0x3ffc0211fff applibs/libc.so .text 0x3ff80080000 0x3ff8019ffff .data 0x3ffc0080000 0x3ffc0093fff .bss 0x3ffc0094000 0x3ffc00a040f -
Now debug as usual:
(idb) where >0 0x3ff8058b448 in nxm_thread_kill(0x140091c68, 0xb, 0x1, 0x0, 0x0, 0xfffffffffffffcc0) in applibs/libpthread.so #1 0x3ff80578c58 in pthread_kill(0x140091c68, 0xb, 0x1, 0x0, 0x0, 0xfffffffffffffcc0) in applibs/libpthread.so #2 0x3ff8056cd34 in UnknownProcedure3FromFile69(0x140091c68, 0xb, 0x1, 0x0, 0x0, 0xfffffffffffffcc0) in applibs/libpthread.so #3 0x3ff807b22d8 in UnknownProcedure4FromFile1(0x140091c68, 0xb, 0x1, 0x0, 0x0, 0xfffffffffffffcc0) in applibs/libexc.so #4 0x3ff807b3824 in UnknownProcedure17FromFile1(0x140091c68, 0xb, 0x1, 0x0, 0x0, 0xfffffffffffffcc0) in applibs/libexc.so #5 0x3ff807b3864 in exc_unwind(0x140091c68, 0xb, 0x1, 0x0, 0x0, 0xfffffffffffffcc0) in applibs/libexc.so #6 0x3ff807b3af0 in exc_raise_signal_exception(0x140091c68, 0xb, 0x1, 0x0, 0x0, 0xfffffffffffffcc0) in applibs/libexc.so #7 0x3ff8057a328 in UnknownProcedure6FromFile80(0x140091c68, 0xb, 0x1, 0x0, 0x0, 0xfffffffffffffcc0) in applibs/libpthread.so #8 0x3ff800d6a30 in __sigtramp(0x140091c68, 0xb, 0x1, 0x0, 0x0, 0xfffffffffffffcc0) in applibs/libc.so #9 0x120001d94 in mandel_val(cr=0.01, ci=0.16, nmin=0, nmax=255) "mb_pi.c":62 #10 0x12000274c in smp_fill_in_data(raw_mthread=0x11fffe998) "mb_pi.c":338 #11 0x3ff80582068 in thdBase(0x0, 0x2, 0x0, 0x0, 0xff, 0x1) in applibs/libpthread.so (idb) quit %
16.5 Quick Reference for Transporting a Core File
The following sections contain a quick reference for transporting a core file.
First, do the following steps on the original system:
-
% idb a.out core -
(idb) listobj; quit - Cut, paste, and edit into list of filenames.
-
Add
/usr/shlib/libpthreaddebug.so, iflibpthread.so -
% tar cfvh mybug.tar a.out core <shlibs>
Next, do the following steps on the current system:
-
% mkdir mybug -
% cd mybug -
% mv <tarfile> mybug.tar -
% mkdir applibs dbglibs -
% tar sfvc mybug.tar -
% mv usr/shlib/* applibs -
% ln -s ../applibs/libptheaddebug.so dbglib/libptheaddebug.so
The ../applibs is not a typo. Think of it as:
% cd dbglibs % ln -s ../applibs/libpthreaddebug.so libpthreaddebug.so % cd ..
-
% env IDB_COREFILE_LIBRARY_PATH=applibs \
LD_LIBRARY_PATH=dbglibs \
idb a.out core -
(idb) listobj -
(idb) <as usual>
Chapter 17 — Kernel Debugging
TBD
Chapter 18 — Machine-Level Debugging
The debugger lets you debug your programs at the machine-code level as well as at the source-code level. Using debugger commands, you can examine and edit values in memory, print the values of all machine registers, and step through program execution one machine instruction at a time.
Only those users familiar with machine-language programming and executable-file-code structure will find low-level debugging useful.
This chapter contains the following sections:
18.1 Examining Memory Addresses
You can examine the value contained at an address in memory as follows:
-
The examine commands
(
/and?) display the values stored in memory. -
The
printcommand, with the appropriate pointer arithmetic, prints the value contained at the address in decimal. -
The
printregscommand prints the values of all machine-level registers.
In addition to examining memory, you can also search memory in 32 and 64-bit chunks.
18.1.1 Using the Examine Commands
You can use the examine commands
(/ and ?) to print the
value contained at the address in one
of a number of formats (decimal, octal, hexadecimal, and so on). See
Memory Display Commands for more information.
The debugger also maintains the $readtextfile
debugger variable that allows you to view the
data from the text section of the executable directly
from the binary file, rather than reading it from memory.
18.1.2 Using Pointer Arithmetic
You can use C and C++ pointer-type conversions to display the contents of a
single address in decimal. Using the print command, the syntax is as
follows:
(idb) print *(int *)(address)
Using the same pointer arithmetic, you can use the assign command to alter the
contents of a single address. Use the following syntax:
(idb) assign *(int *)(address) = value
The following example shows how to use pointer arithmetic to examine and change the contents of a single address:
(idb) print *(int*)(0x10000000) 4198916 (idb) assign *(int*)(0x10000000) = 4194744 (idb) print *(int*)(0x10000000) 4194744 (idb)
18.1.3 Examining Machine-Level Registers
The printregs command prints the values of all machine-level registers.
The registers displayed by the debugger are machine dependent. The values are
in decimal or hexadecimal, depending on the value of the $hexints
variable (the default is 0, decimal). The register aliases are shown; for
example, $r1 [$t0]. See the
printregs command for more information.
18.2 Stepping at the Machine Level
The stepi and nexti commands let you step through program
execution incrementally, like the step and next commands. The
stepi and nexti commands execute one machine instruction at a
time, as opposed to one line of source code. The following example shows
stepping at the machine-instruction level:
(idb) stop in main
[#1: stop in main ]
(idb) run
[1] stopped at [main:4 0x120001180]
4 for (i=1 ; i<3 ; i++) {
(idb) stepi
stopped at [main:4 0x120001184] stl t0, 24(sp)
(idb) [Return]
stopped at [main:5 0x120001188] ldl a0, 24(sp)
(idb) [Return]
stopped at [main:5 0x12000118c] ldq t12, -32664(gp)
(idb) [Return]
stopped at [main:5 0x120001190] bsr ra,
(idb) [Return]
stopped at [factorial:12 0x120001210] ldah gp, 8192(t12)
(idb)
At the machine-instruction level, you can step into, rather than over, a function's prologue. While within a function prologue, you may find that the stack trace, variable scope, and parameter list are not correct. Stepping out of the prologue and into the actual function updates the stack trace and variable information kept by the debugger.
Single-stepping through function prologues that initialize large local variables
is slow. As a workaround, use the next command.
Chapter 19 — Debugging Parallel Applications
Intel IDB supports debugging of message passing interface (MPI) applications launched by
- mpirun, a MPI launcher from mpich, a public domain implementation of MPI.
- prun, a parallel launcher of Resource Management System (RMS) from Quadrics.
This chapter contains the following sections:
- Overview
- Starting a parallel debugging session
- Using commands in a parallel debugging session
- Working with sets of application processes
- Working with aggregated messages
- Parallel debugging tips
- Parallel debugging examples
-
Using the
mpirun_dbg.idbstartup file
19.1 Overview
The biggest challenge of debugging massively parallel applications is coping with large quantities of output from debuggers controlling the parallel application's processes. Intel Debugger helps you do this by condensing (aggregating) similar output into groups. Aggregation is performed by using the following two strategies:
-
Identical output messages are condensed into a single output message. When a condensed message is displayed, it is prefixed with a range of user process IDs (not necessarily consecutive) to which this output applies. All processes with the same output are aggregated into a single and final output message, for example:
[0-41] Linux Application Debugger for Itanium(R)-based applications, Version XX | Process range
-
Outputs that have different hexadecimal digits, but are otherwise identical, are condensed by aggregating the differing digits into a range, for example:
[0-41]>2 0x120006d6c in feedback(myid=[0;41],np=42,name=0x11fffe018="mytest") "mytest.c":41 | | Process range Value range
Another challenge of debugging massively parallel applications is controlling all processes or subsets of the parallel application's processes from the debugger in a consistent manner. The debugger allows you to control all or a subset of your processes through a single user interface. At the startup of a parallel debugging session, Intel IDB does the following:
- Detects the topology of your application and attaches a debugger to each of your application's processes.
- Builds an n-nary tree with the debuggers as root and leaves with special processes called aggregators in the middle (shown in the following diagram). You can specify the tree's branching factor and the aggregator time delay.
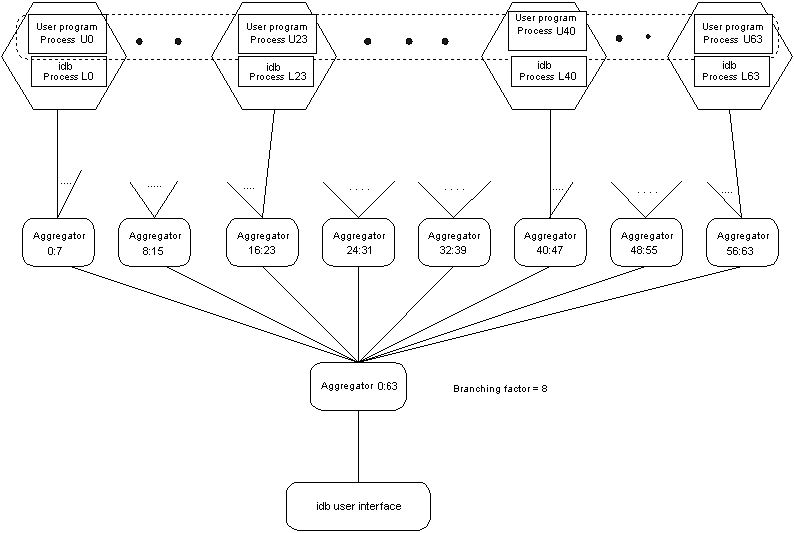
The root debugger is responsible for starting your parallel application and serves as your user interface. The aggregators perform output consolidation as described previously. The leaf debuggers control and query your application processes.
The branching factor is the factor used to build the n-nary tree and determine the number of aggregators in the tree. For example, for 16 processes:
- Using a branching factor of 8 creates 3 aggregators
- Using a branching factor of 2 creates 15 aggregators
You can set the value of the $parallel_branchingfactor variable
from its default value of 8 to a value equal to or greater than 2 in the Intel IDB initialization
file (.idbrc, and so on).
When you delete $parallel_branchingfactor from the Intel IDB initialization
file, the branching factor used in the startup mechanism is the
default value.
Aggregator delay specifies the time that aggregators wait before they aggregate and send messages down to the next level when not all of the expected messages have been received.
You can change the value of the $parallel_aggregatordelay variable
from its default value of 3000 milliseconds in the Intel IDB initialization file
(.idbrc, etc.). See Parallel Debugging Tips for more
information.
When you delete $parallel_aggregatordelay from the Intel IDB initialization
file, the aggregator delay used in the startup mechanism is the
default value.
Note: You can only change the values that are set for
$parallel_branchingfactor and
$parallel_aggregatordelay at startup, in the
.idbrc file.
After the program has started up, you cannot change
these values.
Note: Intel Debugger uses rsh to create the leaf debugger and aggregator processes in the tree structure. Make sure that every node in your cluster has rsh privilege to all other cluster nodes for proper setup of the tree structure.
19.2 Starting a Parallel Debugging Session
To start your parallel application under debugger control, you need to
have the environment variable IDB_HOME
set to the directory your Intel Debugger is in. When debugging an application launched
by mpich, issue the following command at
the shell,
where N represents number of
processes and application is the name of
the MPP program you would like to debug:
% mpirun -dbg=idb -np N [other mpich options] application [application arguments] [--idbopt idb options]
Make sure that there is a file called
mpirun_dbg.idb in the directory in which
mpirun is located. Also note that the Intel IDB option -gdb is not
yet supported under parallel debugging session.
When the debugger starts your parallel application, it detects and attaches to all of your application's processes. At this point, your application stops before executing any user code and the debugger displays a prompt.
You can now set any necessary breakpoints and
use the continue command to continue the execution
of your application.
When debugging an application launched by prun, issue the following command at the shell, where n is the number of processes and N is the number of nodes running the processes.
% $IDB_HOME/idb [idb options] -parallel `which prun` -n n -N N [other prun options] application [application arguments]
19.3 Using Commands in a Parallel Debugging Session
You can use most Intel Debugger commands just as you would when debugging a non-parallel application. Most commands are passed on to the leaf debuggers and you see aggregated output from them in your user interface. However, there are a few important exceptions.
The following table shows debugger commands that can be accessed remotely, locally, and both remotely and locally for parallel debugging; and Intel Debugger commands that are disabled for parallel debugging.
| Remote | Local | Both Remote and Local | Disabled |
|---|---|---|---|
#
|
!/history
|
export
|
attach/detach
|
Remote means commands will be sent to the leaf debuggers. Local means that commands are not sent to the leaf debuggers but are processed by the local Intel IDB.
In addition to the commands listed in the table, you can use four other Intel Debugger commands to assist parallel debugging:
parallel_debugging_command : focus_command | show_process_set_command | show_aggregated_message_command | expand_aggregated_message_command
19.4 Working With Sets of Application Processes
When there are many processes, it can be annoying or impractical to enumerate all the processes when one needs to focus on specific processes. Therefore, Intel IDB introduces the concept of "process sets" and "process ranges" to let the user specify a group of processes in a compact form. Moreover, process sets come with the usual set operations, and both the sets and the ranges can be stored in debugger variables for manipulation, reference, or inspection at a later time.
A process set is a bracketed list of process ranges separated by commas.
Note: Because brackets ([]) are part of the process set
syntax, this section shows optional syntactic items enclosed in curly braces ({}).
process_set : [ ] | [ process_range {,...} ]
Note: The set can be empty.
A process range has the following three forms:
process_range : * | expression | { expression } : { expression }
In the first form, the star (*) specifies all processes.
You can use the second form as follows:
-
If expression evaluates to, or can be coerced into an integer
p, then the range contains the process with pidponly. -
If expression evaluates to a process range
r, then the process range is the same asr.
You can use the third form to specify a contiguous range of processes.
For example, 10:12 stands for the processes associated with pids
10, 11, and 12.
Note: A range whose lower bound is greater than its upper bound is illegal and will be ignored.
Because both the lower bound and the upper bound are optional, you can specify ranges as follows:
| Example | Represents |
|---|---|
:5
|
All processes whose pid is no
greater than 5.
|
20:
|
All processes whose pid is no less than 20.
|
:
|
The process set [:] is equivalent to
the process set [*].
|
19.4.1 Using Debugger Variables to Store Process Sets and Ranges
Like storing other data types supported by the debugger, you can store process sets
and process ranges in debugger variables using the set command.
For example:
(idb) set $set1 = [:7, 10, 15:20, 30:] (idb) print $set1 [:7, 10, 15:20, 30:]
In addition to using the print command, you can also
use the show process set command to inspect the process set
stored in a debugger variable. For example:
show_process_set_command : show process set debugvar_name | show process set all | show process set
If you do not specify the set name, or if you use the all
specifier, the
debugger displays all the process sets that are currently stored in debugger variables, as the
continued example shows:
(idb) set $set2 = [8:9, 5:2, 22:27] `5:2' is not a legal process range. Ignored. (idb) show process set $set2 $set2 = [8:9, 22:27] (idb) show process set * $set1 = [:7, 10, 15:20, 30:] $set2 = [8:9, 22:27]
19.4.2 Process Set Operations
You can use the following three operations on process sets:
| Operation | Represents | Action |
|---|---|---|
+
|
Set union | Takes two sets S1 and S2 and returns a set whose elements are either in S1 or in S2. |
-
|
Difference | Takes two sets S1 and S2 and returns a set whose elements are in S1 but not in S2. |
unary -
|
Negation |
Takes a single set S and
returns the difference of [*] and S.
|
The following example demonstrates these operations:
(idb) set $set1 = [:10, 15:18, 20:] (idb) set $set2 = [10:16, 19] (idb) set $set3 = $set1 + $set2 (idb) print $set3 [*] (idb) print $set3 - $set2 [:9, 17:18, 20:] (idb) print -$set2 [:9, 17:18, 20:]
19.4.3 Changing the Current Set with the focus Command
You can use the focus command to change the current
process set, which is the set of processes whose debuggers receive the remote
command entered at the root debugger:
focus_command : focus expression | focus all | focus
The first form of the command sets the current process set to the set resulting from the evaluation of the given expression. The second form sets the current process set to the set that includes all processes. The third form displays the current process set.
19.5 Working with Aggregated Messages
As mentioned in the Overview, the root debugger collects the outputs from the leaf debuggers and presents you with an aggregated output. In most cases, this aggregation works fine, but it can be an impediment if you want to know the exact output from certain leaf debuggers.
To remedy this, the debugger assigns a unique number (called a message_id)
to each aggregated message and saves the message in the message_id_list.
You can use the following commands to inspect the message list and expand its entries:
show_aggregated_message_command : show aggregated message message_id_list | show aggregated message all | show aggregated message message_id_list : expression {,...}
The first form of the command displays the aggregated messages in the
list whose message IDs match the numbers specified in the message_id_list.
The second form displays all the aggregated messages in the list. If no message_id is
specified, the debugger shows the most recently added (newest) message.
expand_aggregated_message_command : expand aggregated message message_id_list | expand aggregated message
This command expands the specified messages. If no message_id is
specified, the debugger expands the most recently added (newest) message.
You can control the length of the message list using the
$aggregatedmsghistory
debugger variable.
If you set this variable to the default (0), the debugger records as many messages as
the system will allow.
19.6 Parallel Debugging Tips
This section contains the following tips for debugging parallel applications:
- Tip 1. How to obtain better aggregate outputs
- Tip 2. How to synchronize processes
- Tip 3. How to find the sources in a parallel debugging session
Tip 1. How to Obtain Better Aggregate Outputs
If the debugger outputs are not aggregated as you would expect them to be,
you can increase the value of the $parallel_aggregatordelay
debugger variable, whose value is the expiration time (in milliseconds) for
each of the aggregators when the aggregators have not received all the
expected messages. Because the default value of the $parallel_aggregatordelay is 3000 milliseconds, you should not normally have a problem
with the aggregation delay.
Tip 2. How to Synchronize Processes
If the processes become unsynchronized in the debugging session (for example,
if you use the focus command on a subset
of the total set and then use a next or some other
motion command), the easiest way to get the processes back together is to use
a cont to a future location where all processes have to go.
The following example shows how the output from processes is not identical because
different processes are at different locations in the
program. Using the cont to command synchronizes
the processes and aggregates the messages.
(idb) next
(idb) [4:5,12] stopped at [int feedbackToDebugger(int, int, char*):17 0x120006bf4]
[0:3,6:11] [3] stopped at [int feedbackToDebugger(int, int, char*):15 0x120006bf0]
[4:5,12] 17 int pathSize = 1000;
[0:3,6:11] 15 int i = 0;
(idb) l
(idb) [0:3,6:11] 16 char path[1000];
[4:5,12] 18 char hostname[1000];
[0:3,6:11] 17 int pathSize = 1000;
[4:5,12] 19 int hostnameSize = 1000;
[0:3,6:11] 18 char hostname[1000];
[4:5,12] 20
[0:3,6:11] 19 int hostnameSize = 1000;
[4:5,12] 21 volatile int debuggerAttached = 0;
[0:3,6:11] 20
[4:5,12] 22
[0:3,6:11] 21 volatile int debuggerAttached = 0;
[4:5,12] 23 gethostname(hostname,hostnameSize);
%3 [0:12] [22;24]
[0:3,6:11] 23 gethostname(hostname,hostnameSize);
[4:5,12] 25 getcwd(path,pathSize);
[0:3,6:11] 24
[4:5,12] 26 strcat(path,"/");
[0:3,6:11] 25 getcwd(path,pathSize);
[4:5,12] 27 strcat(path,name);
[0:3,6:11] 26 strcat(path,"/");
[4:5,12] 28
[0:3,6:11] 27 strcat(path,name);
[4:5,12] 29 // Print myid pid into idbAttach.myid
[0:3,6:11] 28
[4:5,12] 30 sprintf(filename,"idbAttach.%d",myid);
[0:3,6:11] 29 // Print myid pid into idbAttach.myid
[4:5,12] 31 file = fopen(filename,"w");
[0:3,6:11] 30 sprintf(filename,"idbAttach.%d",myid);
[4:5,12] 32 if (file == NULL) {
[0:3,6:11] 31 file = fopen(filename,"w");
[4:5,12] 33 fprintf(stderr,"smg98: can't open %s for %s\n",filename, "w");
[0:3,6:11] 32 if (file == NULL) {
[4:5,12] 34 exit(1)
[0:3,6:11] 33 fprintf(stderr,"smg98: can't open %s for %s\n",filename, "w");
[4:5,12] 35 }
[12] 36 fprintf(file," %ld %ld %s %s\n", myid, getpid(), hostname, path);
[12] 37 fclose(file);
[12] 38
[4:5] 36 fprintf(file," %ld %ld %s %s\n", myid, getpid(), hostname, path);
[0:3,6:11] 34 exit(1);
[0:3,6:11] 35 }
[4:5] 37 fclose(file);
[0:3,6:11] 36 fprintf(file," %ld %ld %s %s\n", myid, getpid(), hostname, path);
[4:5] 38
(idb) cont to 36
[0:13] stopped at [int feedbackToDebugger(int, int, char*):36 0x120006cb8]
[0:13] 36 fprintf(file," %ld %ld %s %s\n", myid, getpid(), hostname, path);
(idb) next
(idb) [0:13] stopped at [int feedbackToDebugger(int, int, char*):37 0x120006d0c]
[0:13] 37 fclose(file);
Tip 3. How to find the sources in a parallel debugging session
The debugger will not be able to display the source lines if it cannot find the source file in the directory specified in the application binary file or in the directory in which the binary resides.
Specifying the -I option in the
command line fixes the problem. Note that when launching a debugging session
through mpirun, this option should be following the flag --idbopt.
See Starting a Parallel Debugging Session for
details on specifying idb options in a command line.
Alternatively, applying the use command or the
map source directory
command to all the leaf debuggers can overcome the problem as well. For example,
(idb) w
Source file not found or not readable, tried...
./cpi.c
/usr/users/smith/idb-sandbox/test/src/common/Funct/bin/cpi.c
(Cannot find source file mpirun.c)
(idb) use /usr/proj/debug/idb/test/src/common/Funct/src
[0:7] Directory search path for source files:
[0:7] . /usr/users/smith/idb-sandbox/test/src/common/Funct/bin /usr/proj/debug/idb/test/src/common/Funct/src
(idb) w
[0:7] 20
[0:7] 21 double f(double);
[0:7] 22
[0:7] 23 int main(int argc, char *argv[])
[0:7] 24 {
[0:7] 25 int done = 0, n, myid, numprocs, i;
[0:7] 26 double PI25DT = 3.141592653589793238462643;
[0:7] 27 double mypi, pi, h, sum, x;
[0:7] 28 double startwtime = 0.0, endwtime;
[0:7] 29 int namelen;
19.7 Parallel Debugging Examples
The first example is a parallel debugging session started by mpirun. Click on the links within the example for explanation.
% mpirun -dbg=idb -np 8 cpi Linux Application Debugger for Itanium(R)-based applications, Version XX Reading symbolic information ...done stopped at [void* MPIR_Breakpoint(void):101 0x40000000000b3060] 101 { Process has exited (idb) [0:7] Linux Application Debugger for Itanium(R)-based applications, Version XX [0:7] ------------------ [0:7] object file name: /home/nsl/smith/mpich-1.2.4/examples/cpi [0:7] Reading symbolic information ... [0:7] done %1 [0:7] Attached to process id [30596;30636] .... [1:7] stopped at [ 0x20000000001ef962] [0] stopped at [void* MPIR_Breakpoint(void):101 0x40000000000b3060] [0] 101 { (idb) [0:7] stopped at [int main(int, char**):20 0x4000000000003520] [0:7] 20 MPI_Init(&argc,&argv); (idb) [0:7] 16 double startwtime = 0.0, endwtime; [0:7] 17 int namelen; [0:7] 18 char processor_name[MPI_MAX_PROCESSOR_NAME]; [0:7] 19 [0:7] > 20 MPI_Init(&argc,&argv); [0:7] 21 MPI_Comm_size(MPI_COMM_WORLD,&numprocs); [0:7] 22 MPI_Comm_rank(MPI_COMM_WORLD,&myid); [0:7] 23 MPI_Get_processor_name(processor_name,&namelen); [0:7] 24 (idb) stop in f (idb) [0:7] [#1: stop in double f(double) ] (idb) focus [0:3] [0:3]> [0:3]> cont [0:3]> Process 3 on nht6005.spt.intel.com Process 2 on nht6005.spt.intel.com Process 0 on nht6005.spt.intel.com Process 1 on nht6005.spt.intel.com [0:3] [1] stopped at [double f(double):7 0x4000000000003390] [0:3] 7 { [0:3]> where [0:3]> [0:3] >0 0x4000000000003390 in f(a=<no value>) "cpi.c":7 %2 [0:3] #1 0x4000000000003a30 in main(argc=0, argv=0x[0;80000fffffffba7c]) "cpi.c":51 [0:3] #2 0x20000000000906b0 in /lib/libc.so.6.1 [0:3] #3 0x4000000000003220 in _start(...) in /home/nsl/smith/mpich-1.2.4/examples/cpi [0:3]> focus [4:7] [4:7]> [4:7]> cont [4:7]> Process 7 on nht6005.spt.intel.com Process 4 on nht6005.spt.intel.com Process 6 on nht6005.spt.intel.com Process 5 on nht6005.spt.intel.com [4:7] [1] stopped at [double f(double):7 0x4000000000003390] [4:7] 7 { [4:7]> where [4:7]> [4:7] >0 0x4000000000003390 in f(a=<no value>) "cpi.c":7 %3 [4:7] #1 0x4000000000003a30 in main(argc=0, argv=0x[0;80000fffffffba7c]) "cpi.c":51 [4:7] #2 0x20000000000906b0 in /lib/libc.so.6.1 [4:7] #3 0x4000000000003220 in _start(...) in /home/nsl/smith/mpich-1.2.4/examples/cpi [4:7]> focus [*] [0:7]> [0:7]> next [0:7]> [0:7] stopped at [double f(double):8 0x40000000000033b1] [0:7] 8 return (4.0 / (1.0 + a*a)); [0:7]> where [0:7]> %4 [0:7] >0 0x40000000000033b1 in f(a=[0.0050000000000000001;0.074999999999999997]) "cpi.c":8 %5 [0:7] #1 0x4000000000003a30 in main(argc=1, argv=0x[80000fffffffb768;6000000000014a50]) "cpi.c":51 [0:7] #2 0x20000000000906b0 in /lib/libc.so.6.1 [0:7] #3 0x4000000000003220 in _start(...) in /home/nsl/smith/mpich-1.2.4/examples/cpi [0:7]> show aggregated message %1 [0:7] Attached to process id [30596;30636] .... %2 [0:3] #1 0x4000000000003a30 in main(argc=0, argv=0x[0;80000fffffffba7c]) "cpi.c":51 %3 [4:7] #1 0x4000000000003a30 in main(argc=0, argv=0x[0;80000fffffffba7c]) "cpi.c":51 %4 [0:7] >0 0x40000000000033b1 in f(a=[0.0050000000000000001;0.074999999999999997]) "cpi.c":8 %5 [0:7] #1 0x4000000000003a30 in main(argc=1, argv=0x[80000fffffffb768;6000000000014a50]) "cpi.c":51 [0:7]> [0:7]> expand aggregated message 1 %1 [0:7] Attached to process id [30596;30636] .... [3] Attached to process id 30612 .... [2] Attached to process id 30606 .... [0] Attached to process id 30596 .... [1] Attached to process id 30600 .... [4] Attached to process id 30618 .... [5] Attached to process id 30624 .... [7] Attached to process id 30636 .... [6] Attached to process id 30630 .... [0:7]> disable 1 [0:7]> [0:7]> cont [0:7]> pi is approximately 3.1416009869231249, Error is 0.0000083333333318 wall clock time = 69.300781 [0:7] Process has exited with status 0 [0:7]> quit
The following are explanatory notes from the previous example:
| Component of Example | Meaning |
|---|---|
-np 8
|
This parallel session creates 8 processes. |
[0:7]
|
This is a message from processes 0 to 7. |
%1
|
This aggregated message contains messages with differing portions (in this case, the process id's are different from process to process), and 1 is the message id. |
focus [0:3]
|
This focus command sets the current process set to
include processes 0, 1, 2, and 3.
|
[0:3]>
|
This prompt shows the current process set. |
show aggregated message
|
This show aggregated message
command displays all the aggregated messages saved in the message list.
|
expand aggregated message 1
|
This expand aggregated message
command expands the aggregated message with message id 1.
|
The second example demonstrates how to start a parallel debugging session with prun.
% idb -parallel `which prun` -n 16 -N 8 ./cpi
Linux Application Debugger for Itanium(R)-based applications, Version 7.1,
Build 20021118
Reading symbolic information ...done
stopped at [void _rms_breakpoint(void):2150 0x20000000001913e0]
Source file not found or not readable, tried...
./loader.cc
/usr/bin/loader.cc
(Cannot find source file loader.cc)
stopped at [void _rms_breakpoint(void):2150 0x20000000001913e0]
Source file not found or not readable, tried...
./loader.cc
/usr/bin/loader.cc
(Cannot find source file loader.cc)
Process has exited
(idb)
[0:15] Linux Application Debugger for Itanium(R)-based applications,
Version 7.1, Build 20021118
[0:15] ------------------
[0:15] object file name: cpi
[0:15] Reading symbolic information ... [0:15] done
[0:15] 13 int done = 0, n, myid, numprocs, i;
(idb) where
(idb)
[0:15] >0 0x4000000000000c60 in _start(...) in cpi
(idb) stop in main
(idb)
[0:15] [#1: stop in int main(int, char**) ]
(idb) cont
(idb)
[0:15] [1] stopped at [int main(int, char**):13 0x4000000000000f52]
[0:15] 13 int done = 0, n, myid, numprocs, i;
In this examples, the first couple of messages about not being able to find certain file can be ignored; they are caused by the fact that this file ususally does not exist on a production system.
19.8 Using the mpirun_dbg.idb Startup File
The latest mpich distribution should come with the idb startup file
mpirun_dbg.idb. If it does not, or if you are using an
older distribution of mpich, you can create the idb
startup file by saving the following script as
mpirun_dbg.idb in the directory in which
mpirun resides:
#! /bin/sh
cmdLineArgs=""
p4pgfile=""
p4workdir=""
prognamemain=""
while [ 1 -le $# ] ; do
arg=$1
shift
case $arg in
-cmdlineargs)
cmdLineArgs="$1"
shift
;;
-p4pg)
p4pgfile="$1"
shift
;;
-p4wd)
p4workdir="$1"
shift
;;
-progname)
prognamemain="$1"
shift
;;
esac
done
#
if [ -n "$IDB_HOME" ] ; then
ldbdir=$IDB_HOME
idb=$ldbdir/idb
if [ -f $ldbdir/idb.cat ] && [ -r $ldbdir/idb.cat ] ; then
if [ -n "$NLSPATH" ]; then
nlsmore=$NLSPATH
else
nlsmore=""
fi
NLSPATH=$ldbdir/$nlsmore
fi
else
idb="idb"
fi
#
#
# Need to `eval echo $cmdLineArgs` to undo evil quoting done in mpirun.args
#
$idb -parallel $prognamemain -p4pg $p4pgfile -p4wd $p4workdir -mpichtv `eval echo $cmdLineArgs`
Appendixes
Appendix 1 — Debugger Variables
The debugger has the following predefined variables. Conventionally, an Intel IDB variable
name is an identifier with a leading dollar sign ($).
| Variable | Default Setting | Description |
|---|---|---|
$aggregatedmsghistory |
Controls the length of the aggregated message list. If set to the default (0), the debugger records as many messages as the system will allow. | |
$ascii |
Prints ASCII or all ISO Latin-1. | |
$beep |
Beeps on illegal command line editing. | |
$catchexecs
| Stops execution on program exec. | |
$catchforkinfork |
Notifies you as soon as the forked process is created (otherwise you are notified when the call finishes). | |
$catchforks |
Notifies you on program fork and stops child. | |
$childprocess |
When the debugger detects a fork, it assigns the child process ID to
$childprocess. | |
$curevent |
Displays the current breakpoint number. | |
$curfile |
Displays the current source file. | |
$curfilepath |
Displays the current source file access path. | |
$curline |
Displays the current source line. | |
$curpc |
Displays the current point of program execution. | |
$curprocess |
Displays the current process ID. | |
$cursrcline |
Displays the last source line at end of most recent source listing. | |
$cursrcpc |
Displays the PC address at end of most recent machine code listing. | |
$curthread |
Displays the current thread ID. | |
$dbxoutputformat |
Displays various data structures in dbx format. | |
$dbxuse |
Replaces current use paths. | |
$decints |
Displays integers in decimal radix. | |
$doverbosehelp |
Displays the help menu front page. | |
$editline |
Enables command line editing. | |
$eventecho |
Echoes events with event numbers. | |
$exitonterminationofprocesswithpid |
If set to process ID (pid), when that process
terminates, the debugger exits. | |
$floatshrinking |
If set to the default (1), the debugger prints binary floating point numbers using the shortest possible decimal number. If set to 0, the debugger prints the decimal number which is the closest representation in the number of decimal digits available of the internal binary number. | |
$framesearchlimit |
Defines the maximum number of call frames by which to extend normal language-based identifier lookups. | |
$funcsig |
Displays function signature at breakpoint. | |
$givedebughints |
Displays hints on debugger features. | |
$hasmeta |
Interprets multibyte characters. | |
$hexints |
Displays integers in hex radix. | |
$historylines |
Defines the number of commands to show for history. | |
$indent |
Prints structures with indentation. | |
$lang |
Defines the programming language of current routine. | |
$lasteventmade |
Displays the number of last (successful) breakpoint definition. | |
$lc_ctype |
Displays the current locale information. | |
$listwindow |
Displays the number of lines to show for list. | |
$main |
Displays the name of the first routine in the program. | |
$maxstrlen |
Defines the largest string to print fully. | |
$memorymatchall |
When set to non-zero, displays all memory matches in the specified range. Otherwise, only the first memory match is displayed. | |
$octints |
Displays integers in octal radix. | |
$overloadmenu |
Prompts for choice of overloaded C++ name. | |
$page |
Paginates debugger terminal output. | |
$pagewindow |
Defines the number of lines per output page. The default of 0 causes the debugger to query the terminal for the page size. | |
$parallel_branchingfactor |
Specifies the factor used to build the n-nary tree and determine the number of aggregators in the tree. | |
$parallel_aggregatordelay |
Specifies the length of time that aggregators wait before they aggregate and send messages down to the next level when not all the expected messages have been received. | |
$parentprocess |
When the debugger detects a fork, it assigns the parent process ID
to $parentprocess. | |
$pimode |
Echoes input to log file on playback input. | |
$prompt |
Specifies debugger prompt. | |
$readtextfile |
If set to non-zero, instructions are read from the text area of the binary file rather than from the memory image. | |
$regstyle |
Controls the format of register names during disassembly.
Valid settings are:
| |
$repeatmode |
Repeats previous command when you press the Return key. | |
$reportsotrans |
Report when an event was changed because a shared object was either opened or closed. | |
$showlineonstartup |
Displays the first executable line in main. | |
$showwelcomemsg |
Displays welcome message at startup time. | |
$stackargs |
Shows arguments in the call stack if 1. | |
$statusargs |
Prints breakpoints with parameters if 1. | |
$stepg0 |
Steps over routines with minimal symbols. | |
$stoponattach |
Stops the running process on attach. | |
$stopparentonfork |
Stops parent process execution on fork.
When set to a
nonzero value, this variable
instructs the debugger to stop the parent process after it forks a child process.
The child process continues to run if $catchforks is not
set, otherwise stops.
The default is 0. | |
$symbolsearchlimit |
100 |
Specifies the maximum number of symbols that will be returned by the
whereis
command for a regular expression search. The default value is 100; a value of 0
indicates no limit. |
$threadlevel |
decthreads |
Specifies POSIX threads (DECthreads) or native threads. |
$usedynamictypes |
Evaluates using C++ static or dynamic type. | |
$verbose |
Produces even more output. |
Appendix 2 — Debugger Aliases
The debugger has the following predefined aliases:
(idb) alias F1 print F2 print 'F2 executes the command "F2 selected-text" - define alias F2' F3 print 'F3 executes the command "F3 selected-text" - define alias F3' S next Si nexti W list $curline - 10:20 a assign att attach b stop at bp stop in c cont d delete det detach e file exit quit f func focus ladebug multi select g goto h history j status l list li ($cursrcpc)/10 i; set $cursrcpc = $cursrcpc + 40 n next ni nexti p print pb printb pd printd pi printi plist show process all po printo pr printregs ps printf "%s", pt printt px printx q quit r rerun ri record input ro record output s step si stepi source playback input sw switch switch process t where tlist show thread ts where thread all tset thread tstack where thread all u list $curline - 9:10 w list $curline - 5:10 wi ($curpc - 20)/10 i wm watch memory wv watch variable
Appendix 3 — corefile_listobj.c Example
You can use the following example as an alternative to the listobj
command for cases in which the debugger cannot be run on the original system.
See the Transporting Core Files section for more
information.
/*
cc corefile_listobj.c -lxproc -o corefile_listobj
*/
#include <stdio.h>
#include <stdarg.h>
#include <stdlib.h>
#include <errno.h>
typedef unsigned long vma_t;
/* core file format */
#include <sys/user.h>
#include <sys/core.h>
/* dynamic loader hookup */
#include <loader.h>
typedef int (*ldr_reader_func)(vma_t from,
void * to,
long nbytes,
int is_string);
extern pid_t ldr_core_process();
extern int ldr_set_core_reader(ldr_reader_func reader);
/********************************************************************/
static FILE * corefile;
static struct core_filehdr corehdr;
static int nsections;
static struct core_scnhdr * section_headers;
int
open_corefile(const char * corename)
{
size_t nread;
corefile = fopen(corename, "rb");
if (!corefile) {
perror("Opening corefile");
return -1;
}
nread = fread(&corehdr, sizeof(corehdr), 1, corefile);
if (nread != 1) {
perror("fread() of corefile header");
return -1;
}
if (strncmp(corehdr.magic, "Core", 4) != 0) {
fprintf(stderr, "Corefile header magic is not \"Core\"\n");
return -1;
}
nsections = corehdr.nscns;
section_headers = calloc(nsections, sizeof(section_headers[0]));
if (!section_headers) {
perror("Allocating corefile section headers");
return -1;
}
nread = fread(section_headers, sizeof(section_headers[0]),
nsections, corefile);
if (nread != nsections) {
perror("fread() of corefile section headers");
return -1;
}
return 0;
}
static int
section_type_has_memory(int type)
{
switch (type) {
case SCNTEXT: case SCNDATA: case SCNRGN: case SCNSTACK:
return 1;
case SCNREGS: case SCNOVFL:
default:
return 0;
}
}
static int
read_from_corefile(vma_t from,
void * to,
long nbytes,
int is_string)
{
vma_t getter = from;
char * putter = (char *) to;
long to_go = nbytes;
int secnum;
size_t nxfer;
try_for_more:
while (to_go > 0) {
for (secnum = 0; secnum < nsections; secnum += 1) {
if (section_type_has_memory(section_headers[secnum].scntype)) {
vma_t vaddr = (vma_t) section_headers[secnum].vaddr;
vma_t size = (vma_t) section_headers[secnum].size;
if (vaddr <= getter && getter < vaddr+size) {
vma_t this_time = (size < to_go ? size : to_go);
long file_offset = section_headers[secnum].scnptr+(getter-vaddr);
if (fseek(corefile, file_offset, SEEK_SET) != 0) {
perror("fseek() for corefile read");
return -1;
}
nxfer = fread(putter, 1, this_time, corefile);
if (nxfer != this_time) {
perror("fread() of corefile data ");
return -1;
}
to_go -= this_time;
getter += this_time;
putter += this_time;
goto try_for_more;
}
}
}
fprintf("Couldn't find core address for %#lx\n", getter);
return -1;
}
return 0;
}
int
main(int argc, char* argv[])
{
pid_t process;
if (argc != 2) {
fprintf(stderr, "Usage is %s <corefile>\n", argv[0]);
return 1;
}
if (open_corefile(argv[1]) < 0)
return -1;
process = ldr_core_process();
ldr_set_core_reader(read_from_corefile);
if (ldr_xattach(process) < 0) {
perror("Attaching to corefile");
return 1;
} else {
ldr_module_t mod_id = LDR_NULL_MODULE;
ldr_module_info_t info;
size_t ret_size;
while (1) {
if (ldr_next_module(process, &mod_id) < 0) {
perror("ldr_next_module");
return 1;
}
if (mod_id == LDR_NULL_MODULE)
break;
if (ldr_inq_module(process, mod_id, &info,
sizeof(info), &ret_size) < 0) {
perror("ldr_inq_module");
return 1;
}
printf("%s\n", info.lmi_name);
}
ldr_xdetach(process);
return 0;
}
}
Appendix 4 — Array Navigation Example
The debugger provides parameterized aliases and debugger variables of arbitrary types. Clever use of these can do almost any list traversal.
For example, here is how to navigate an array:
alias elt(e_) "{ p e_ }"
alias pa0(a) "{ set $a = &a[0]; set $i = 0; elt($a[$i]); set $i = $i+1 }"
alias pan "{ elt($a[$i]); set $i = $i+1 }"
pa0
pan
pan
pan
%idb a.out
...
(idb) alias elt(e_) "{ p e_ }"
(idb) alias a0(a) "{ set $a = &a[0]; set $i = 0; elt($a[$i]); set $i = $i+1 }"
(idb) alias pan "{ elt($a[$i]); set $i = $i+1 }"
...
(idb) pa0(a)
struct S {
next = 0x140000178;
}
(idb) pan
struct S {
next = 0x140000180;
}
(idb)
struct S {
next = 0x140000188;
}
(idb)
struct S {
next = 0x140000190;
}