Selecting the Intel® Compiler
In this example, you are compiling the gzip.exe application.
Select the Intel® C++ Compiler to Compile your Project
You want to use the Intel C++ Compiler as the compiler for your project.
|
1. |
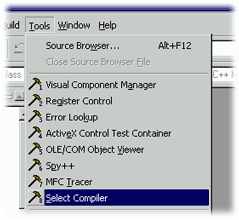
Open Select Compiler from the Tools menu. Notes:
|
 |
|
2. |
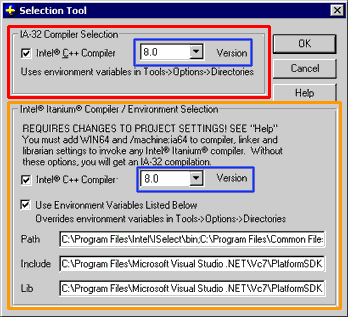
Parts of the Selection Tool dialog may be disabled if the Intel C++ Compiler for 32-bit Applications and the Intel C++ Compiler for Itanium®-based Applications are not installed at the same time. Check the box labeled Intel® C++ Compiler in the IA-32 Compiler Selection frame (in the red frame) to indicate the compiler you want to use. If you do not check the box, the Selection Tool defaults to the Microsoft* compiler. To switch back to the Microsoft Visual C++ compiler for IA-32 platforms, uncheck the box for the Intel C++ Compiler. |
 |
|
3. |
Check the box labeled Intel® C++ Compiler in the Intel® Itanium® Compiler/Environment Selection frame (in the orange frame) to indicate the compiler that you want to use. If you do not check the box, the Selection Tool defaults to the Microsoft compiler. To switch back to the Microsoft Visual C++ compiler for Itanium-based applications, uncheck the box for the Intel® C++ Compiler. |
|
|
4. |
If you have selected the Intel C++ Compiler, type or select a version number in the Version box (in the blue frames). |
|
|
5. |
In order to use different PATH, INCLUDE, and LIB environment variables when compiling for Itanium-based applications, check the box labeled Use Environment Variables Listed Below in the IntelŪ ItaniumŪ Compiler Selection frame. When this box is checked, the IA-32 environment is not changed: PATH, INCLUDE, and LIB environment variables under the Tools>Options>Directories menu are still used when building for IA-32 platforms. |
|
|
6. |
Click OK. |
Select the Microsoft Compiler for an Individual File
Although you chose the Intel compiler as your project's compiler, you want to use the Microsoft compiler to compile a specific file within the project.
|
1. |
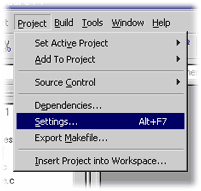
Open the Project Settings dialog box. |
|
|
2. |
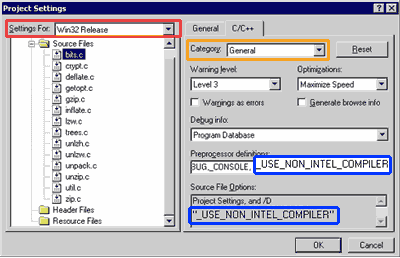
Select the configuration to activate in the Settings For list (in the red frame). |
 |
|
3. |
Select the file you want to modify, in this case, bits.c. |
|
|
4. |
Under the C++ tab, select General from the Category drop-down list (in the orange frame). |
|
|
5. |
In the Preprocessor definitions edit box (in the blue frames), add the _USE_NON_INTEL_COMPILER macro to force the use of the Microsoft Visual C++ compiler for the selected files. (Alternatively, if you are using the Microsoft compiler for your project and want to specify the Intel C++ Compiler for a specific file, add the _USE_INTEL_COMPILER macro for that file.) |
|
|
6. |
Click OK. |
Tip: To verify that the special macros were effective, watch the build output window. Filenames of files that don't use the project's compiler are preceded by the command-line name of the compiler used for compilation.
