Selecting the Intel® C++ Compiler
This topic discusses how to use the Intel® C++ Compiler within Microsoft* Visual Studio* .NET.
Note: If you install the Intel C++ Compiler 8.0 before installing Visual Studio .NET, you will need to reinstall the compiler, or modify your compiler installation before Visual Studio .NET can recognize the Intel C++ Compiler. See Installation Notes in the Intel C++ Compiler User's Guide for more information.
In this example, you are compiling the gzip.exe application.
Select the Intel C++ Compiler to Compile your Project
You want to use the Intel C++ Compiler as the compiler for your project.
| 1. |
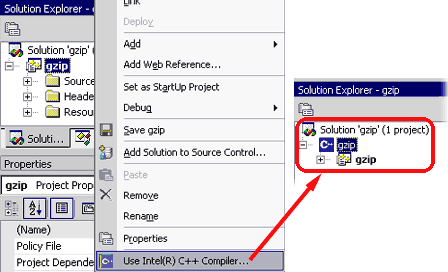
With Solution Explorer, right-click the project whose settings you want to modify, in this case, the gzip project. |
 |
| 2. |
Select Use Intel(R) Compiler. The project is converted to use the Intel C++ Compiler as the default compiler. Note: You can revert to using the Microsoft* compiler by repeating this step 1, and then selecting Do not use Intel(R) C++ Compiler... (Not shown here.) |
Select the Microsoft Compiler for an Individual File
Although you chose the Intel compiler as your project's compiler, you want to use the Microsoft compiler to compile a specific file within the project.
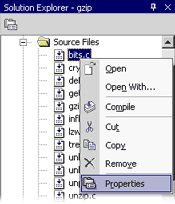
| 1. |
With Solution Explorer, right-click on the file whose settings you want to modify. |
|
| 2. |
Select Properties. |
|
| 3. |
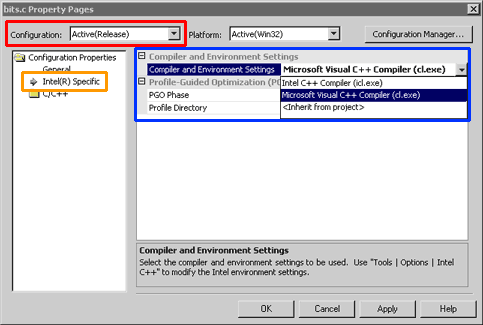
Be sure the correct configuration is selected (in the red frame). |
 |
| 4. |
Select Intel® Specific in the left pane (in the orange frame). |
|
| 5. |
The right pane displays the Compiler and Environment Settings. Select Microsoft Visual C++ Compiler (cl.exe) from the drop-down list (in the blue frame). |
|
| 6. |
Click OK. |