Generating MPEG animations using DV

(last updated April 30, 2003)


Follow these 5 basic steps to generate MPEG animations using DV.

  1. From the Options menu of the DV local view window, select Screen Capture as shown below

    This should pop up the Screen Capture form:

    Click on the Start capture button. The button label will thereafter read Stop capture and every subsequent redraw of the graphics output in local view will cause the viewing area to be captured as a JPEG image located within the directory specified in the directory widget (which you are free to modify). Each such capture will be logged to DV's standard output, producing diagnostic messages such as
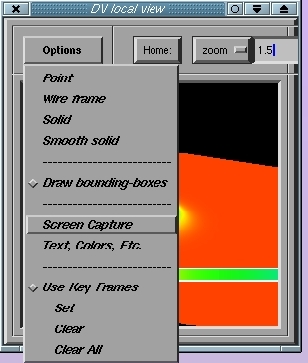
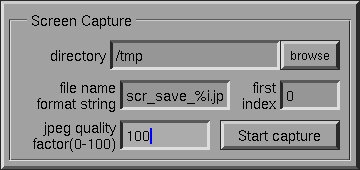
    refresh_gl_display: saving screen to file /tmp/scr_save_0.jpeg
    vp:0,0,256,256
    refresh_gl_display: saving screen to file /tmp/scr_save_1.jpeg
    vp:0,0,256,256
    refresh_gl_display: saving screen to file /tmp/scr_save_2.jpeg
    vp:0,0,256,256
    refresh_gl_display: saving screen to file /tmp/scr_save_3.jpeg
    vp:0,0,256,256
    
    The third and fourth numbers following vp: in the above messages are the width and height, respectively, of the graphics area that is being captured in the form of JPEG images.

    IMPORTANT!!! It is crucial that the local view window be resized so that the WIDTH of the JPEG images that are produced is a MULTIPLE of 16.

    Currently, this resizing must be done intearactively by "trial-and-error", but note that once Start capture has been enabled, interactive resizing of the local view window will cause a graphics redraw and an associated diagnostic message from which the width of the image can be read off. In the example shown above, the window has been sized to produce images that are 256 pixels wide x 256 pixels high.

  2. Once you are satisfied with the size of the local view drawing area, as well as the view of the data that you wish to recode, click on the Stop capture button twice in order to reset the sequencing of the captured JPEG images (i.e. so that the first image in the recorded sequence of images will be labelled via the entry in the first index widget).

  3. Click the Send to local view button of the main Data Vault window to playback the data and generate a complete sequence of JPEG images.

  4. Follow the instructions HERE to convert the JPEG images to an MPEG file.

  5. When you are done generating your movie(s), disable the screen capture. Also note that the JPEG images that are produced via the screen capture will need to be manually removed, and should be so removed (once the MPEG generation is complete) in order to conserve disk space.

Report any problems encountered to Matt.